Automating C2 Infrastructure with Terraform, Nebula, Caddy and Cobalt Strike
In this post, I am going to show the readers how to build a fully automated C2 infrastructure using Terraform with Nebula's end-to-end encryption backend communication layer.
The ability to quickly build out a C2 infrastructure within a few minutes, including all the set up and tear down logic included would be a great asset for any offensive security group or operator. In this post, I will show exactly how to build a fully automated functional C2 infrastructure using Terraform, Nebula, Caddy and Cobalt Strike.
Special thanks to both @byt3bl33d3r and @bin3xish477 for bringing Caddy to my attention as a possible replacement for Nginx/Apache.
TL;DR
If reading all the content below is too hard for you :) you can simply skim the paper and check the git repo below if you are only interested in the code.
 maliciousgroup
Prerequisites
During the development process I will be using Kali Linux as a host operating system, and will be running PyCharm Professional from Jetbrains for the HCL and Python development. For the cloud resources, I will be using Linode as my provider for both virtual machines and DNS settings.
I will also be covering this material with the assumption the reader has previous knowledge of at least some of the subject matter I am going to cover, but just in case, I will be posting links at each step a long the way for reference.
Build Setup
I will be using Python as a wrapper around the Terraform build, so that once the build is complete and tested, it will be easy to roll into a tool for easier automation, however, most of the work will be taking place on the command line within the Python project.
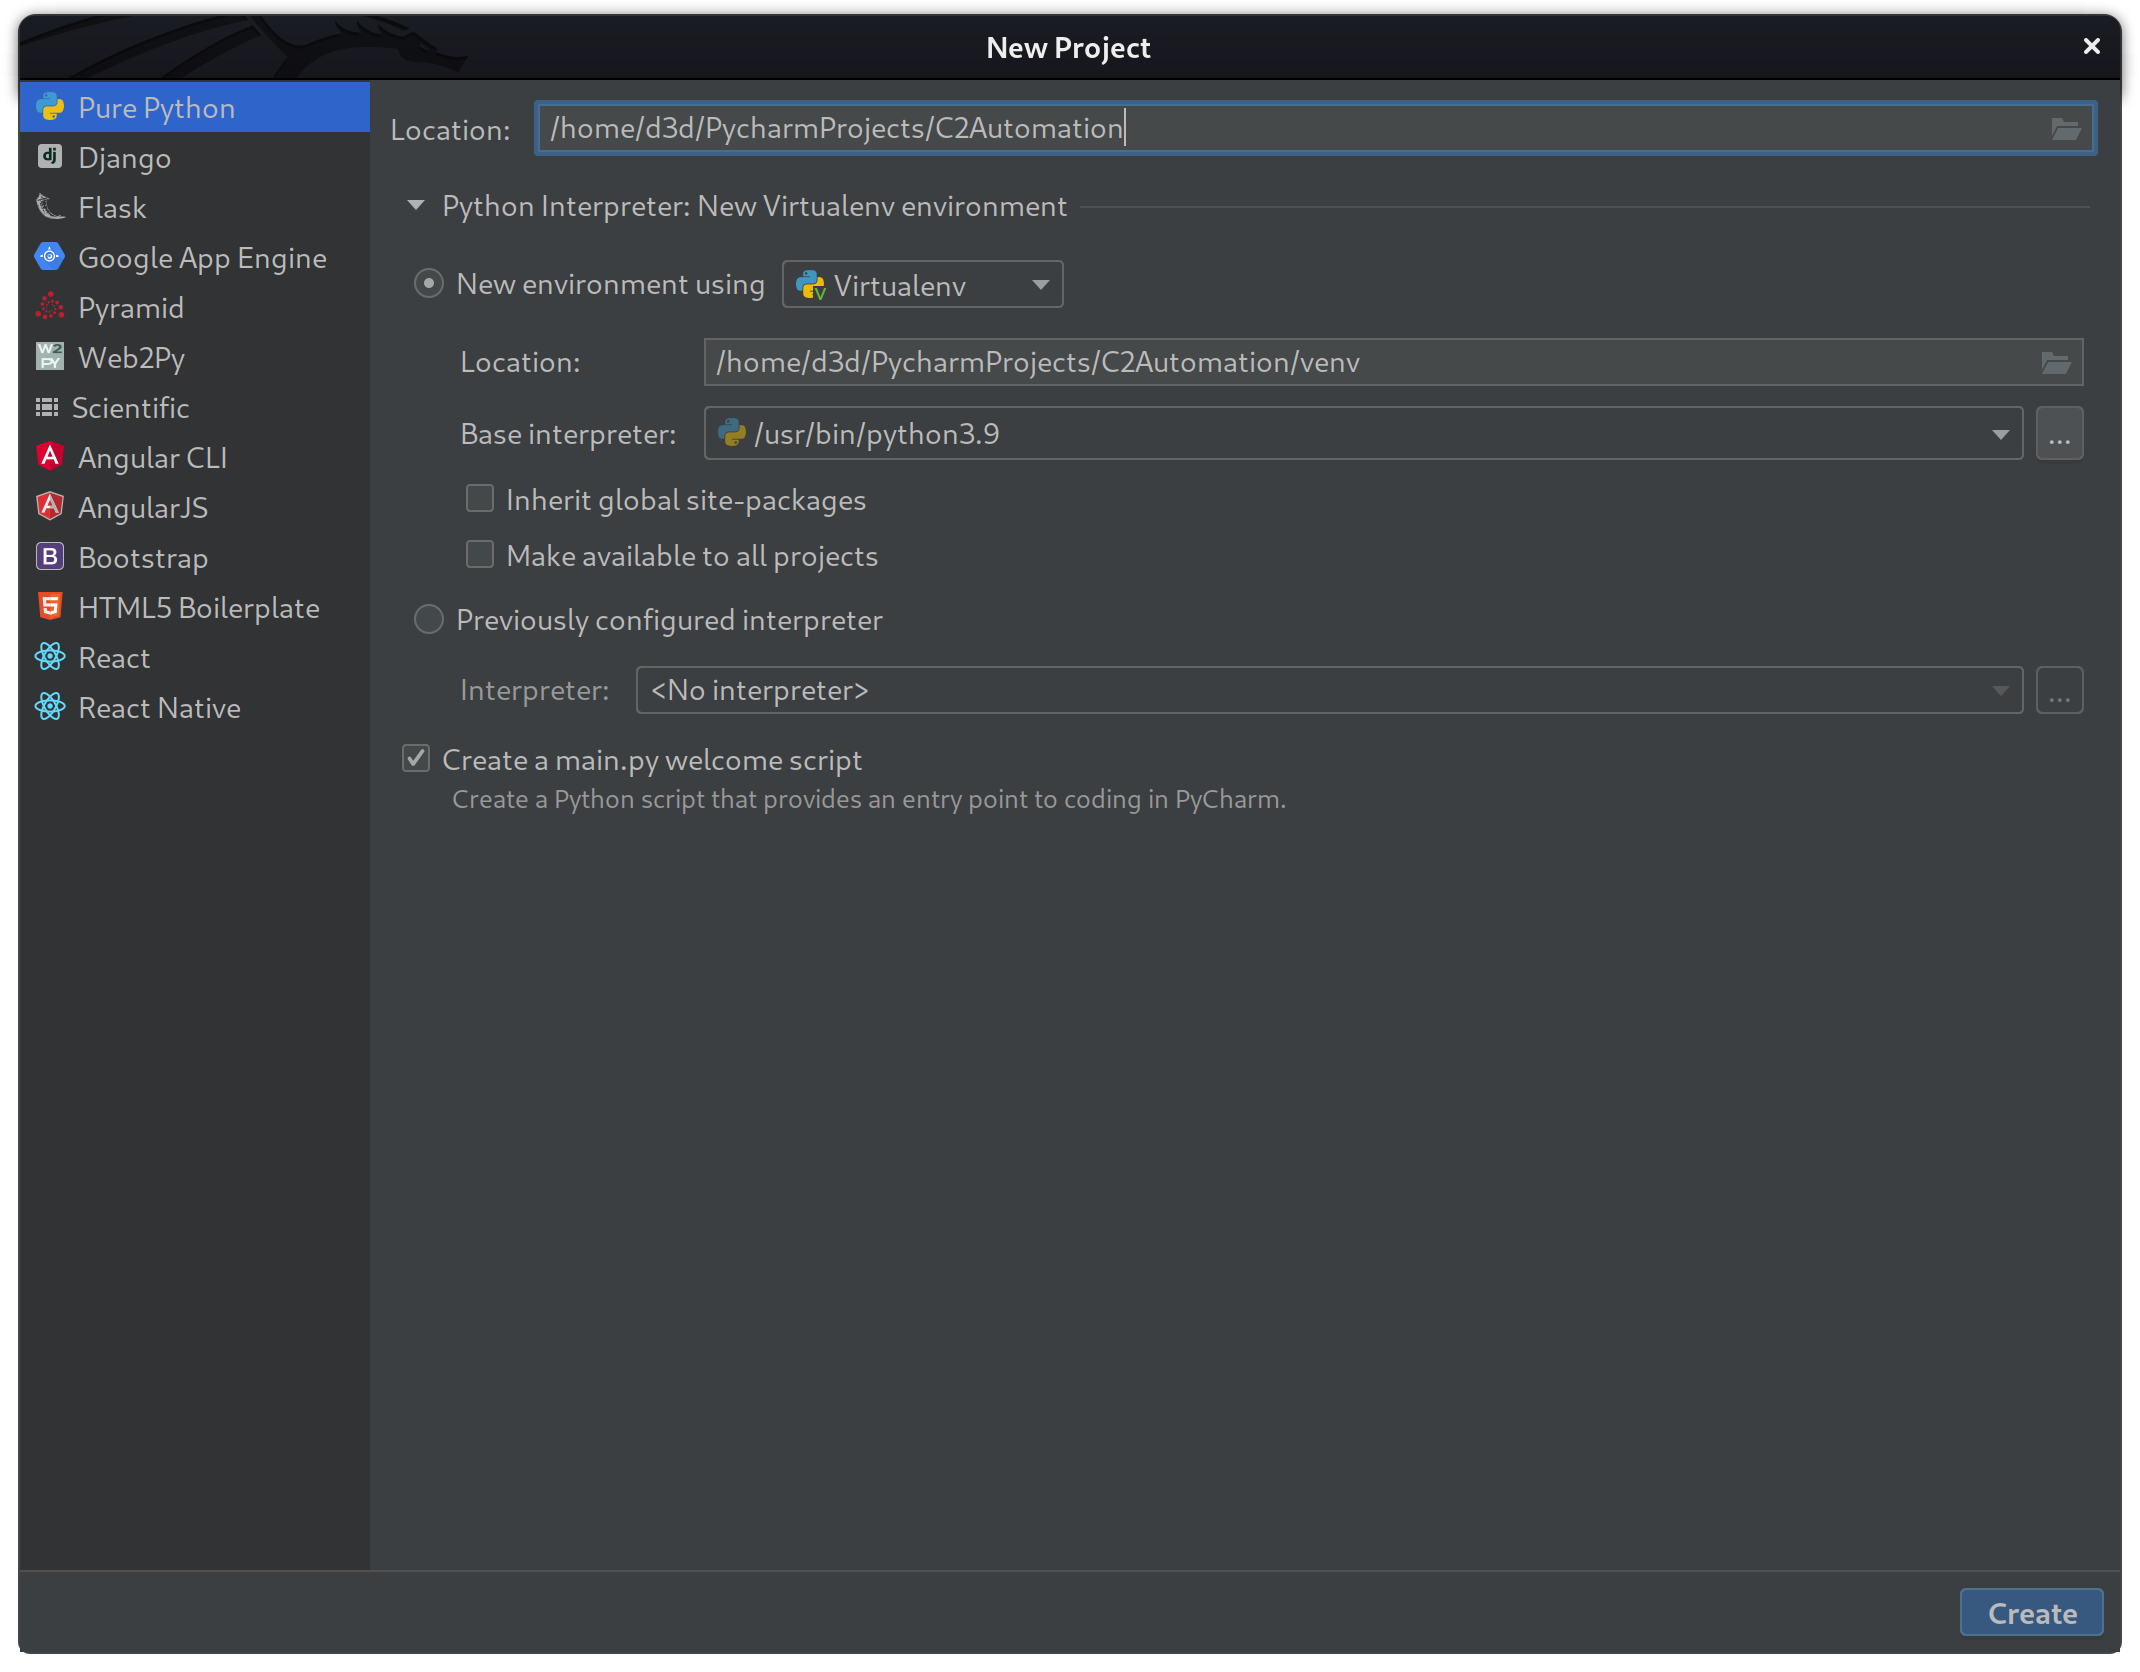
First step is to prepare a new Python 3.9 project using a virtual environment for easy management as seen below.
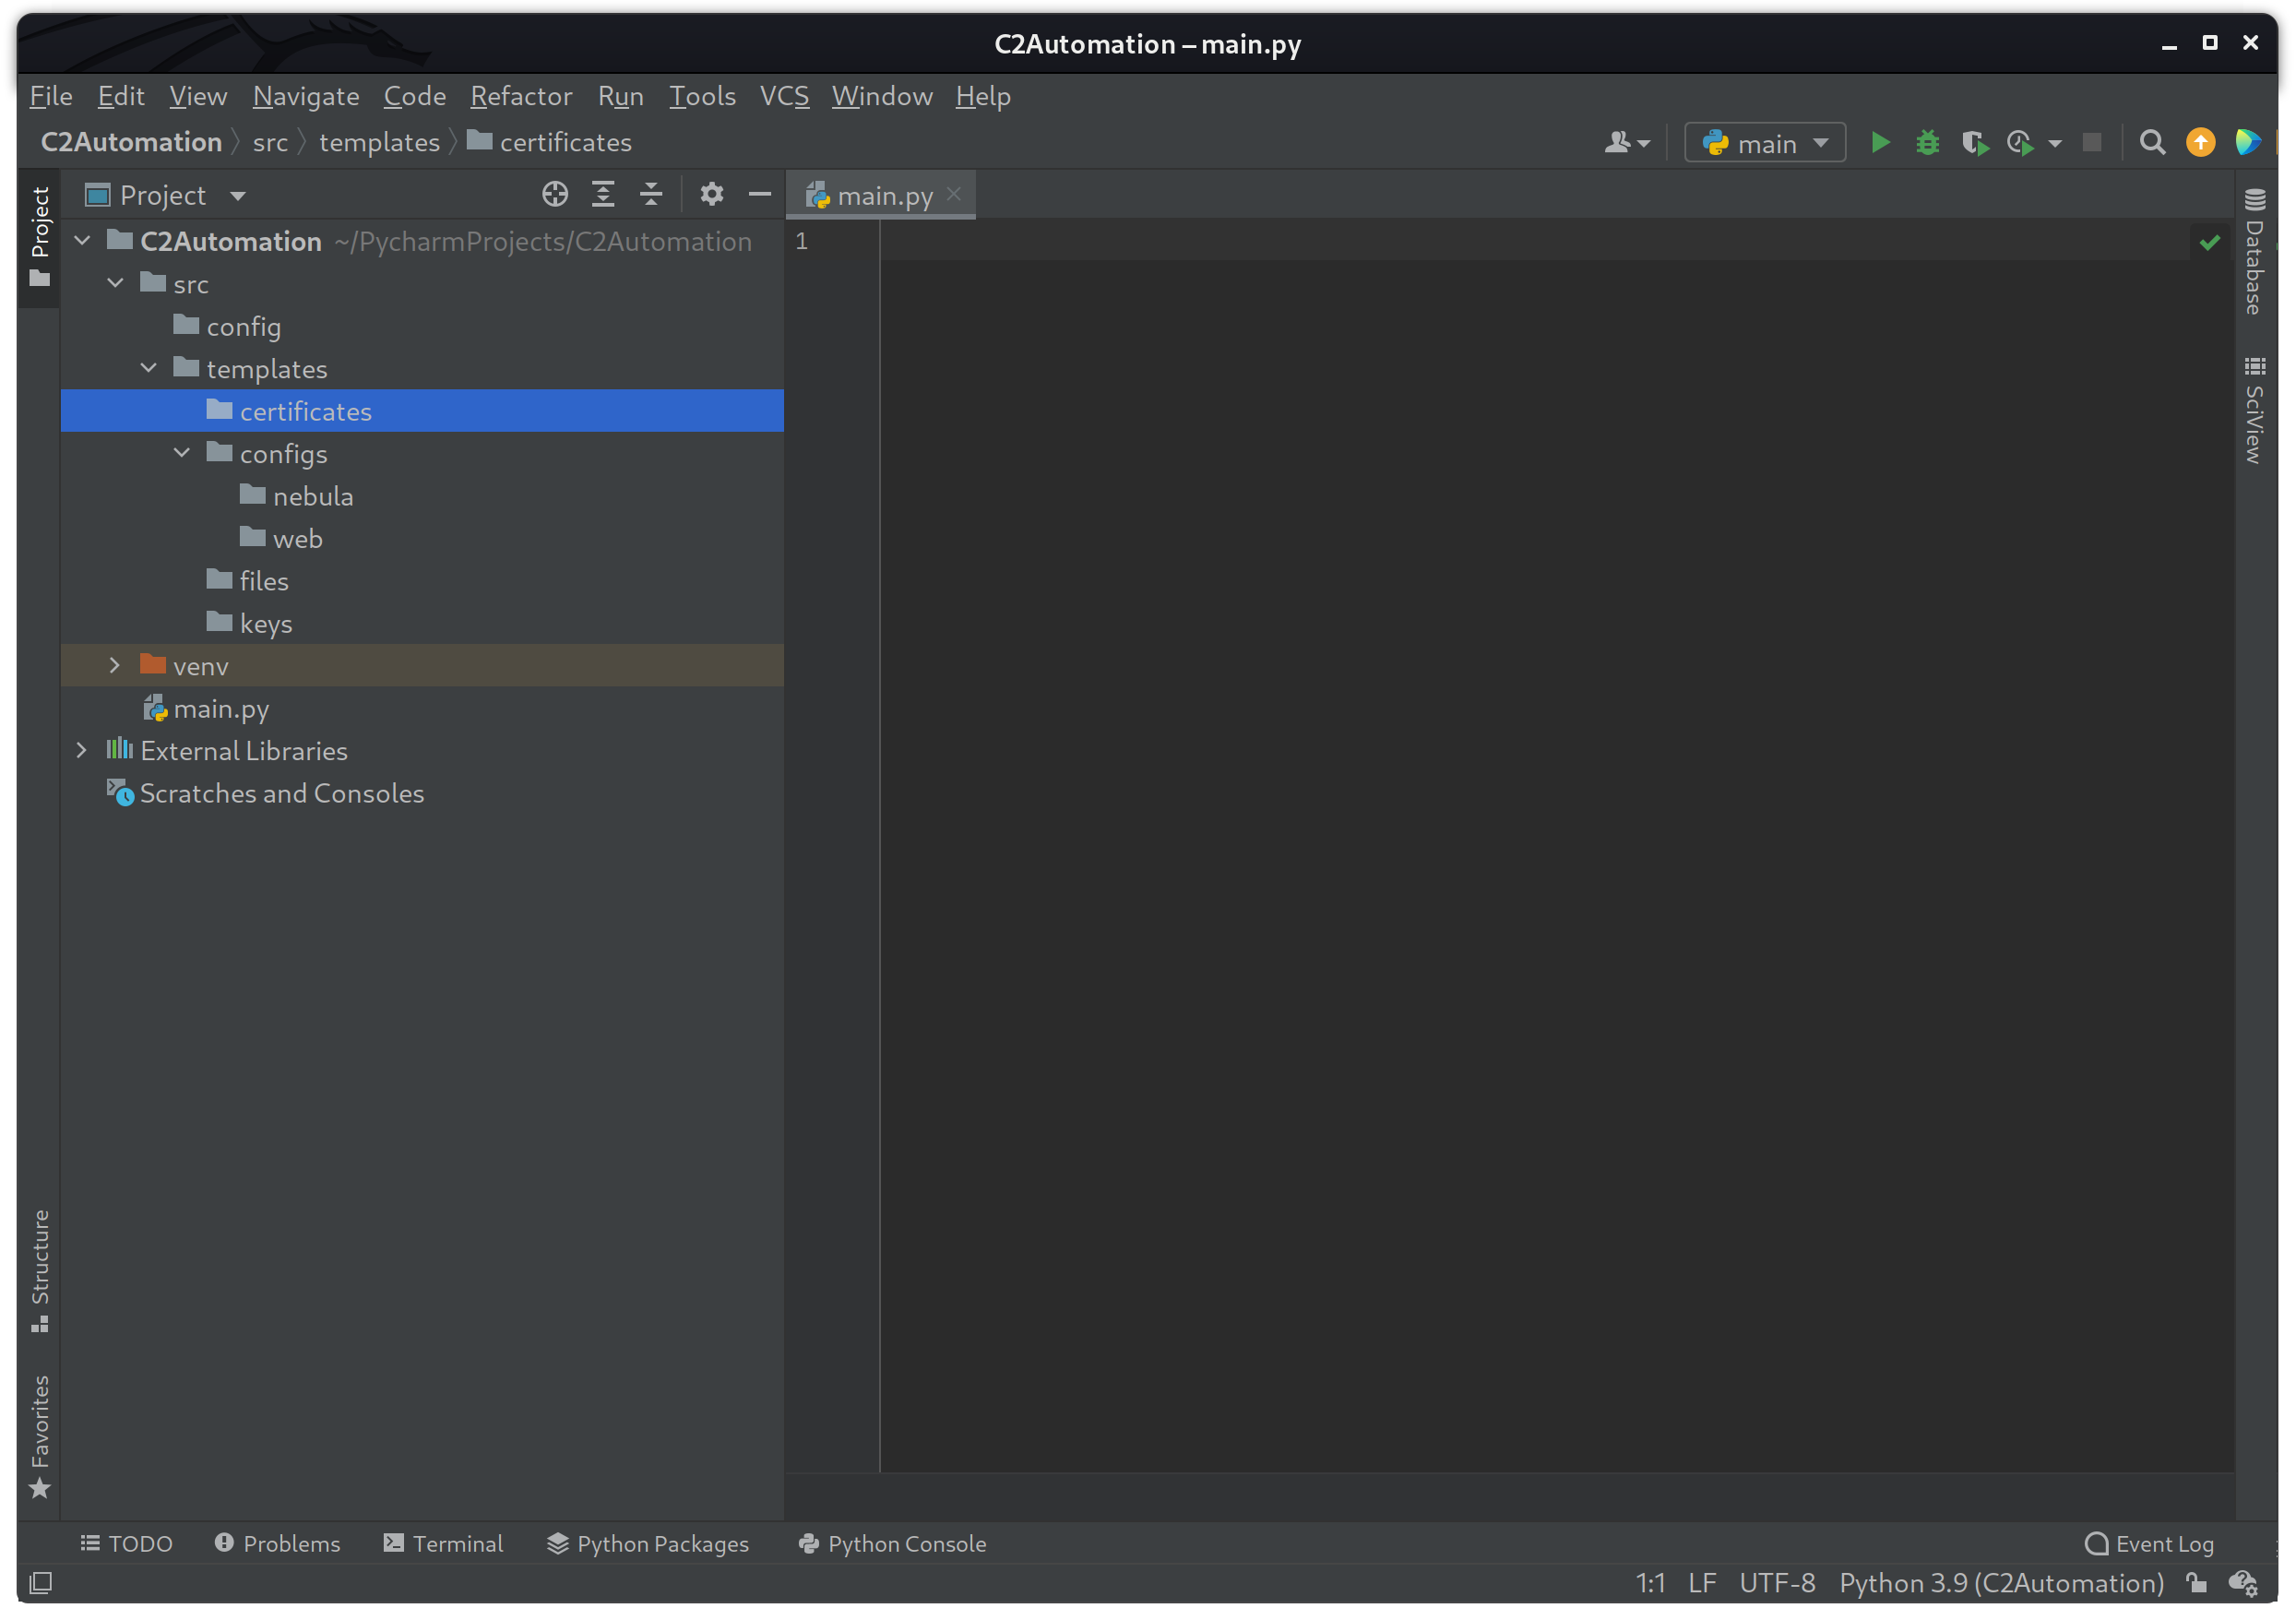
After the new project has been created, open up a terminal within the IDE Alt + F12 and create the following folders.
mkdir -p src/{config,templates}
mkdir -p src/templates/{certificates,configs,files,keys}
mkdir -p src/templates/configs/{nebula,web}
If the commands were successful, you should see the following file structure within your project.
With the initial folder structure done, the next step is to download the Terraform binary and place it within the venv/bin folder. This will make sure the binary is within the virtual environment execution PATH.
wget -O /tmp/tf.zip https://releases.hashicorp.com/terraform/1.2.9/terraform_1.2.9_linux_amd64.zip
unzip /tmp/tf.zip -d venv/bin/
Once the Terraform binary is in place, I should be able to check the version by running the following command.
terraform -version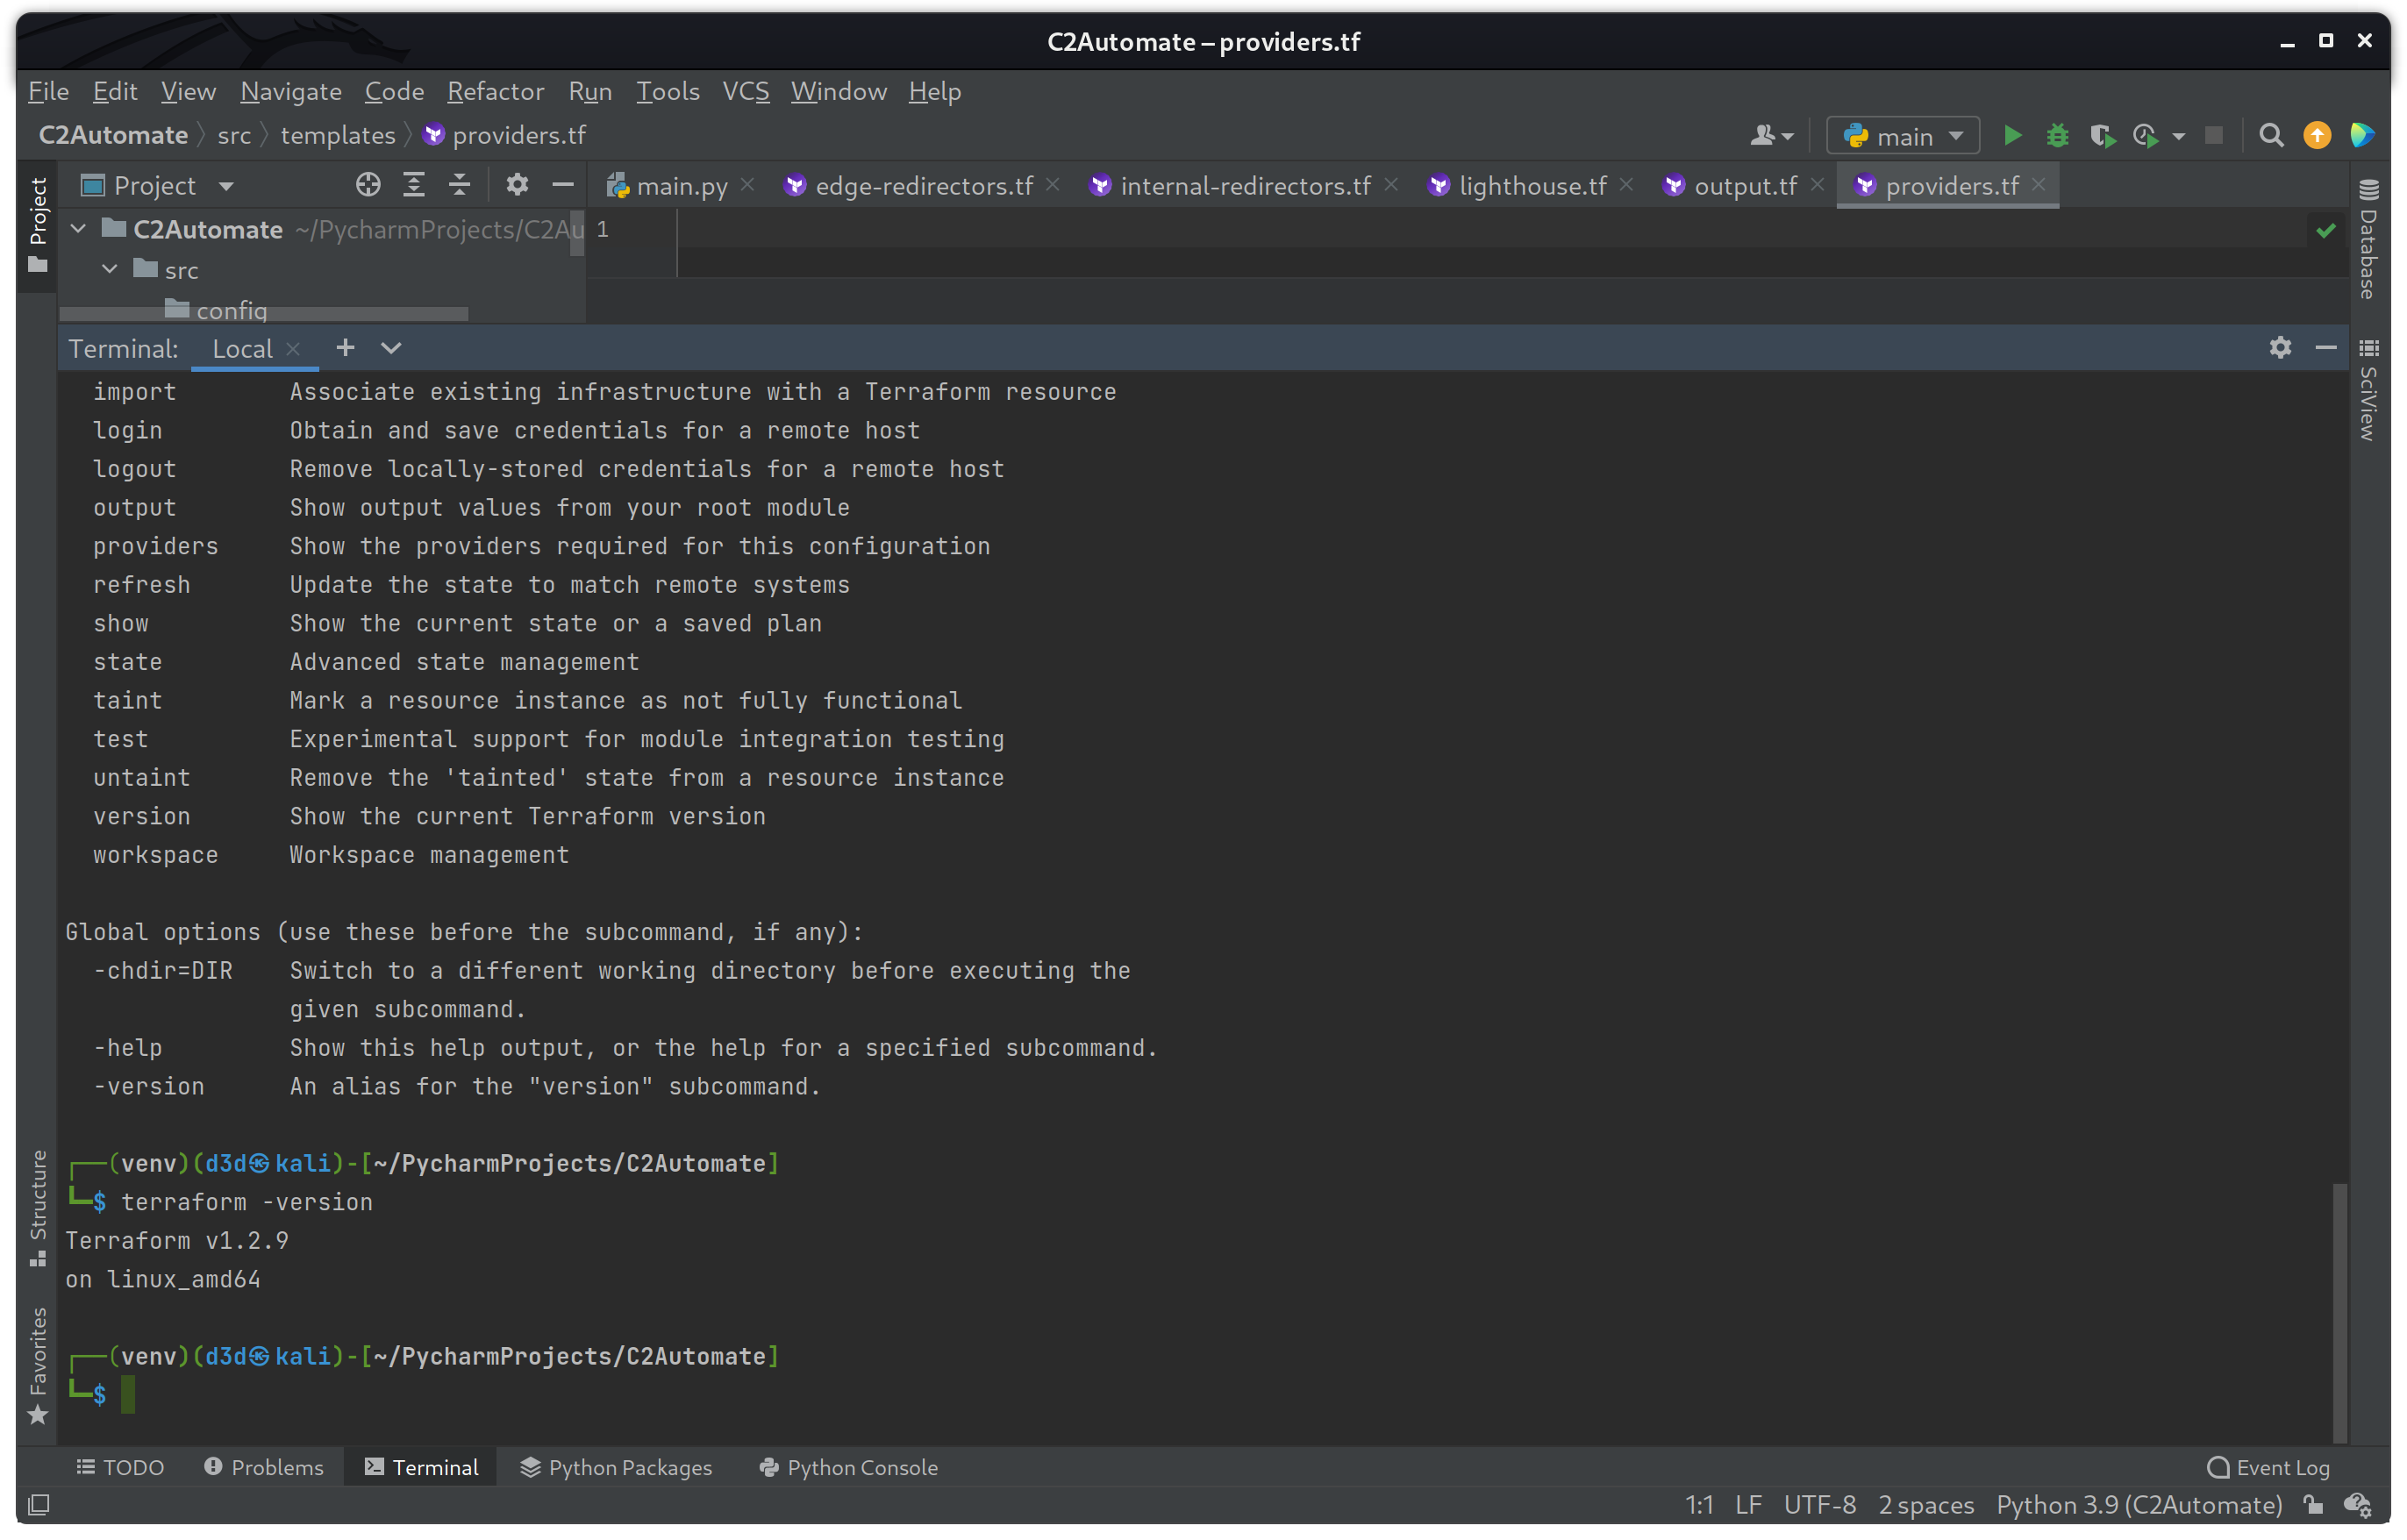
With the Terraform binary in place and initial folder structure done, I can start to focus on building the infrastructure. To start with, I will need to build templates for the Linode provider in order to spin up the six (6) different machines that will be required in this build.
Virtual Machines
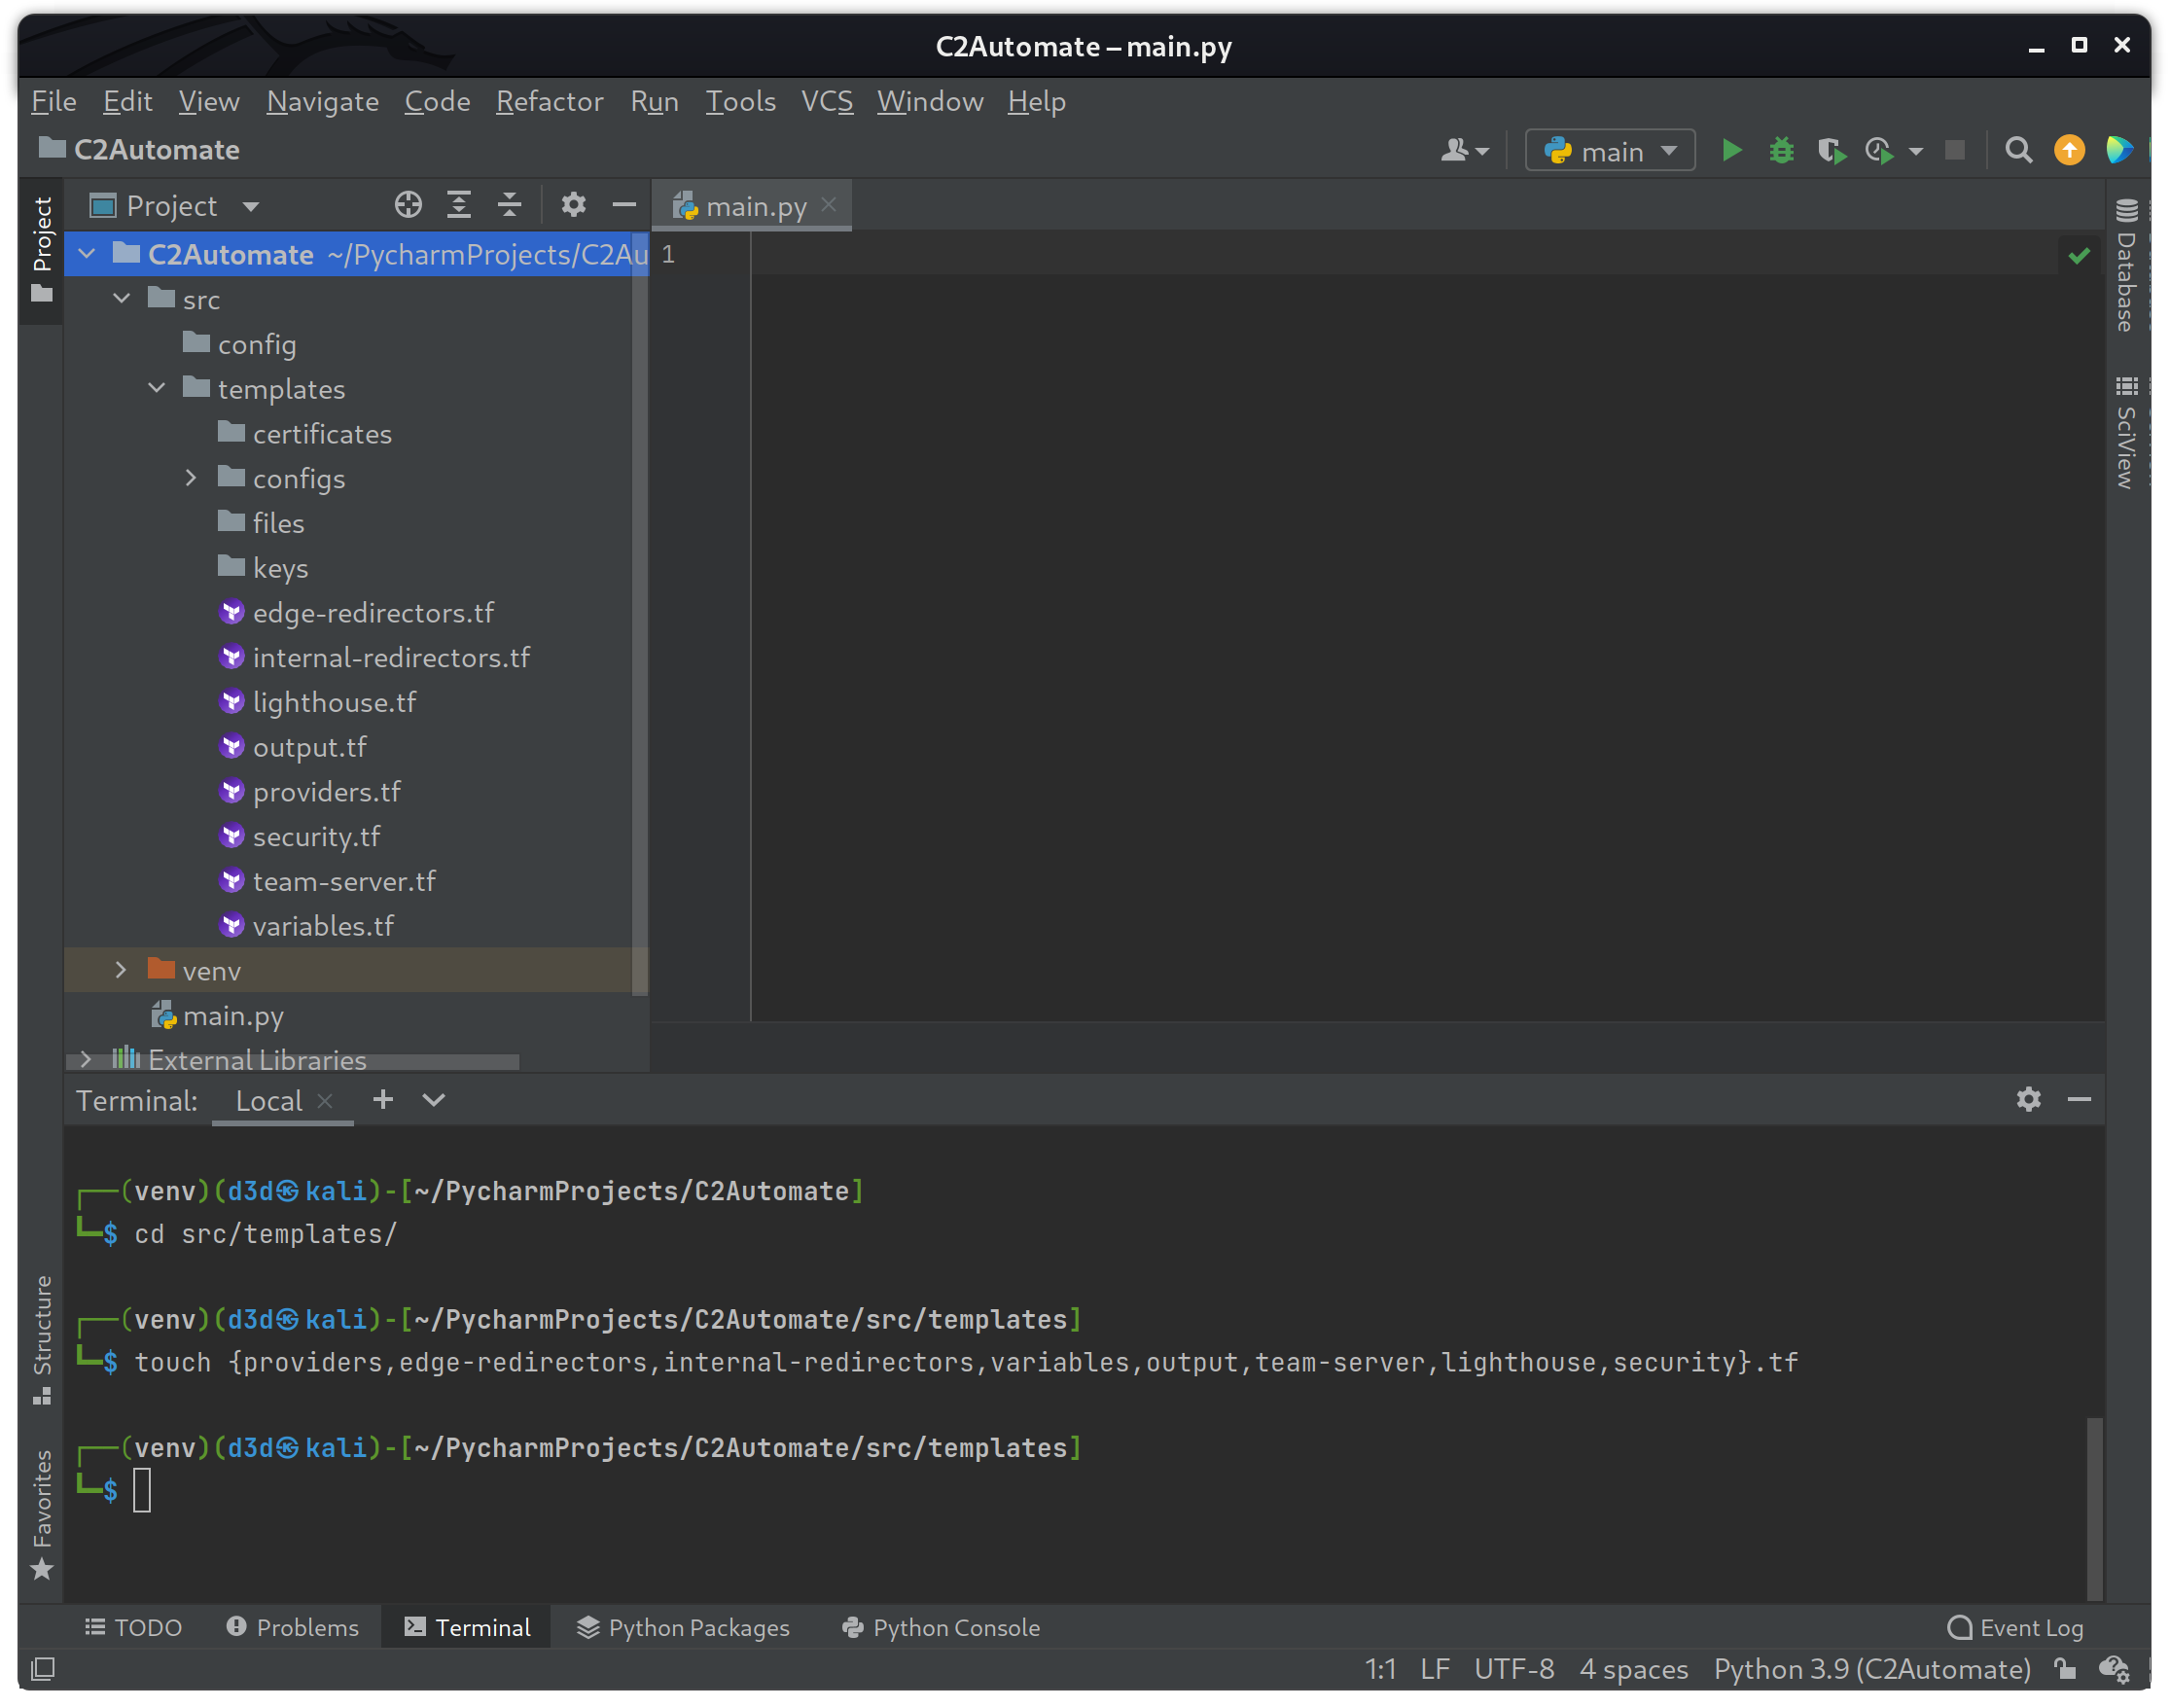
To start with, I will create all the template files needed to manage the various resources by running the following touch command within the src/templates directory.
cd src/templates
touch {providers,edge-redirectors,internal-redirectors,variables,output,team-server,lighthouse,security,dns}.tf
If the above commands were successful, the file structure should look like the following.
The first file I am going to modify will be the providers.tf file, because this file is required to make a connection to the Linode API. According to the following documents, you can see the exact format and version of provider to use when creating Terraform templates with the latest version.
providers.tf
You can see by the file above, that the provider for Linode also requires a token (API key) which I will add to the variables.tf file as seen below.
variables.tf
There is also a linode_domain variable that holds the C2 domain used in the build. With both the providers.tf and variables.tf files updated, it is time to start building templates for the six different machines.
The six (6) virtual machines used in this build are stored in four (4) files:
lighthouse.tfteam-server.tfedge-redirectors.tfinternal-redirectors.tf
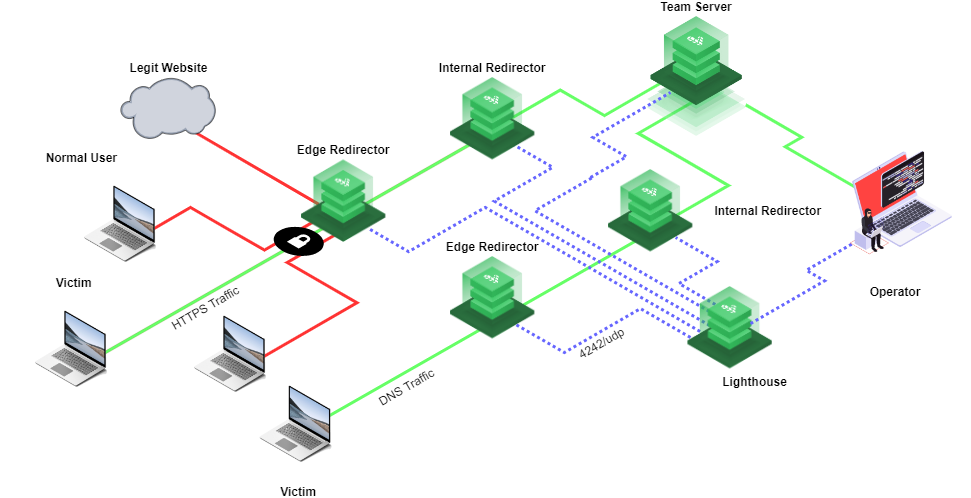
The edge-redirectors.tf and internal-redirectors.tf templates will each contain two (2) virtual machines, where the others will only contain one (1). The virtual machines are reflected in the green icons in the network diagram below.
Before I can create the templates for each instance mentioned above, I will first need to setup a SSH key to use. This can be fully automated by using the Terraform tls_private_key resource which Generates a secure private key and encodes it in PEM (RFC 1421) and OpenSSH PEM (RFC 4716) formats. To accomplish this, I will modify the security.tf file in the src/templates directory as seen below.
security.tf
The linode_sshkey resource is required to build each instance, and by using the built-in tls_private_key resource, I can generate a 4096 bit RSA key on the fly that is then used to access each instance for the setup and install process. Another resource being used in this file is the random_string resource which generated a random string of N characters.
Now I can start building each machine template using the linode_instance resource as seen in the below files. At this point, each machines template will be the same except for the label and linode_instance name.
lighthouse.tf
edge-redirectors.tf
internal-redirectors.tf
team-server.tf
All the above instances will be using Linode specific resources like linode_instance and others that are made available from the provider set in the providers.tf file. The linode_instance has various options available to set the operating system image, the region and the label of the machine itself.
Each template also contains a connection directive that sets any connection variables required to connect via SSH to the instance. The connection directive is required in order to use the remote-exec provisioner, which allows a bootstrap of terminal commands to run once the machine is online.
Now with all the linode_resource templates done, I can show the IP address for every instance built using the output directive which will take place in the output.tf file. This will display the name and IP address of each instance when the build is complete.
output.tf
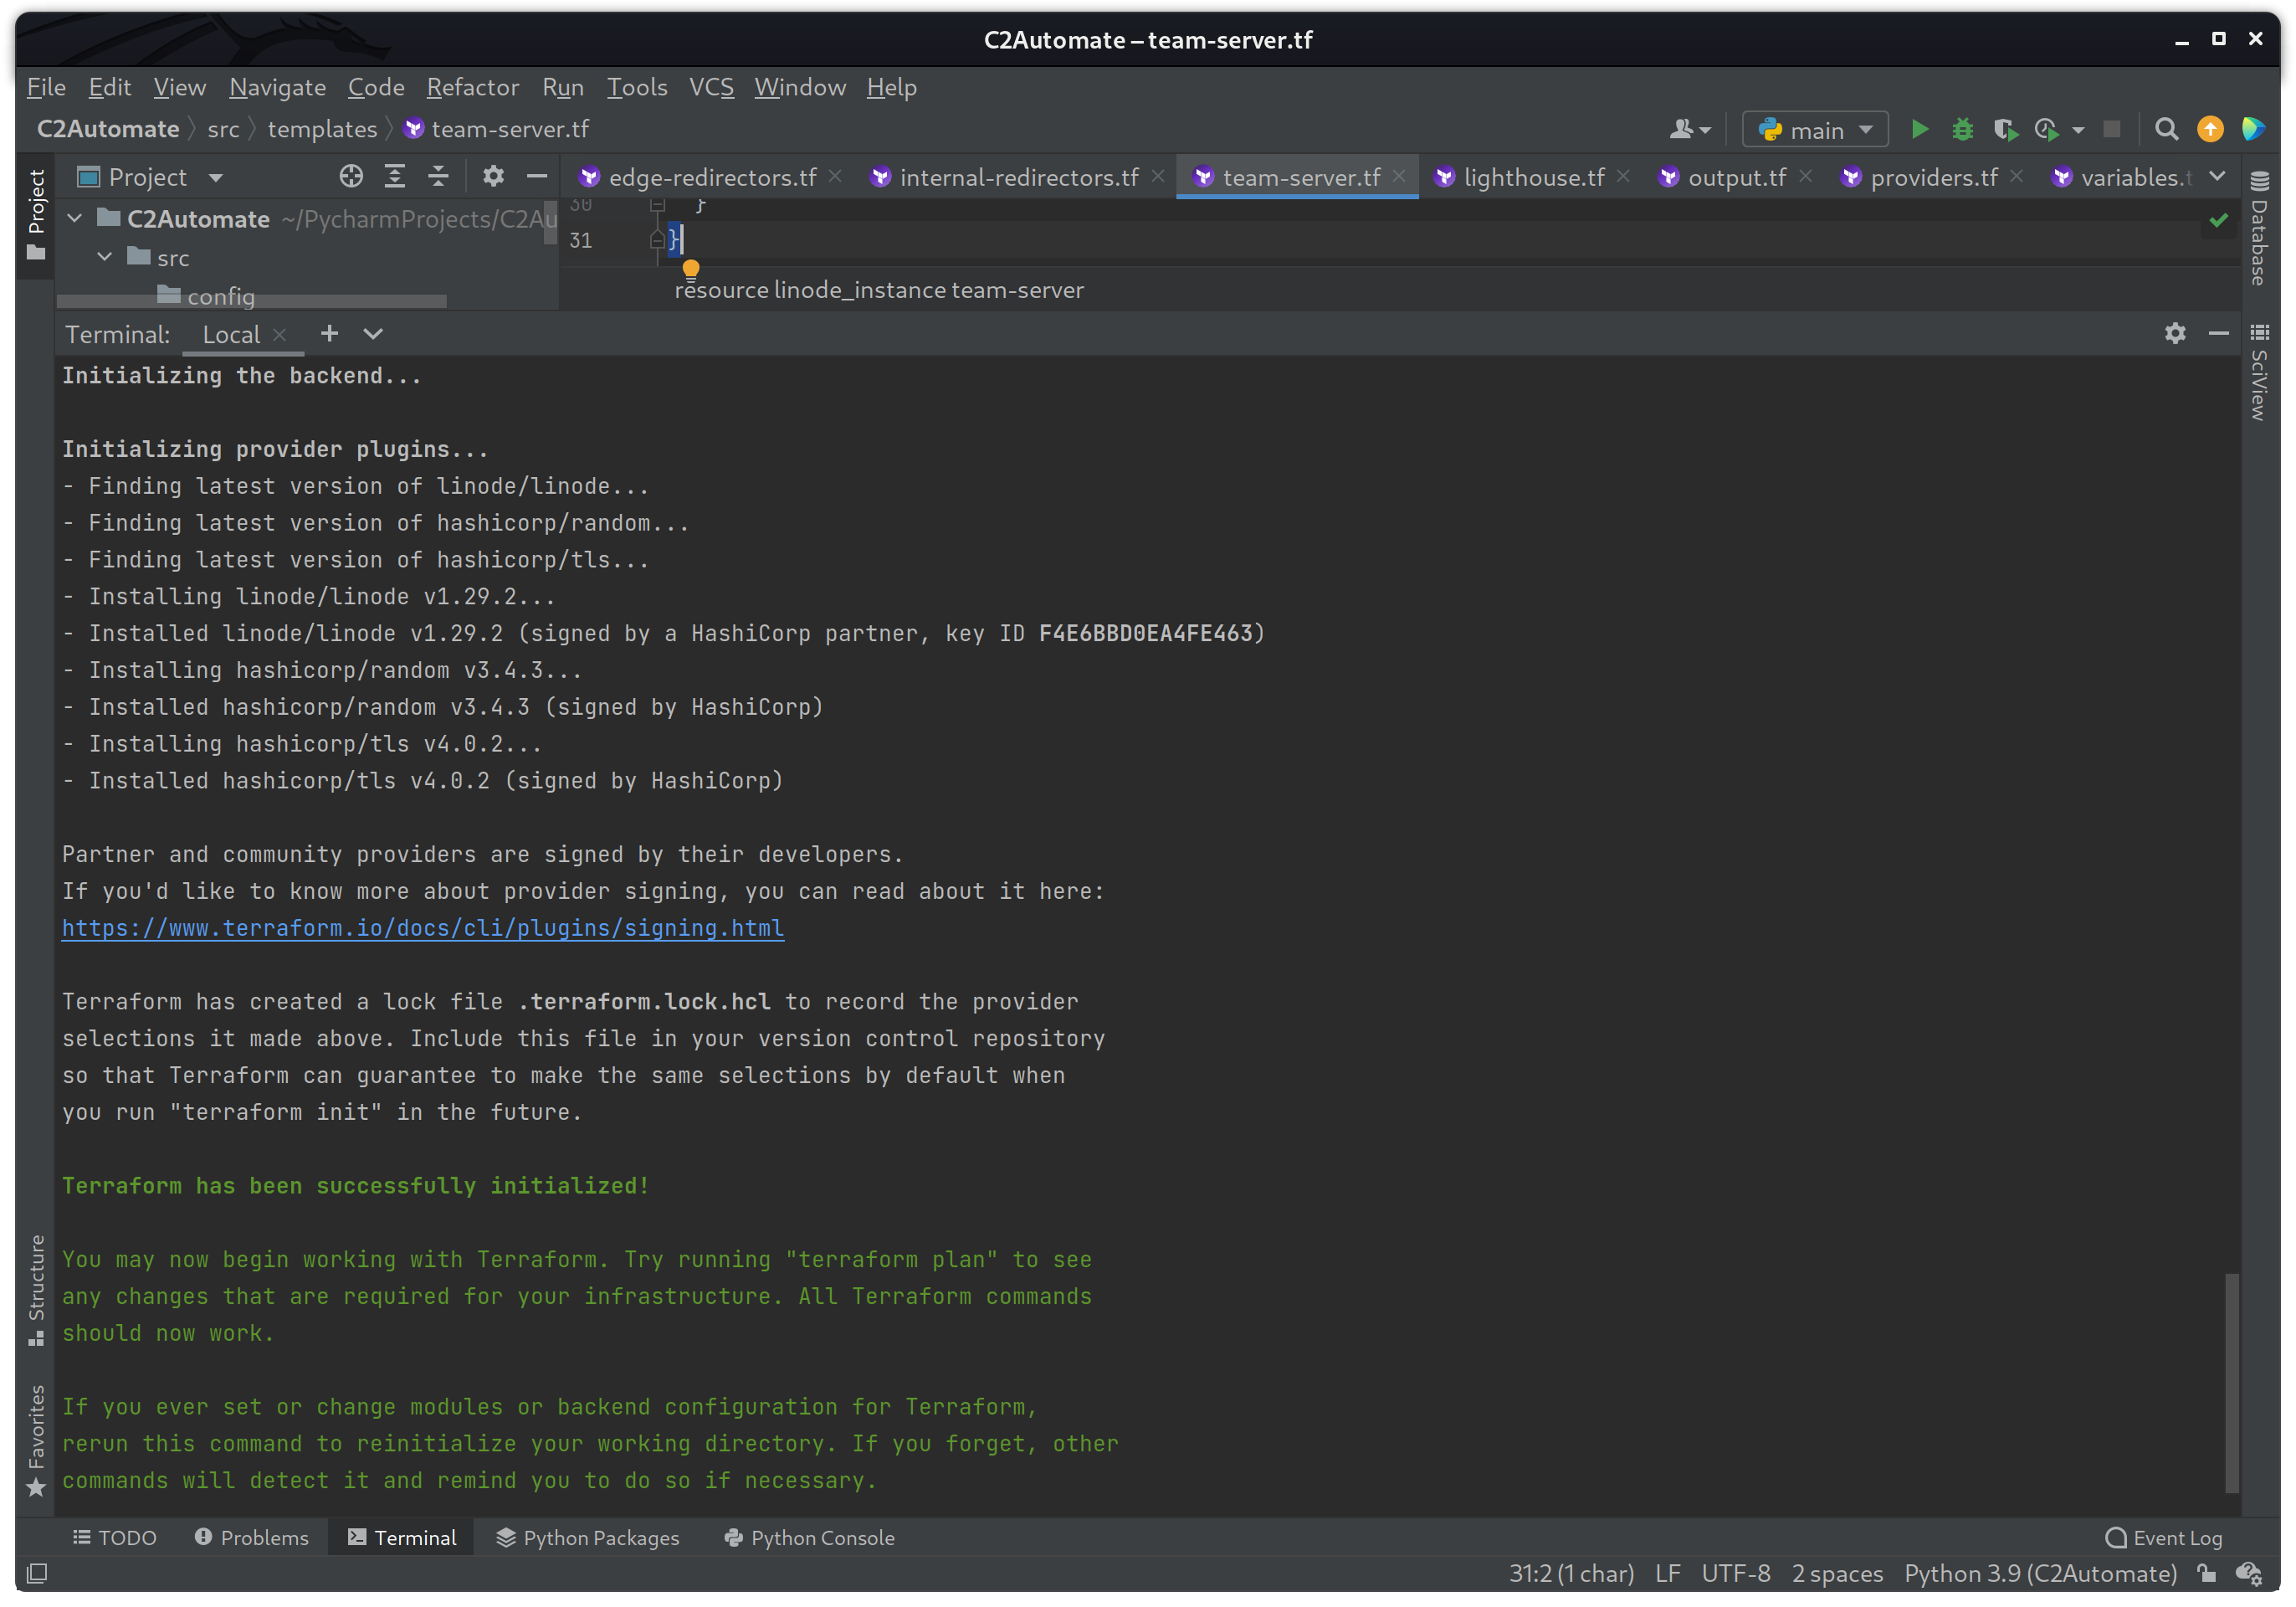
The output directive will print the value associated with each block once the build is complete. At this point, I can test to make sure that the instances do in fact build without any errors, and this can be done by using the terraform commands seen below.
terraform initThe terraform init command initializes a working directory containing Terraform configuration files. This is the first command that should be run after writing a new Terraform configuration or cloning an existing one. It is safe to run this command multiple times.
terraform applyThe terraform apply command executes the actions proposed in a Terraform plan. If there are no errors of syntax issues with the configuration, it will prompt the user to type 'yes' to start the build.
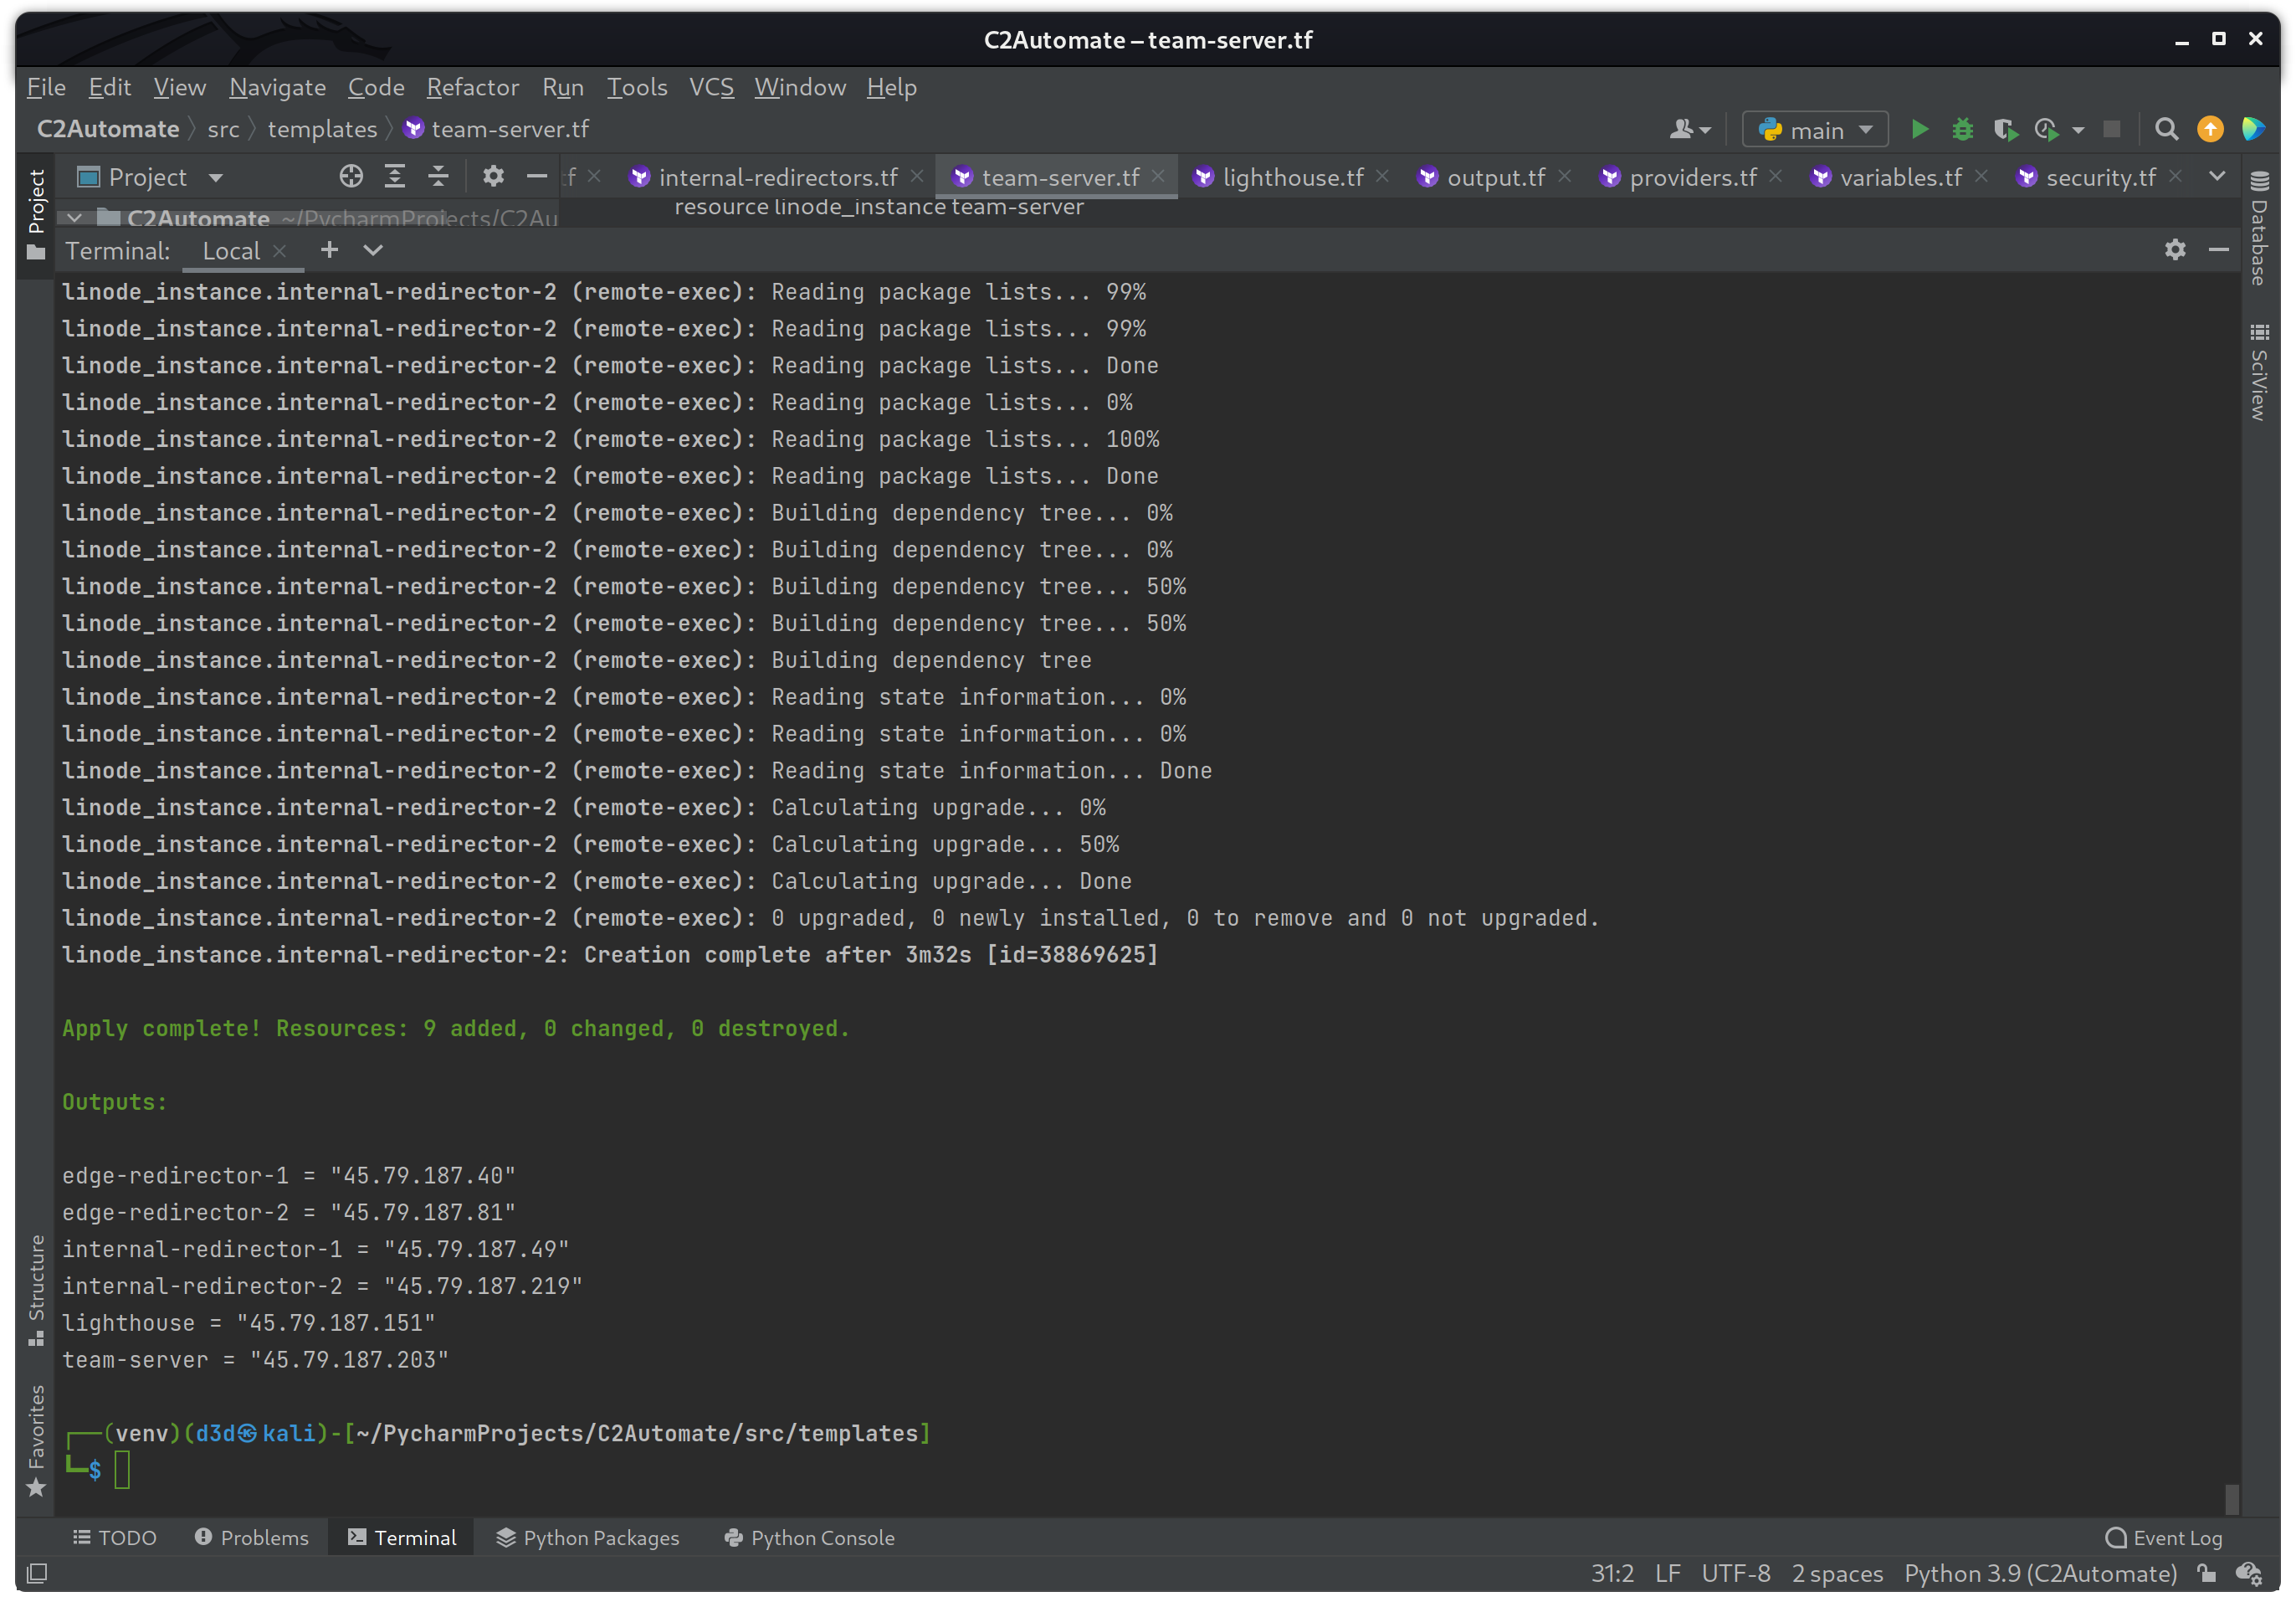
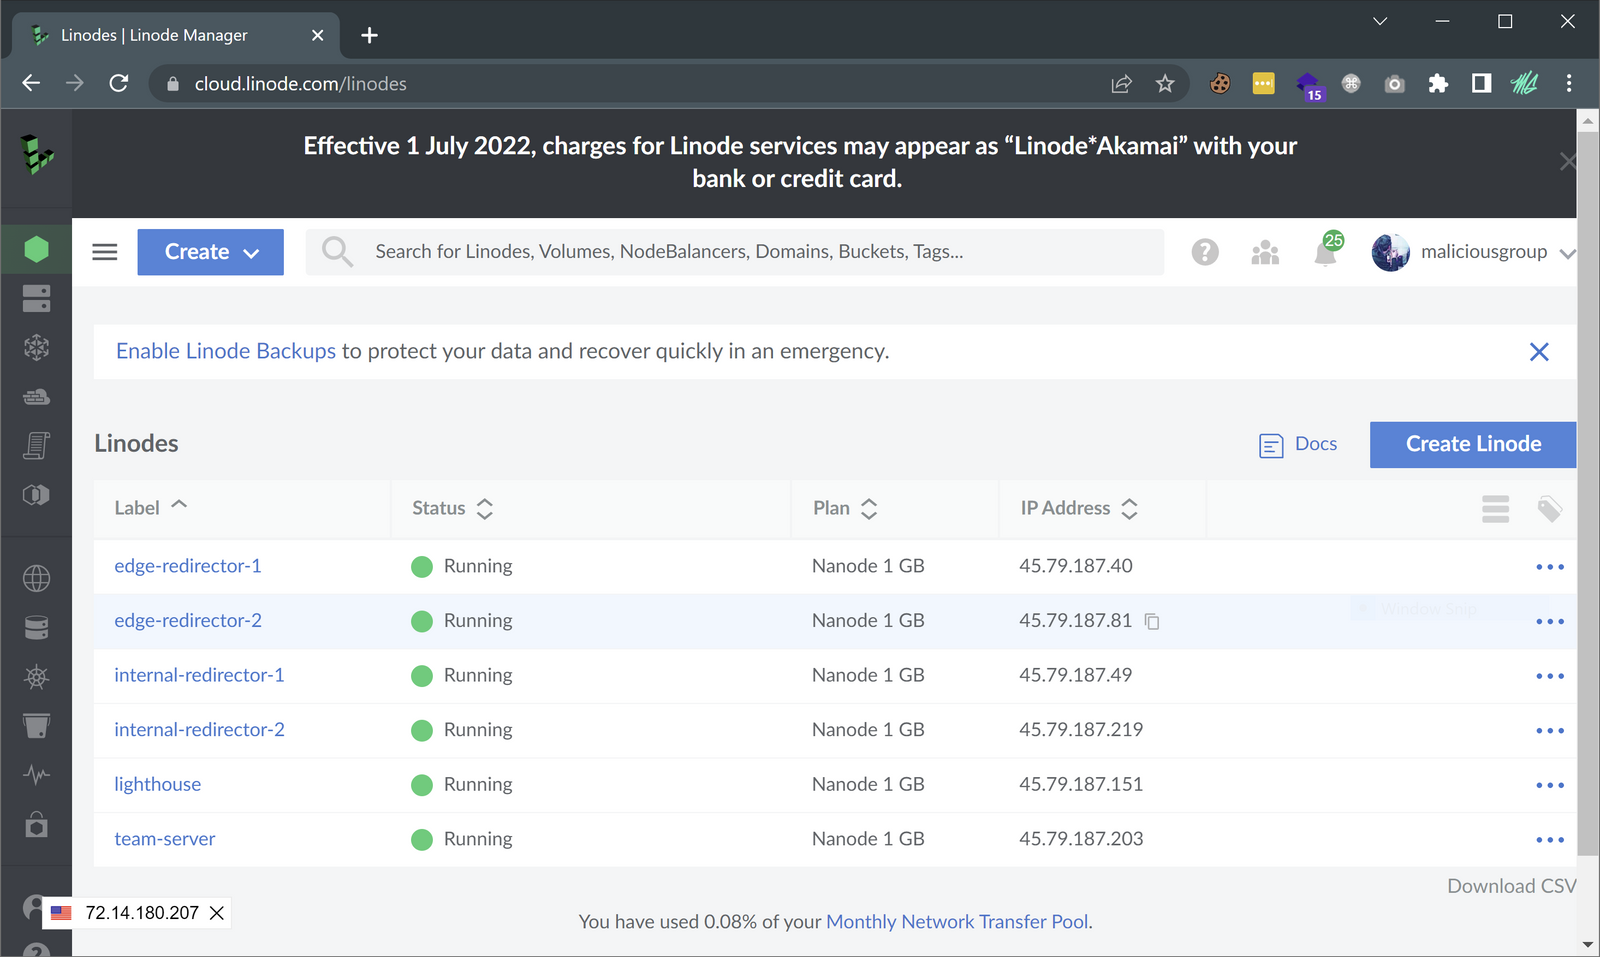
On success you should see the six (6) different linode_resource instance IP addresses printed in the Outputs section as seen above. To verify I can also see within my Linode dashboard that the instances were created without issue.
Now that I know the current build works, I am going to destroy the infrastructure before moving forward, this is to avoid making changes while the infrastructure configuration is still running. The following command will destroy the build.
terraform destroyThe terraform destroy command is a convenient way to destroy all remote objects managed by a particular Terraform configuration.
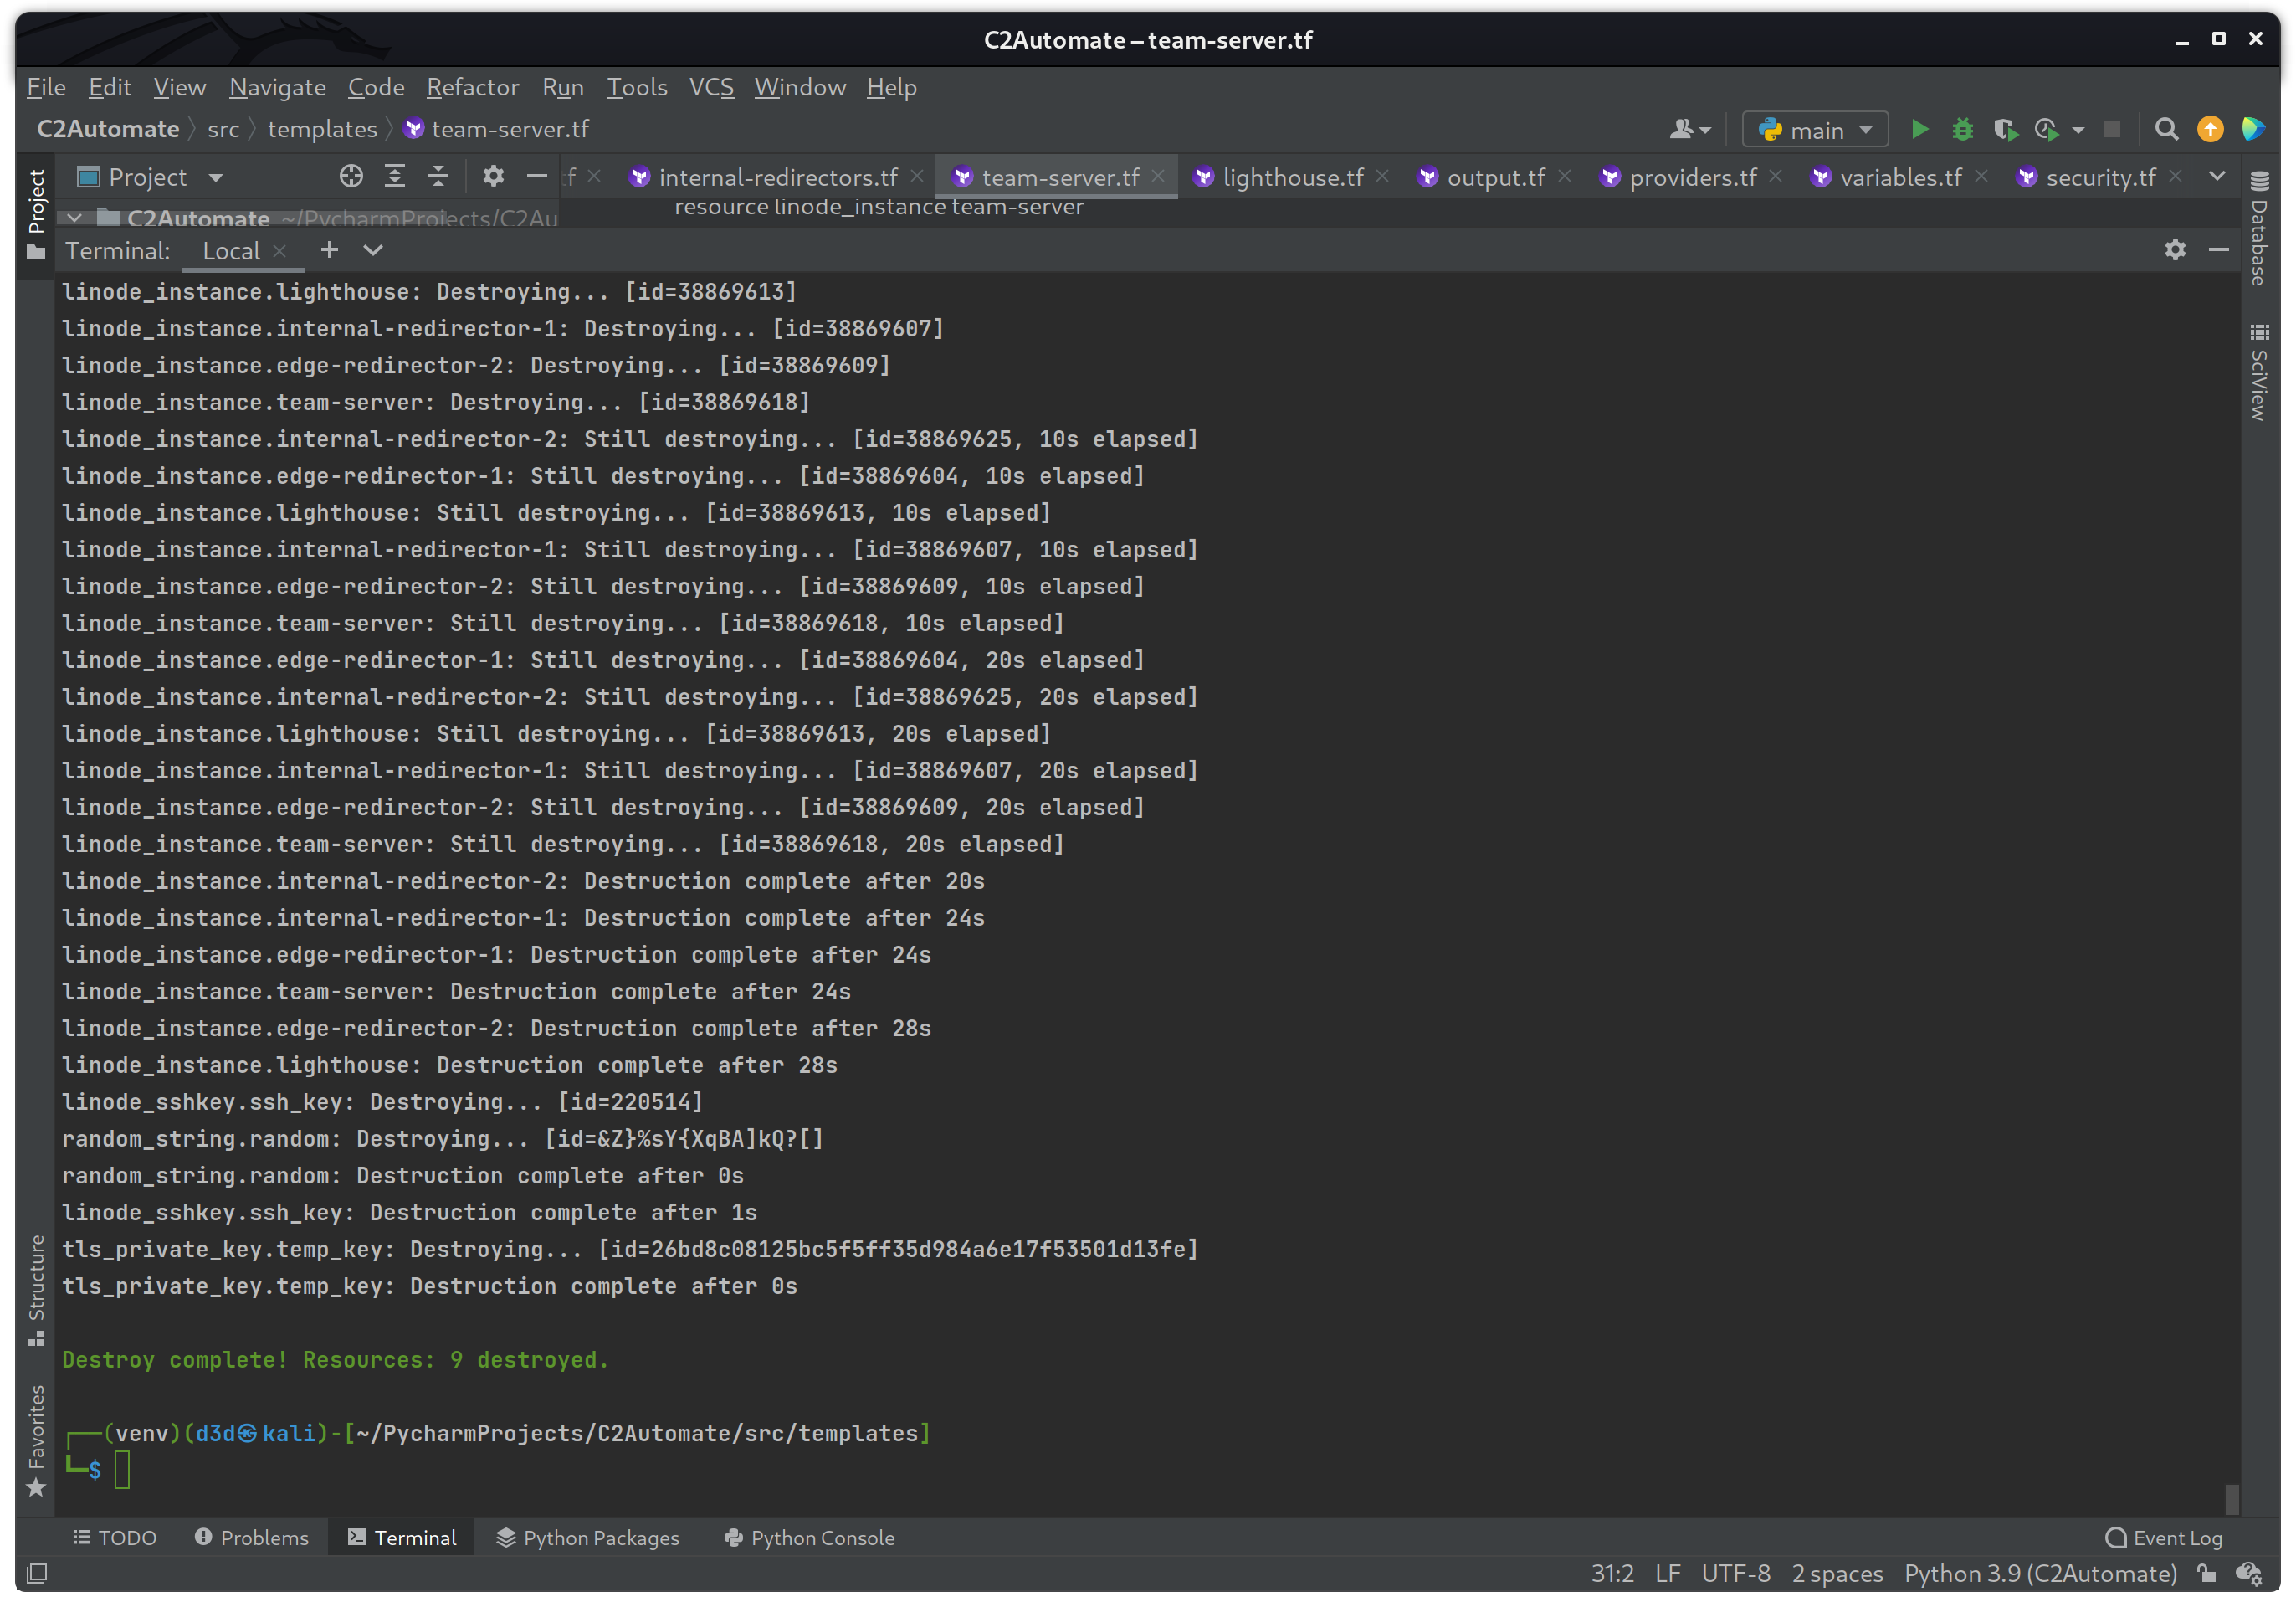
On success you can see all resources were destroyed without error. With the build at a stable state, it is now time to move on to setting up the DNS records before moving on to the Nebula end-to-end encrypted network layer.
DNS Setup
To create the DNS records required to route both DNS and HTTPS traffic correctly, I will be creating a dns.tf template to add a domain to the Linode account, then create three (3) different DNS records to handle both HTTP and DNS routing.
dns.tf
In the dns.tf template above, I used two (2) new directives that are provided by the same linode provider. The linode_domain resource is used to identify or create a specific domain within the Linode account, and the linode_domain_record directive is used for setting up specific DNS records for that same domain. Also, the depends_on directive makes sure the virtual machines are created before applying DNS modifications.
Now to run another build test to make sure the DNS records are created with the correct IPs as expected.
terraform apply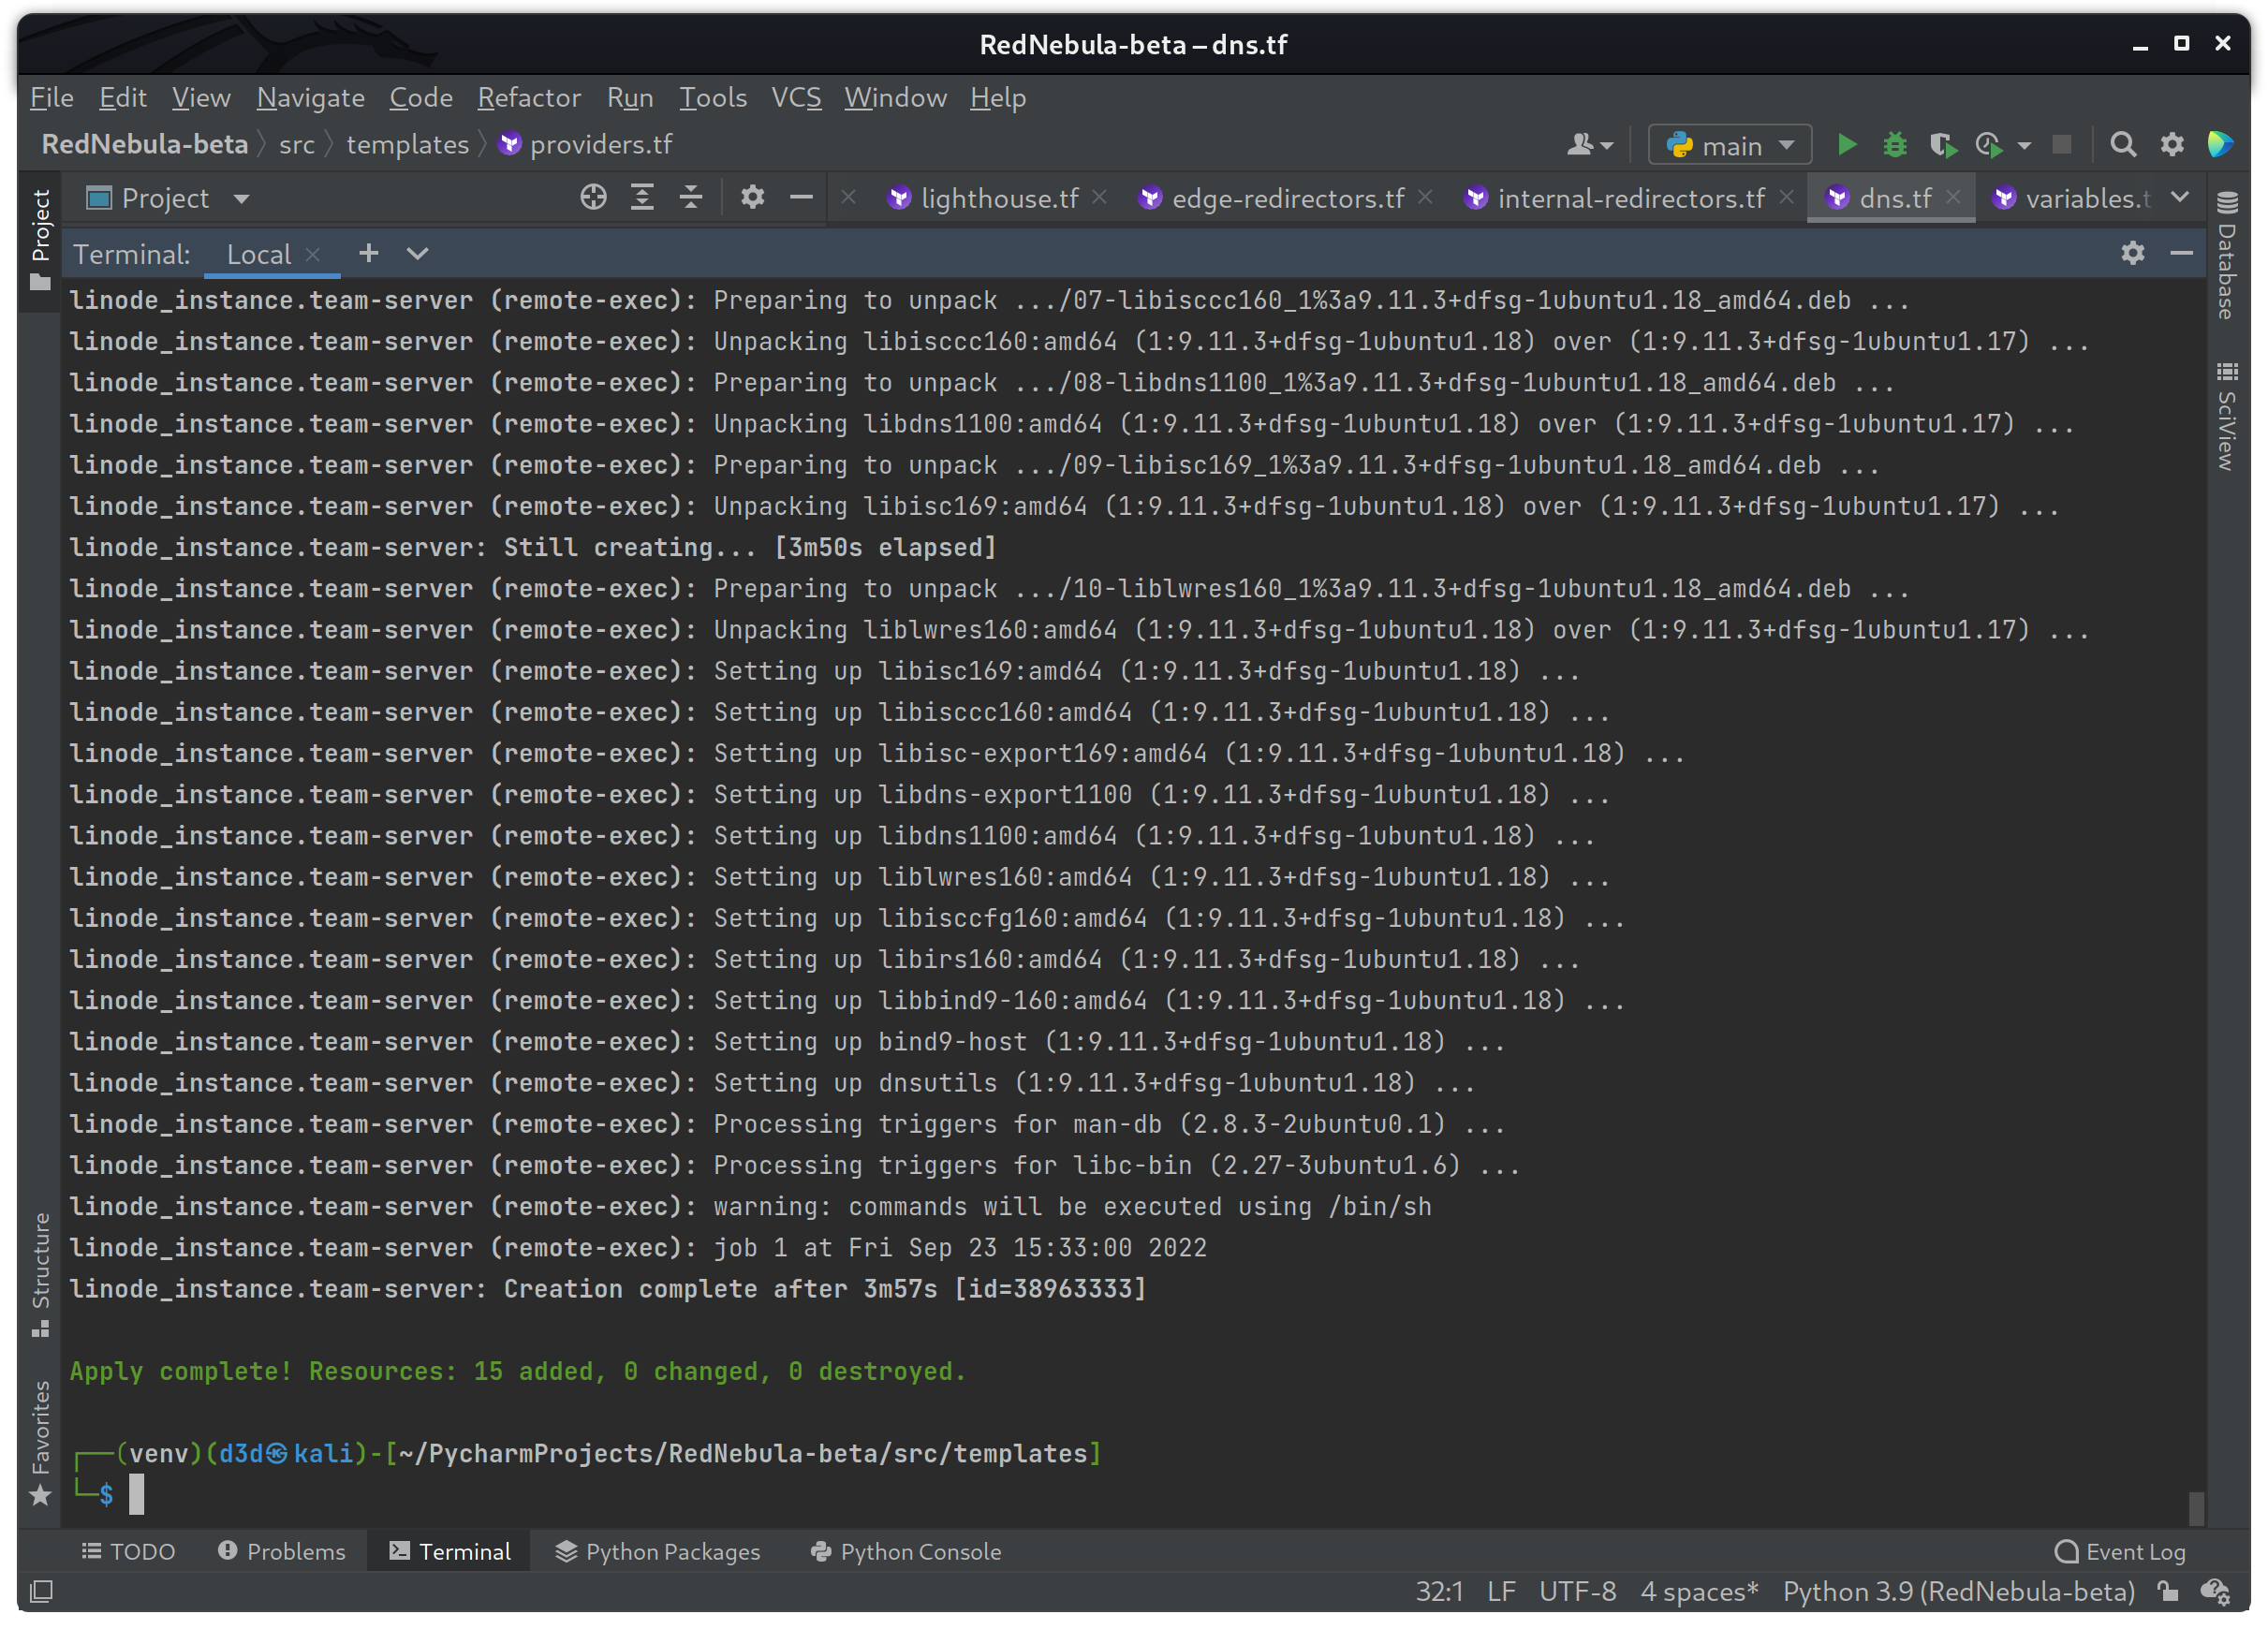
The build was a success, so now I need to check the Linode dashboard for verification that the domain windows.pe was added to the account.
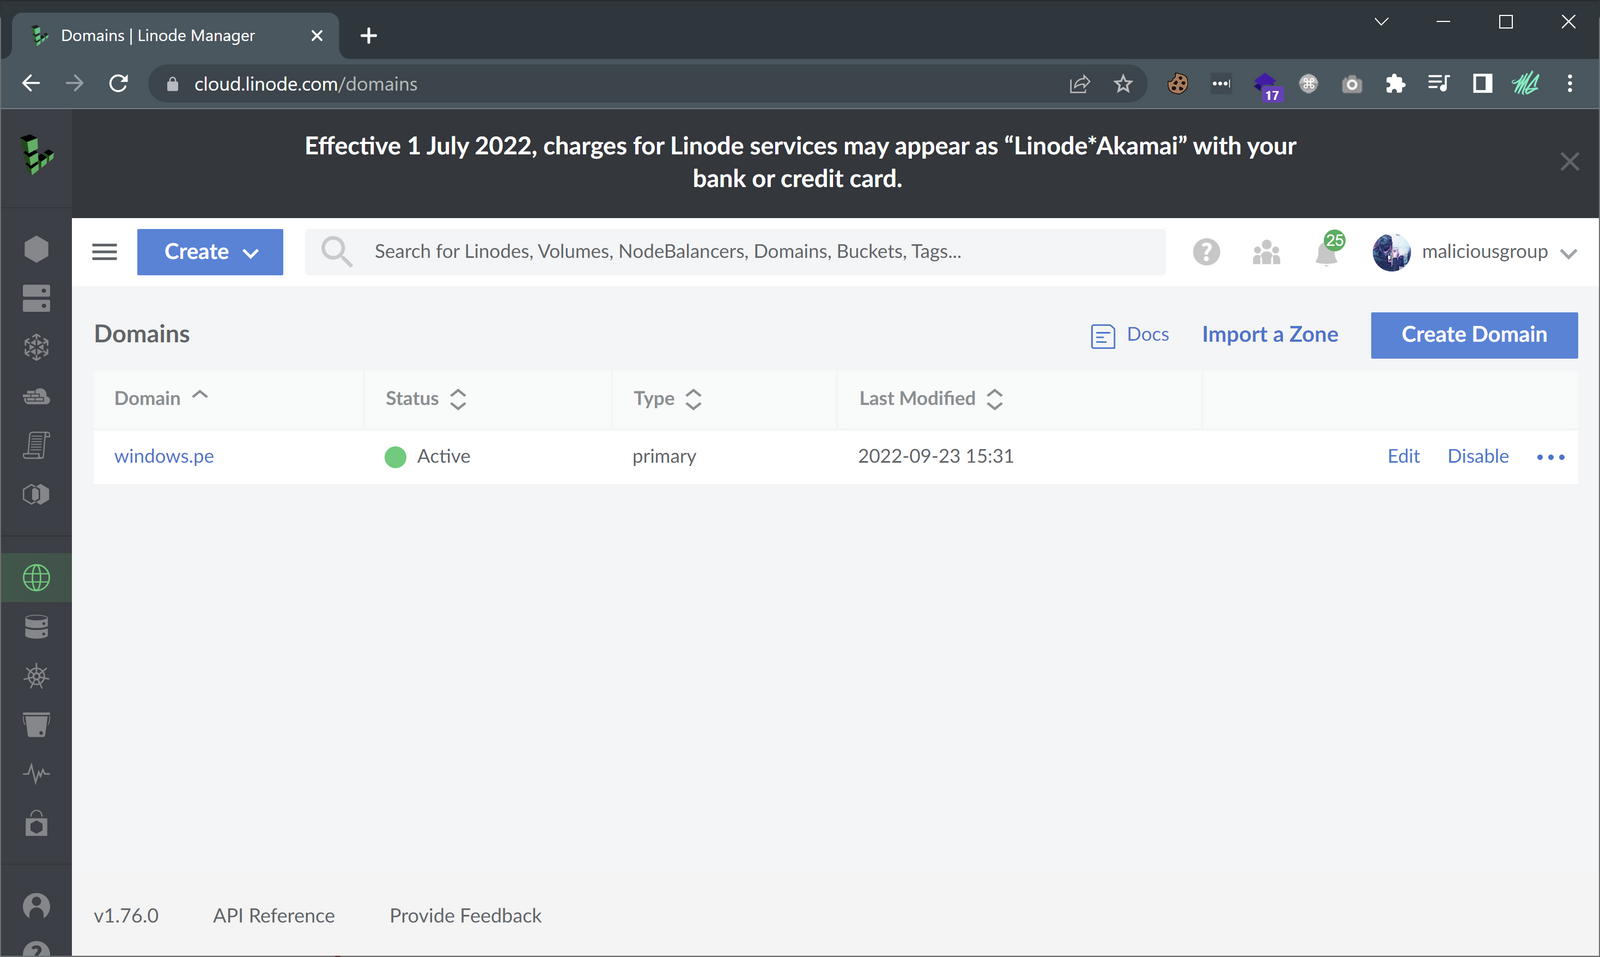
Good, now to check to ensure the correct records were created, and pointing to the correct virtual machines.
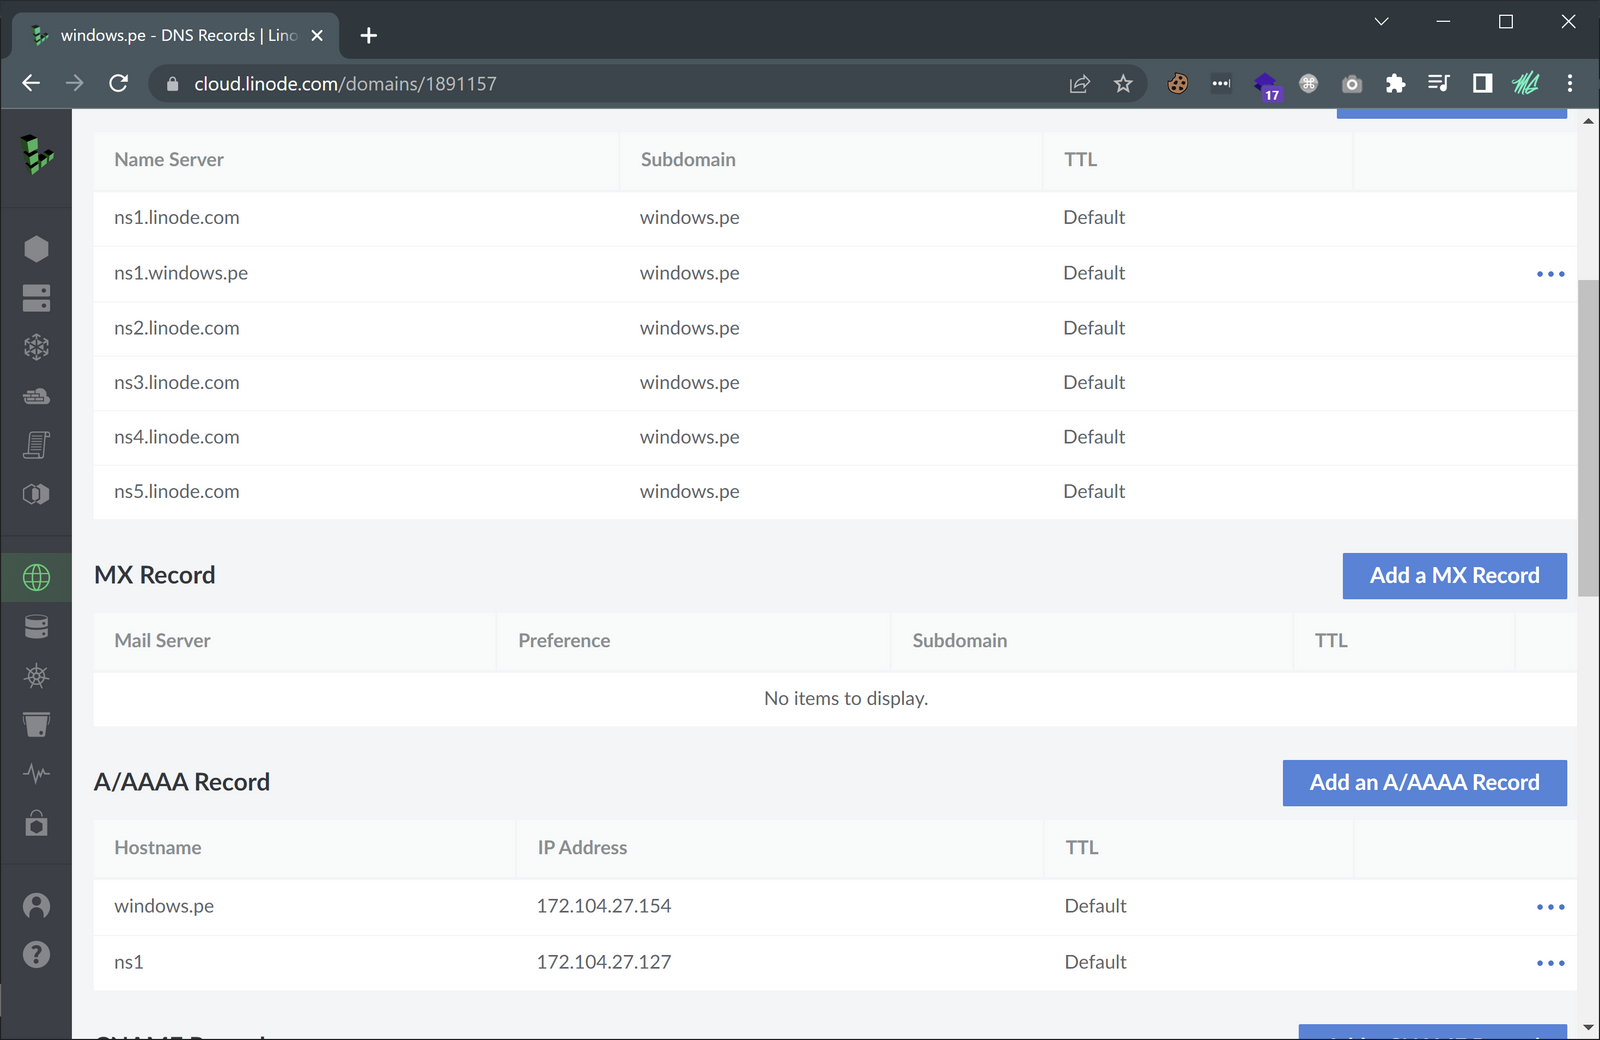
Success! The domain was added and the correct records were created. With the virtual machines setup, along with the DNS configuration done, I can focus on creating the Nebula end-to-end encrypted network layer in order to securely tunnel C2 traffic to the team-server.
Operator SSH key Setup
Now would be a good time to write a small bash script to generate an operator SSH key when the infrastructure is building, and then deleted when the infrastructure is destroyed. For this, I will be adding the following file generate_key.sh into the src/templates/keys directory as seen below.
generate_key.sh
To make sure this bash script runs at build time and deletes the keys it created during destruction, I will be creating two new templates in the next section to handle this functionality.
Nebula Setup
In order to setup a Nebula network, the host machine used to build the infrastructure will need to download the nebula binary, generate a new CA certificate and then generate keys for each machine used in this build. This can be done before any of the machines are created, so that I can move the specific key to each host in order to test and verify the network status.
To accomplish this I will be creating two new files to put in the src/templates directory. These files will be called setup.tf and cleanup.tf, and will be responsible for handling all pre-build and post-build operations to make sure the operator has a clean environment between every run.
setup.tf
The setup.tf template above downloads the nebula binary and then proceeds to setup a new CA certificate, then generates a key for every machine connecting to the Nebula network. It also contains two (2) commands to run the bash script generate_key.sh mentioned above.
cleanup.tf
In the cleanup.tf template above, the generated files during the build process are all deleted and directories removed.
Now that the Nebula keys are created during the build process, I need to create some Nebula configuration files to set the IP range and individual addresses for each node, as well as some ACL rules to allow specific traffic. The configuration files below will be stored in the src/templates/configs/nebula directory.
config-lighthouse.yamlconfig-teamserver.yamlconfig-edge.yamlconfig-internal.yamlconfig-operator.yaml
config-lighthouse.yaml
The only ACL for the "Lighthouse" configuration allows ICMP traffic from other Nebula connected nodes. This is purely for making sure they are all connected, and could be removed for security precautions.
config-teamserver.yaml
The "Team-Server" configuration contains a ACL that allows traffic from the internal group, and the operator group. Any C2 traffic coming to the "Team-Server" must pass through the "Internal-Redirectors" first.
config-edge.yaml
The "Edge-Redirectors" configuration contains a ACL that allows traffic from the internal group only, and this is by design. Any C2 traffic coming into the "Edge-Redirectors" will need to tunnel through the "Internal-Redirectors" before reaching the "Team-Server."
config-internal.yaml
The "Internal-Redirectors" configuration contains a ACL that allows traffic from both the edge and team-server groups. This is because the "Internal-Redirectors" are responsible for moving data from the "Edge-Redirectors" to the "Team-Server."
config-operator.yaml
The "Operator" configuration contains a ACL that has access to the "Team-Server" only.
You may notice there is a LIGHTHOUSE_IP_ADDRESS place-holder as well, but this will be addressed during the build process with a sed command.
With the Nebula certificate, configurations and keys created, it is time to figure out how to move all the required files to each machine during the build process to ensure that Nebula has everything it needs to connect.
Thankfully moving files from the operator host machine to the remote machine is easy thanks to the Terraform file provisioners, which takes a file as its source and where to place it as its destination. To make sure Nebula can connect on each machine, I will need to modify the Linode templates to include the required files and commands to run Nebula.
lighthouse.tf
edge-redirectors.tf
internal-redirectors.tf
team-server.tf
As mentioned, you can see the six (6) file provisioners moving the following files from the host machines to the remote server:
keys/red_nebula_rsa.pubconfigs/nebula/config-<instance>.yamlcertificates/ca.crtcertificates/<instance_name>.keycertificates/<instance_name>.crt/tmp/nebula/nebula
After the file provisioners move everything to the/tmp directory, the remote-exec provisioner will move the files from the /tmp directory to their final location on the server. Afterwards, once all files are in place, nebula is started.
I should be able to test the build again, but this time I should be able to log into each machine using the SSH key that was generated during the build, and make sure the Nebula network is up and connected.
terraform apply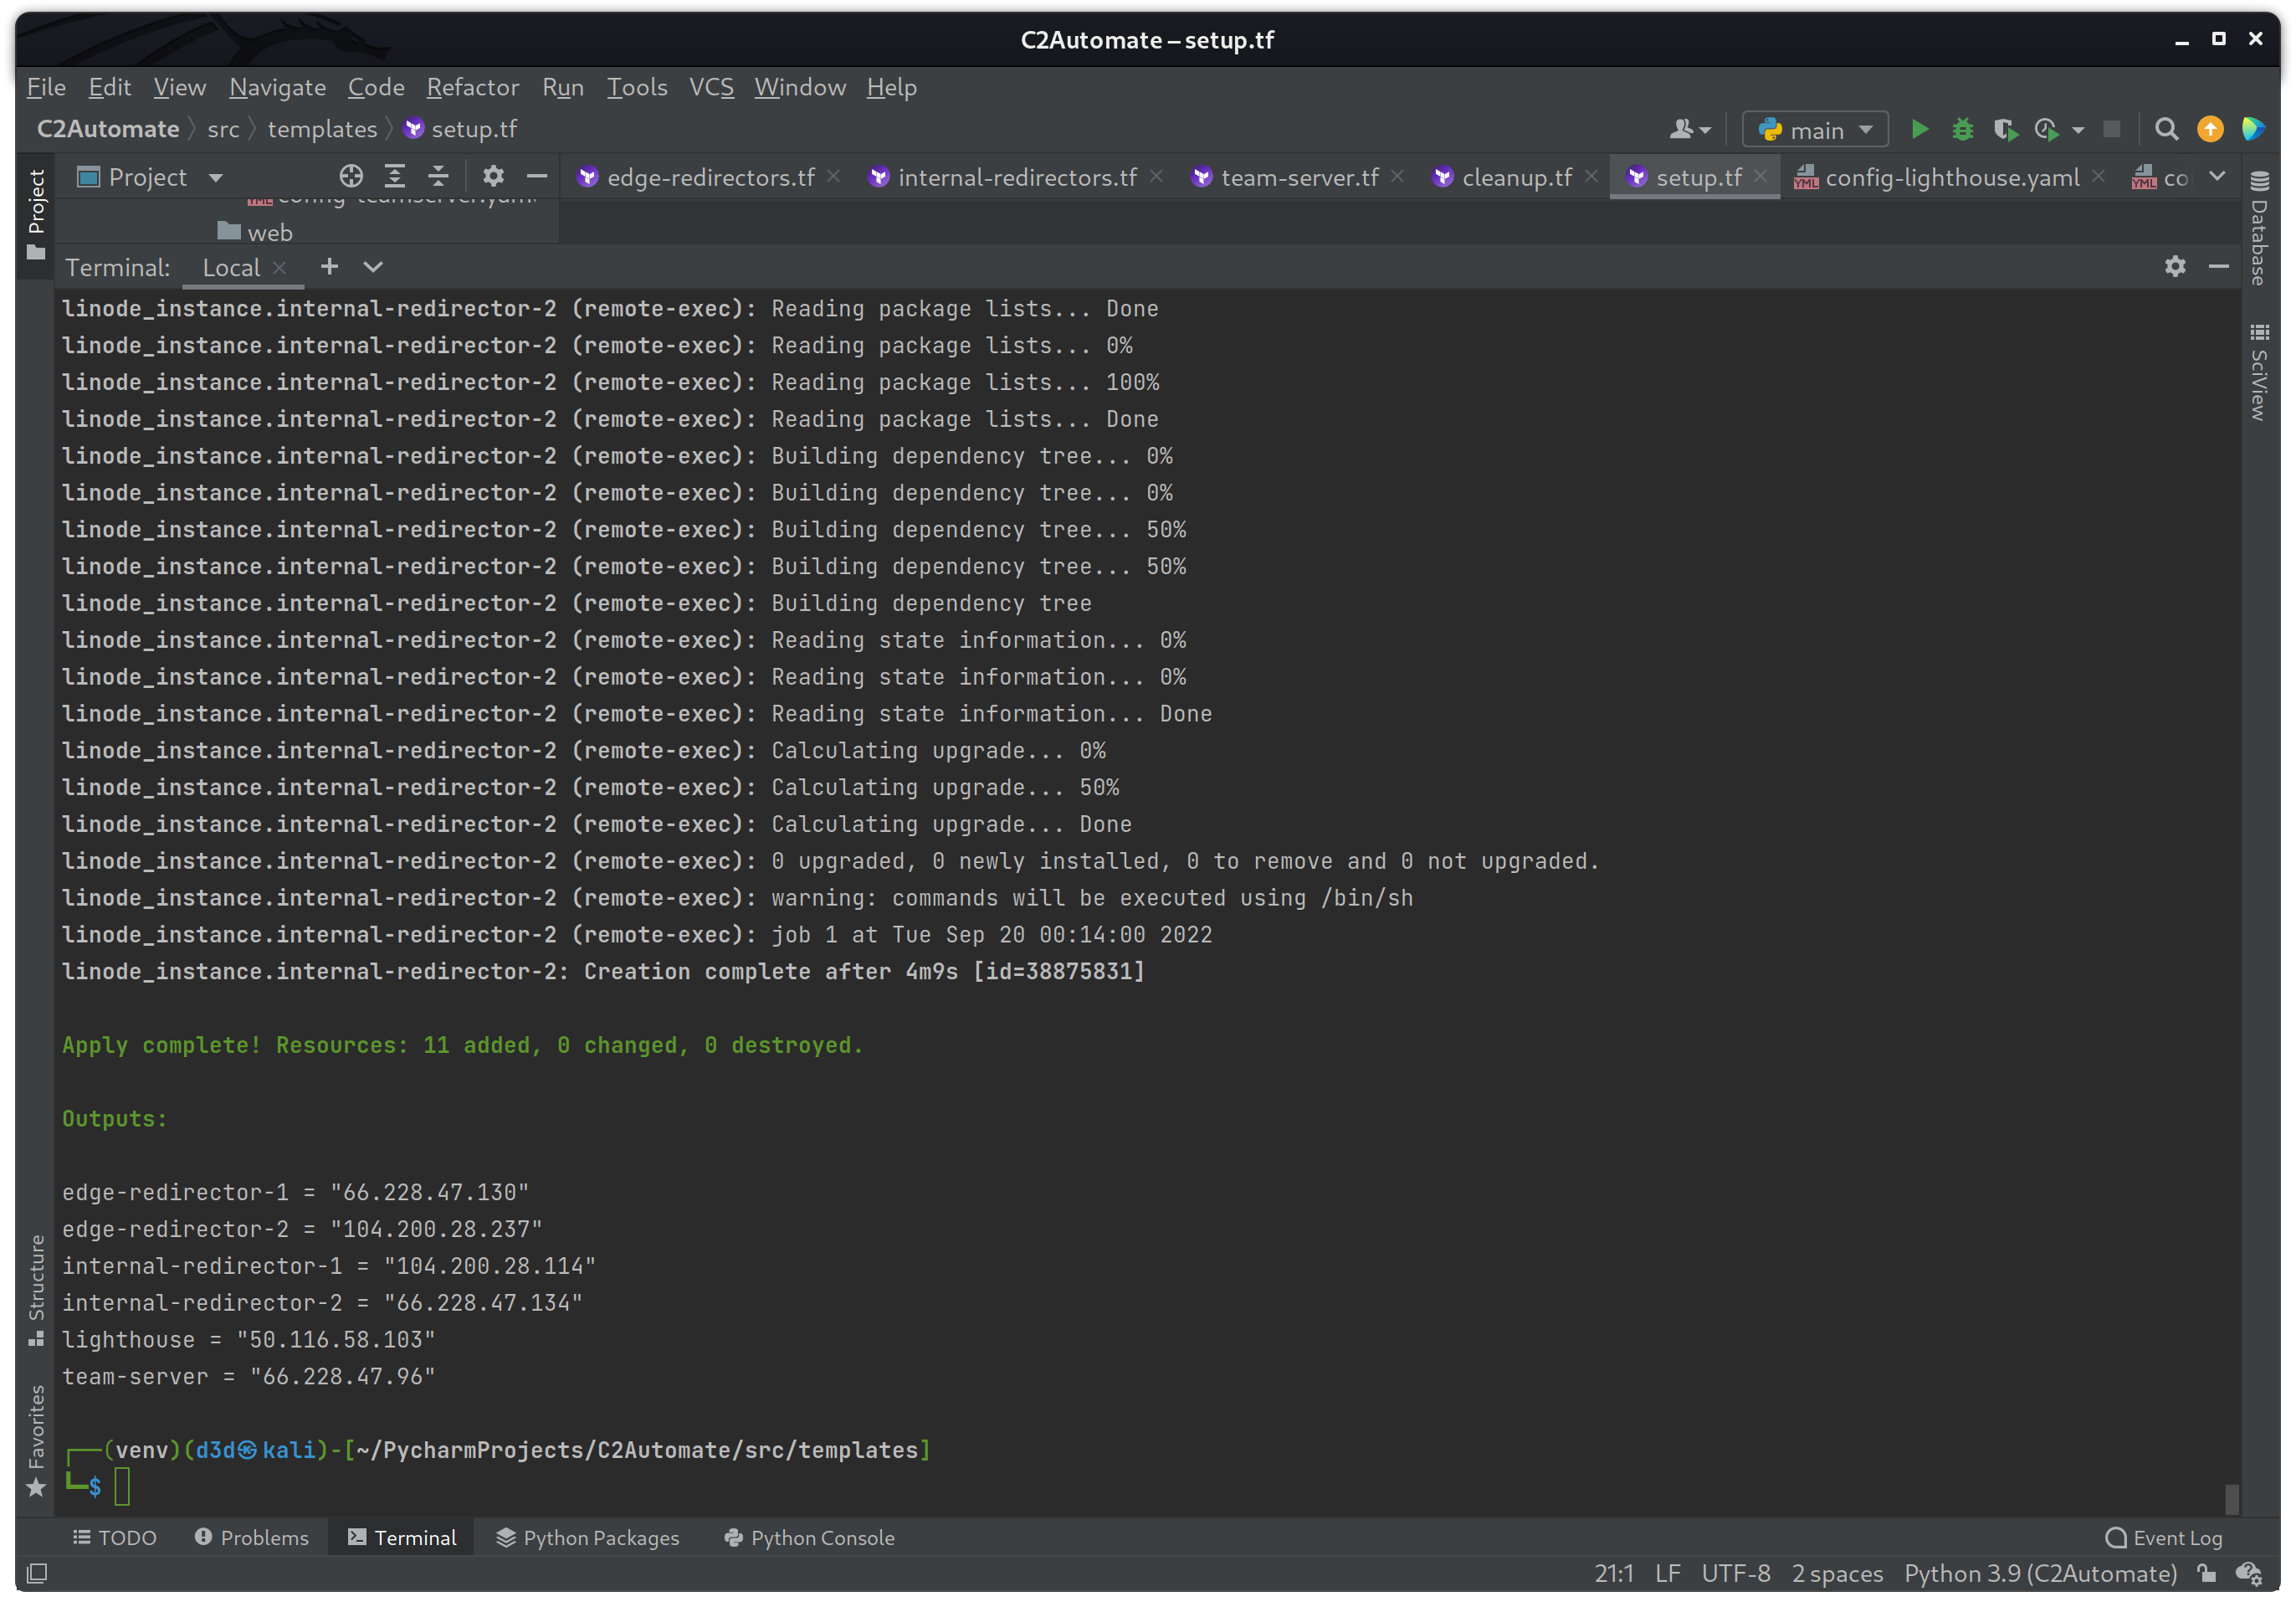
If the build was a success you should see the same output as the image above. The IP address of each instance should be displayed in the output as well.
Now I want to test both the SSH key moved to the server via the file provisioner, and the Nebula network connectivity. I will start with the team-server instance, so to log in I will use the following command while in the src/templates directory.
ssh -i keys/red_nebula_rsa root@66.228.47.96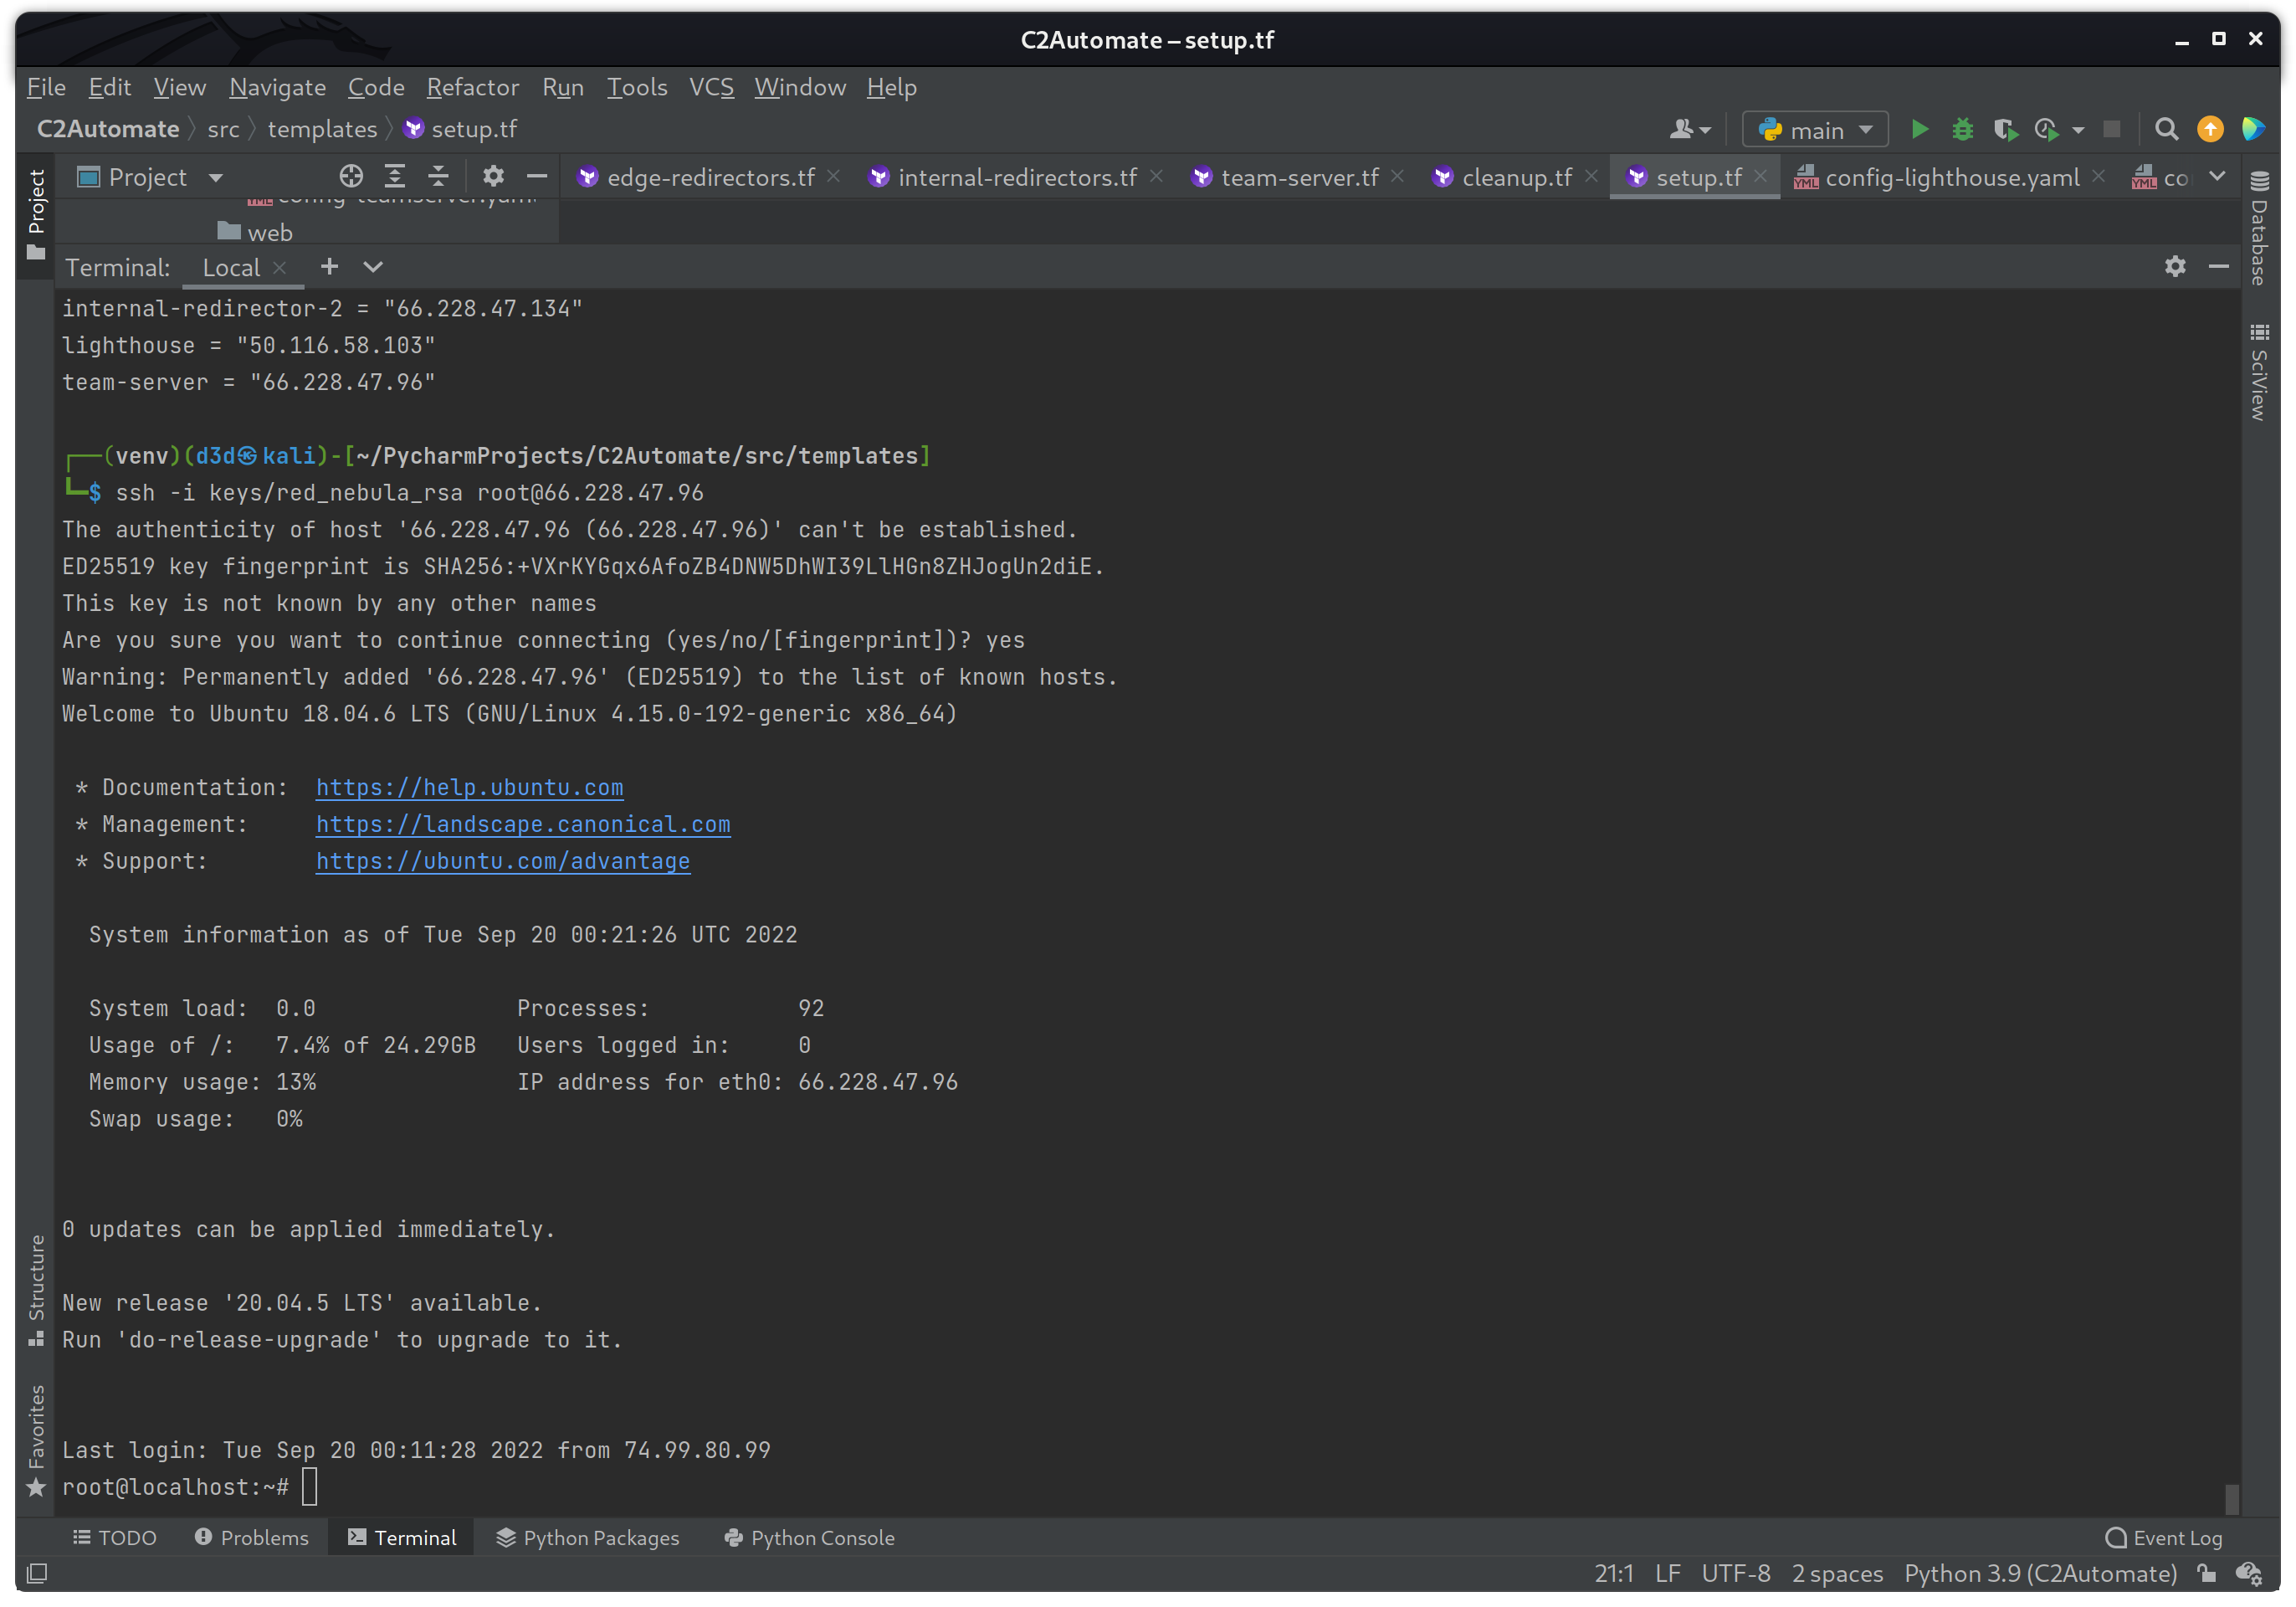
The SSH key generated by the generate_key.sh script worked great, now to check to see if Nebula is running on tun0 and that I can ping all the other endpoints with the following commands.
ifconfig | grep tun0
ping -c 1 192.168.100.1
ping -c 1 192.168.100.10
ping -c 1 192.168.100.20
ping -c 1 192.168.100.110
ping -c 1 192.168.100.120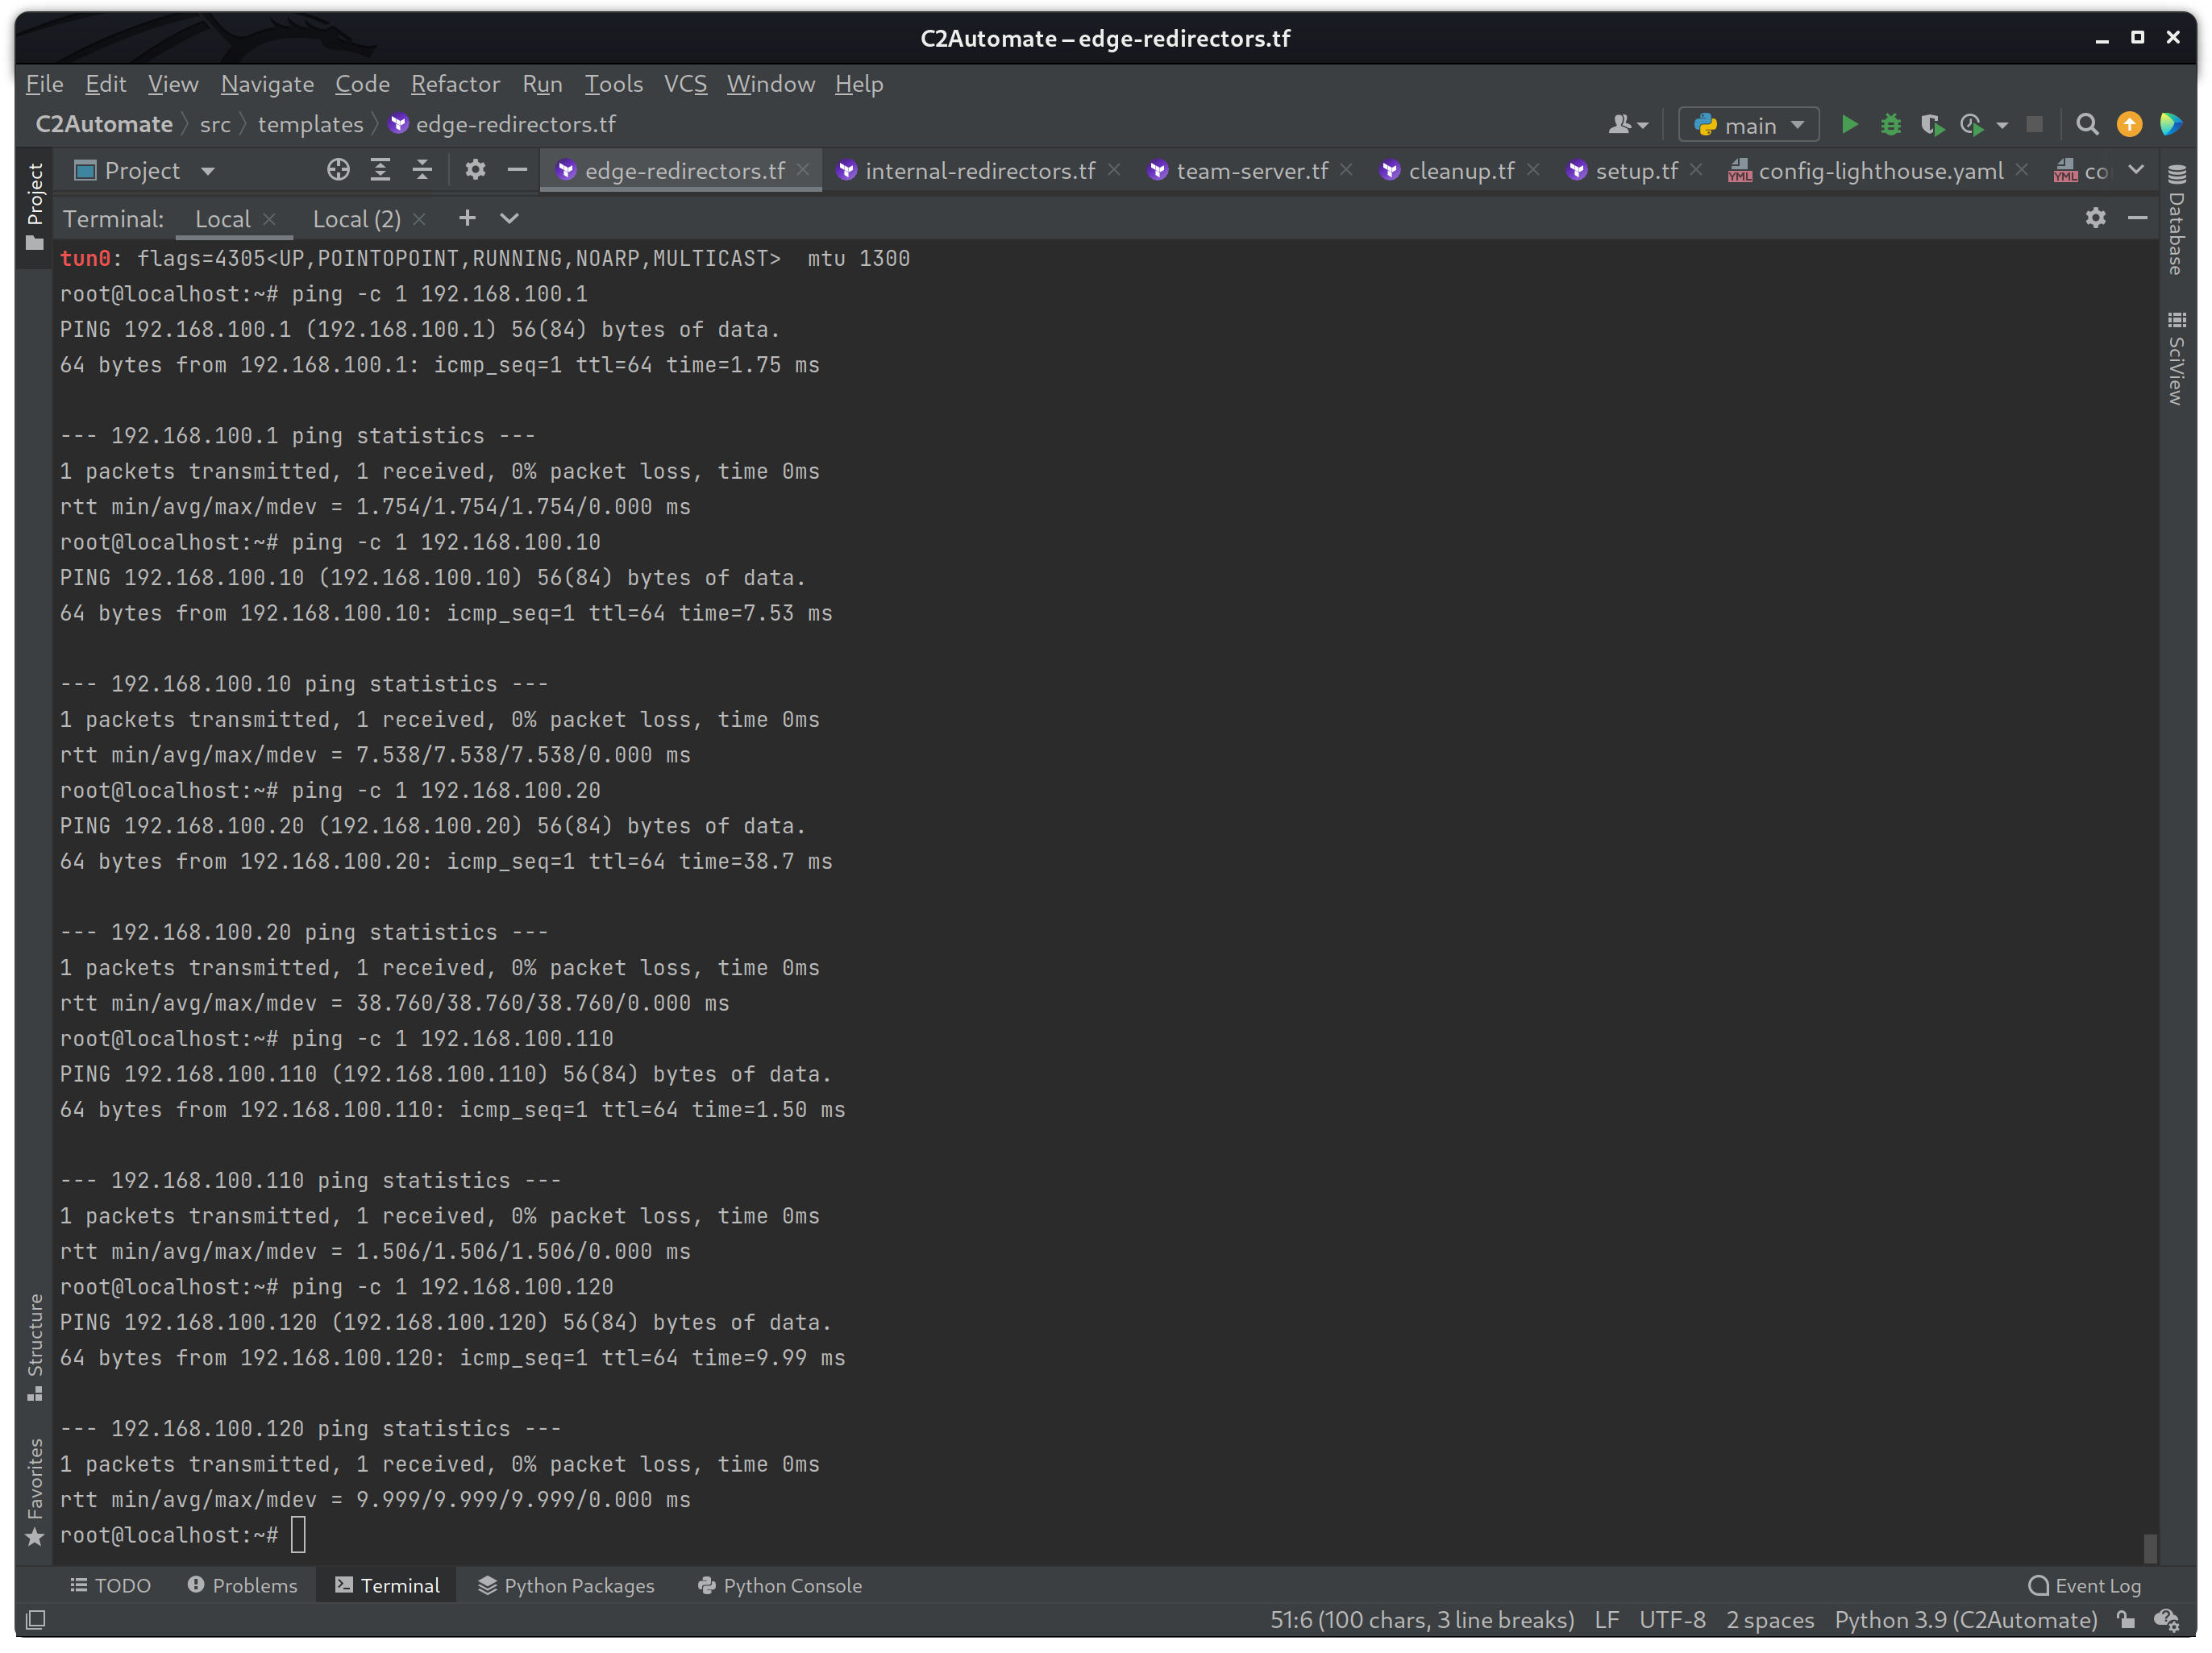
If the commands were successful, you should see that each host could be pinged and that the tun0 interface was active. Once everything is tested to be working, then I will destroy the build using terraform destroy again to avoid making changed while the build is still active.
At the moment, the build is at another stable state where both the Linode infrastructure automation works without error including DNS, and the end-to-end encrypted Nebula network layer is also working without issue. Time to focus on traffic routing.
Caddy Setup
In order to setup the Caddy HTTPS server, I will first need to install Go on the edge-redirector-1 instance to build Caddy from source, or just download the binary. For this build I will be using the binary straight from their github since it is quicker to deploy.
Caddy requires a configuration in order to setup the HTTP/S routing rules as well as the SSL setup. Because the configuration on the HTTP/S and DNS servers needs to match the C2 profile being used, I will be using a modified version of the Cobalt Strike webbug_getonly.profile from the repo here. The C2 profile will be stored in the src/templates/files directory.
webbug_getonly.profile
Once I have a C2 profile picked out to use, I will modify the Caddy configuration to match the routing. The Caddy configuration file is called Caddyfile and can be found below.
Caddyfile
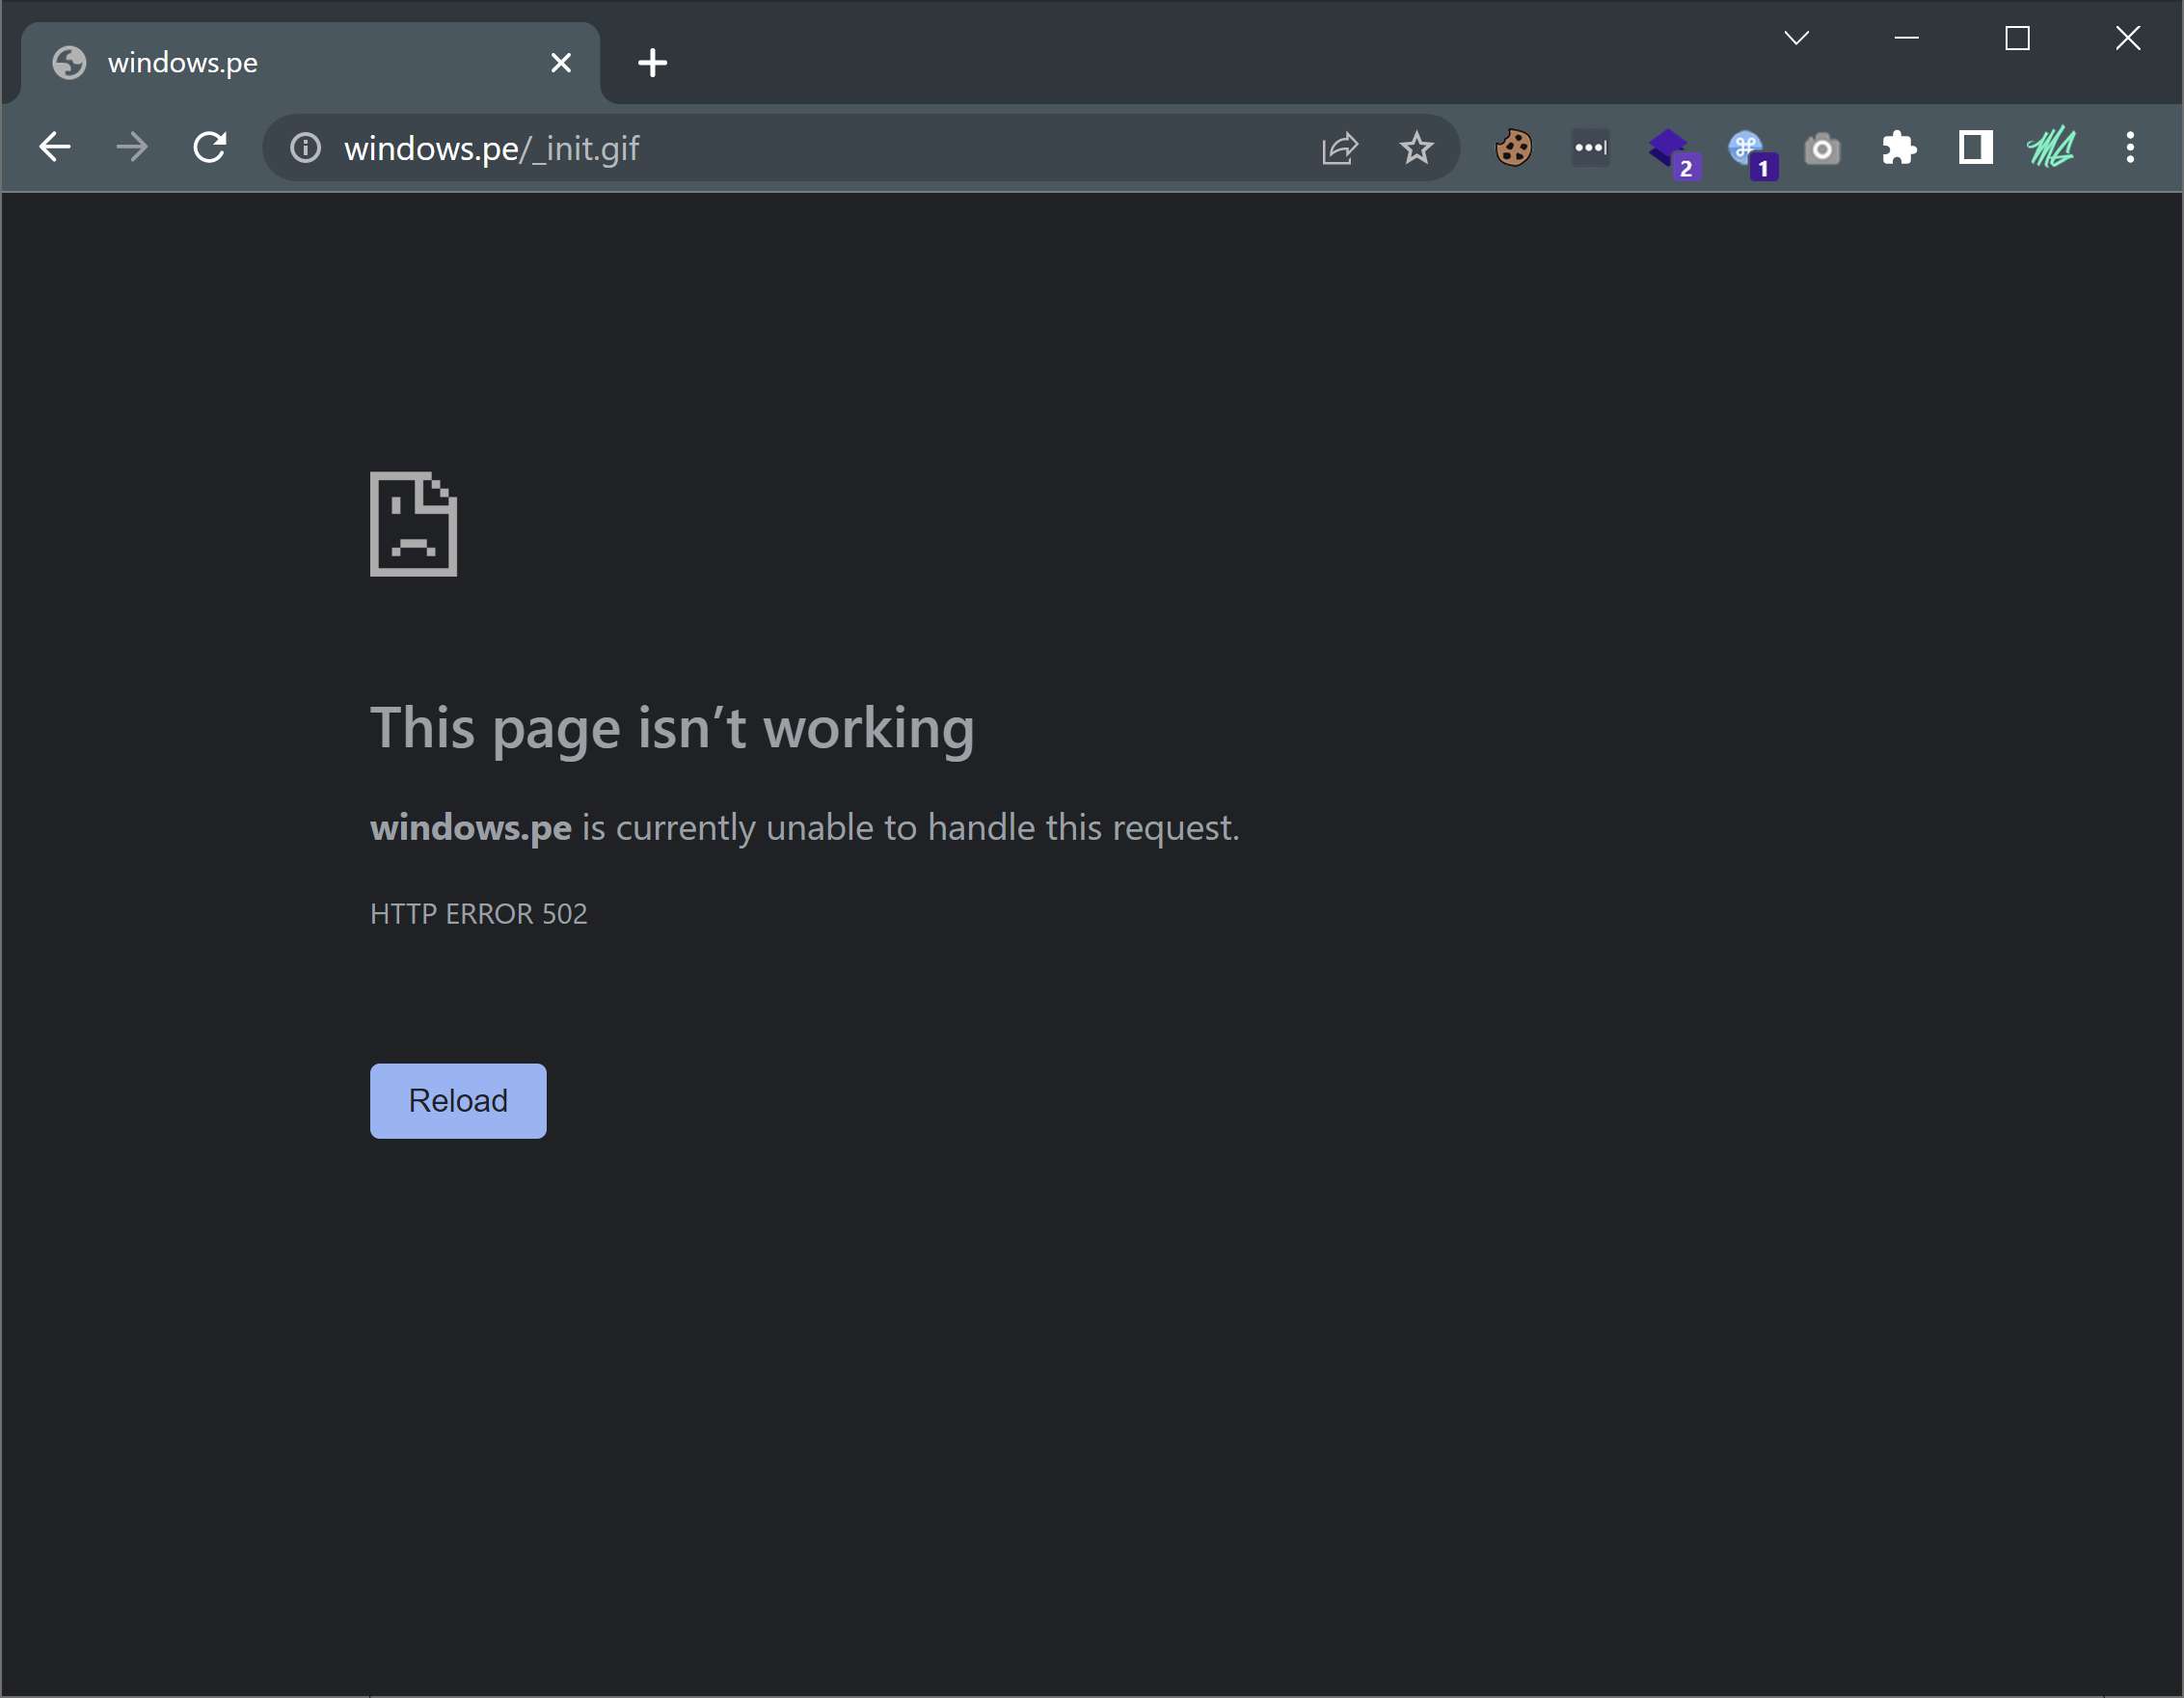
The above configuration is fairly straight forward, and will only redirect traffic to the internal-redirector-1 instance if the User-Agent matches the pattern and if specific endpoints are accessed (_init.gif, __init.gif, __utm.gif, ___utm.gif ). All other requests will be redirected to the Microsoft Windows PE format docs page.
There is a EDGE_DOMAIN_NAME place-holder that will be fixed below as the following commands will be added to the edge-redirector-1 instance within the edge-redirectors.tf template.
wget https://github.com/caddyserver/caddy/releases/download/v2.5.2/caddy_2.5.2_linux_amd64.tar.gz
tar -C /usr/local/bin -xzf caddy_2.5.2_linux_amd64.tar.gz
chmod +x /usr/local/bin/caddy
mv /tmp/Caddyfile .
sed -i 's/EDGE_DOMAIN_NAME/${var.linode_domain}/g' Caddyfile
echo 'caddy run --watch' | at now + 1 min
The above commands will download Caddy and setup the configuration before connecting to the Nebula network.
At this point I should be able to test all the modifications made above, by building the infrastructure to make sure the HTTPS server will redirect traffic based on specific rules.
terraform apply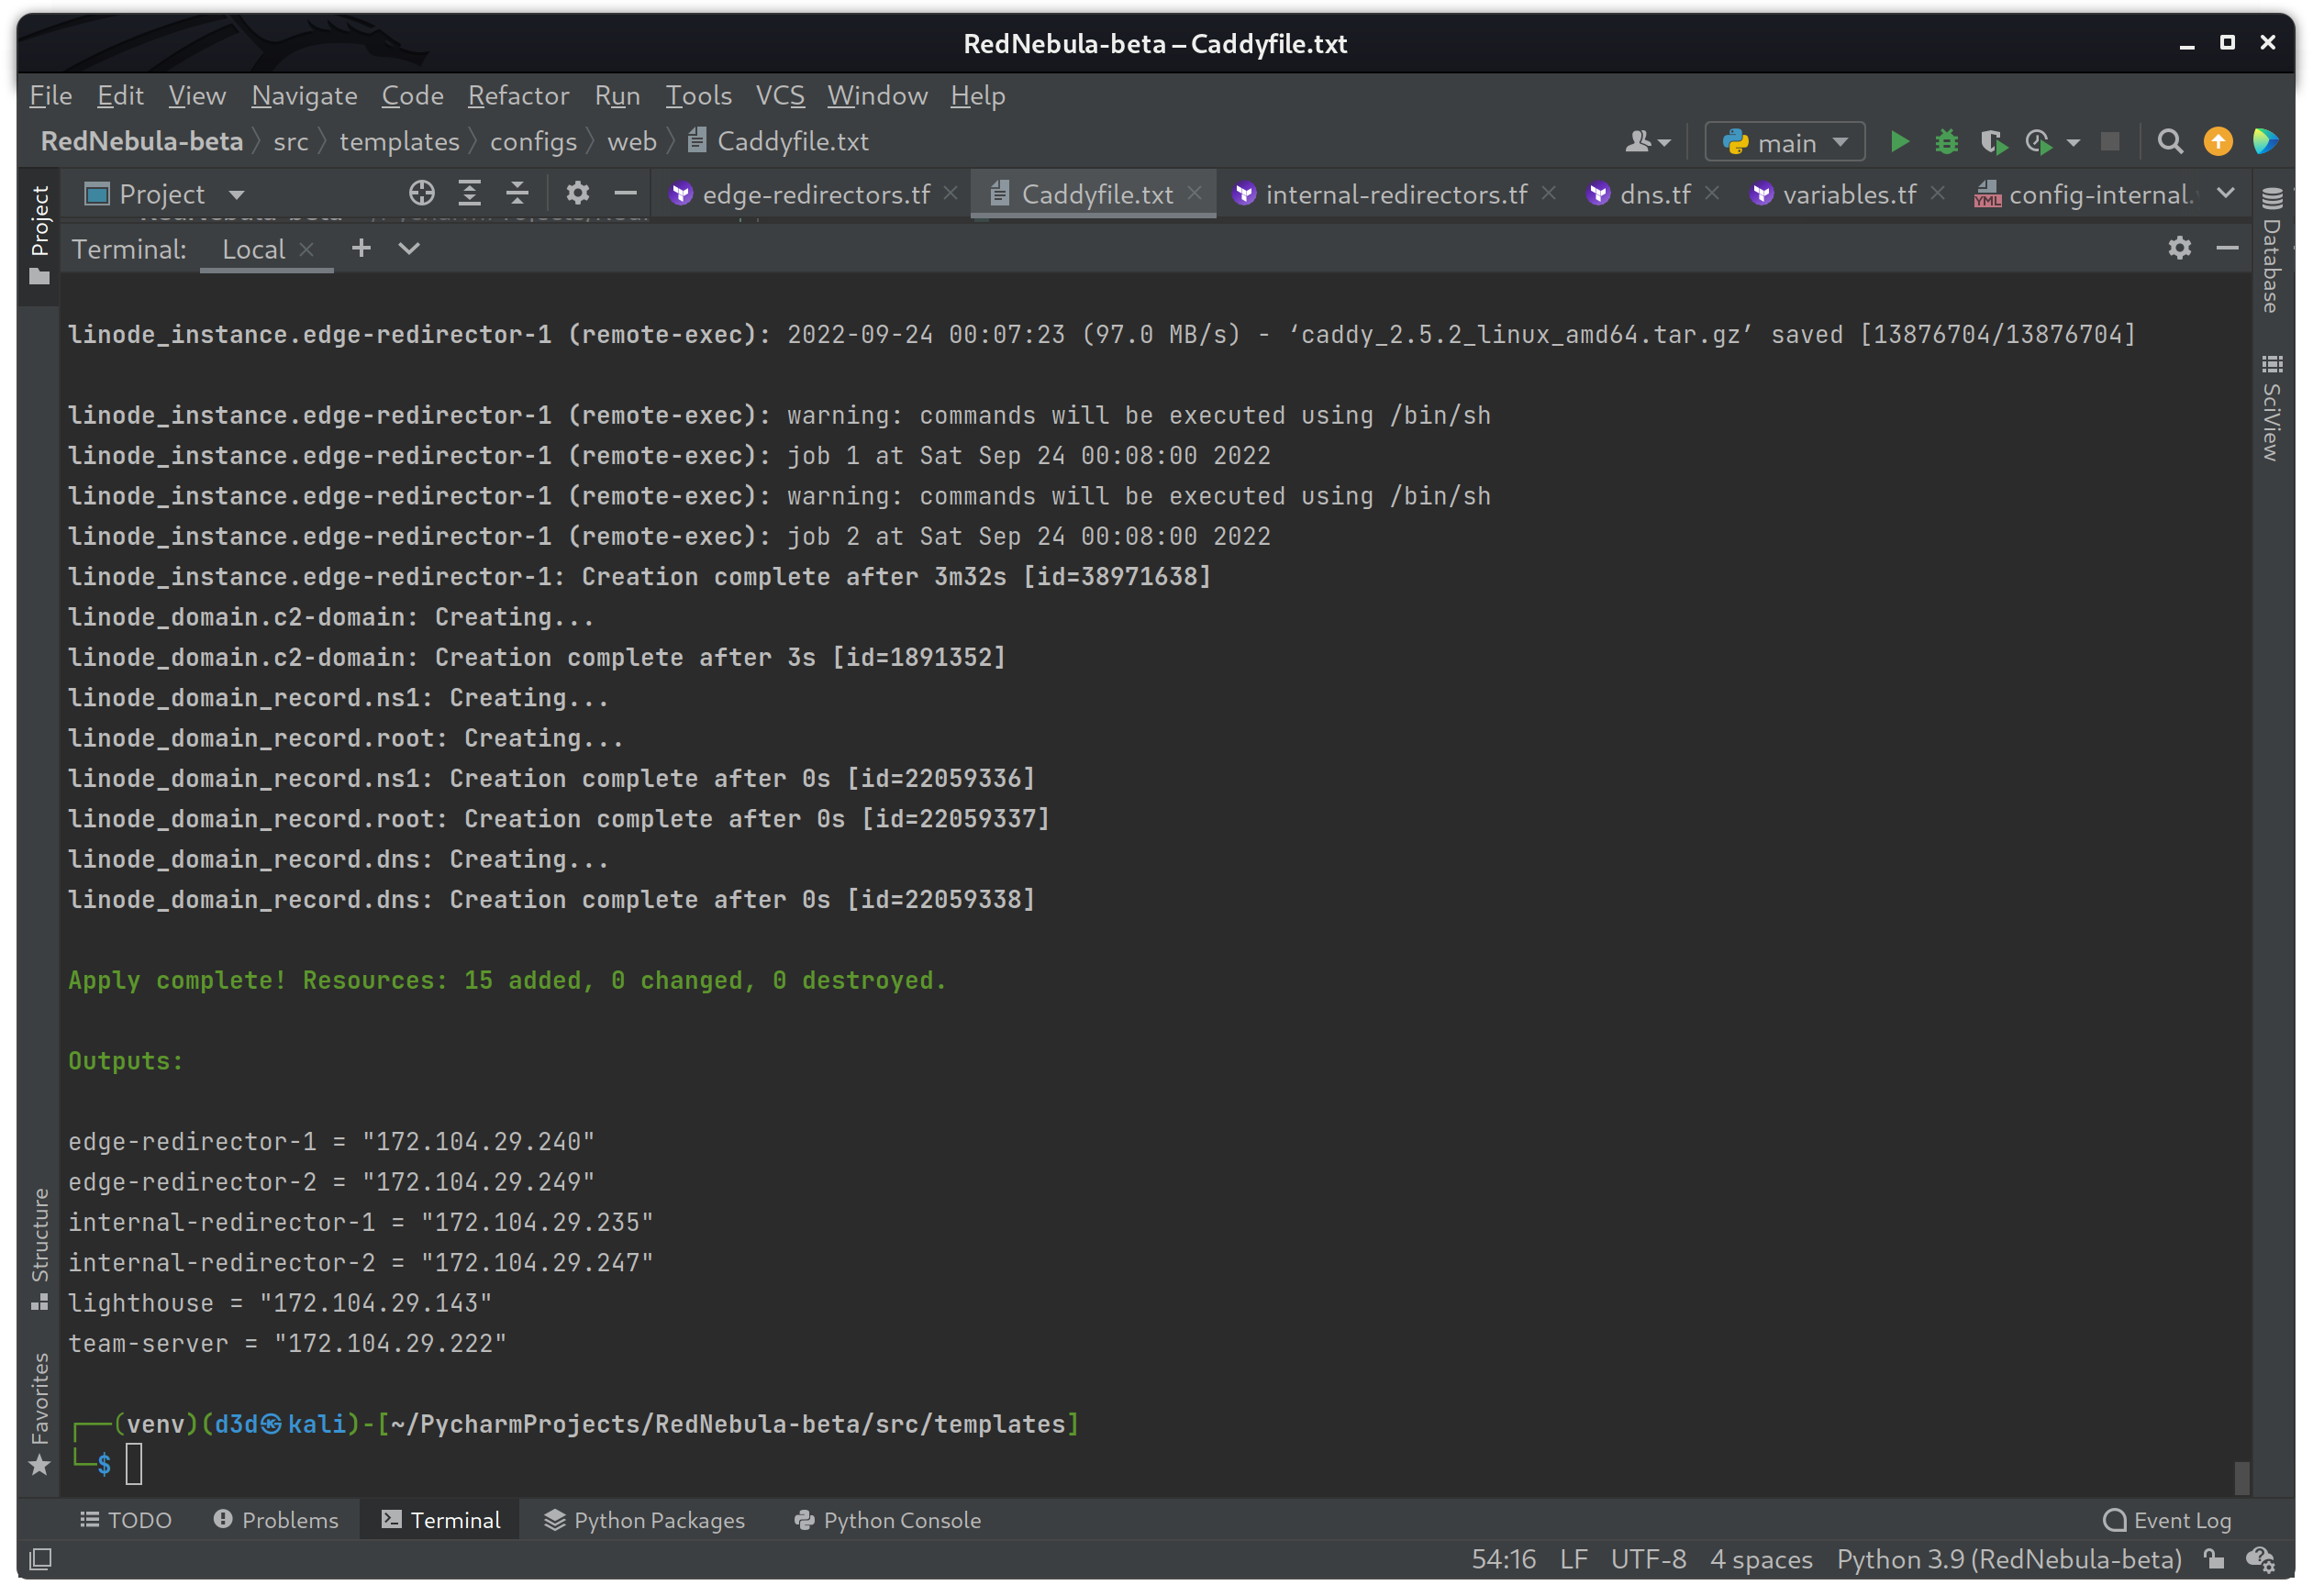
On success you should see that fourteen resources were created without error, and see the output data showing the IP Address for each instance created.
All the resources are up and running, so let me check the windows.pe domain in a browser to make sure it redirects all non C2 traffic to the Windows PE Format docs page as expected.
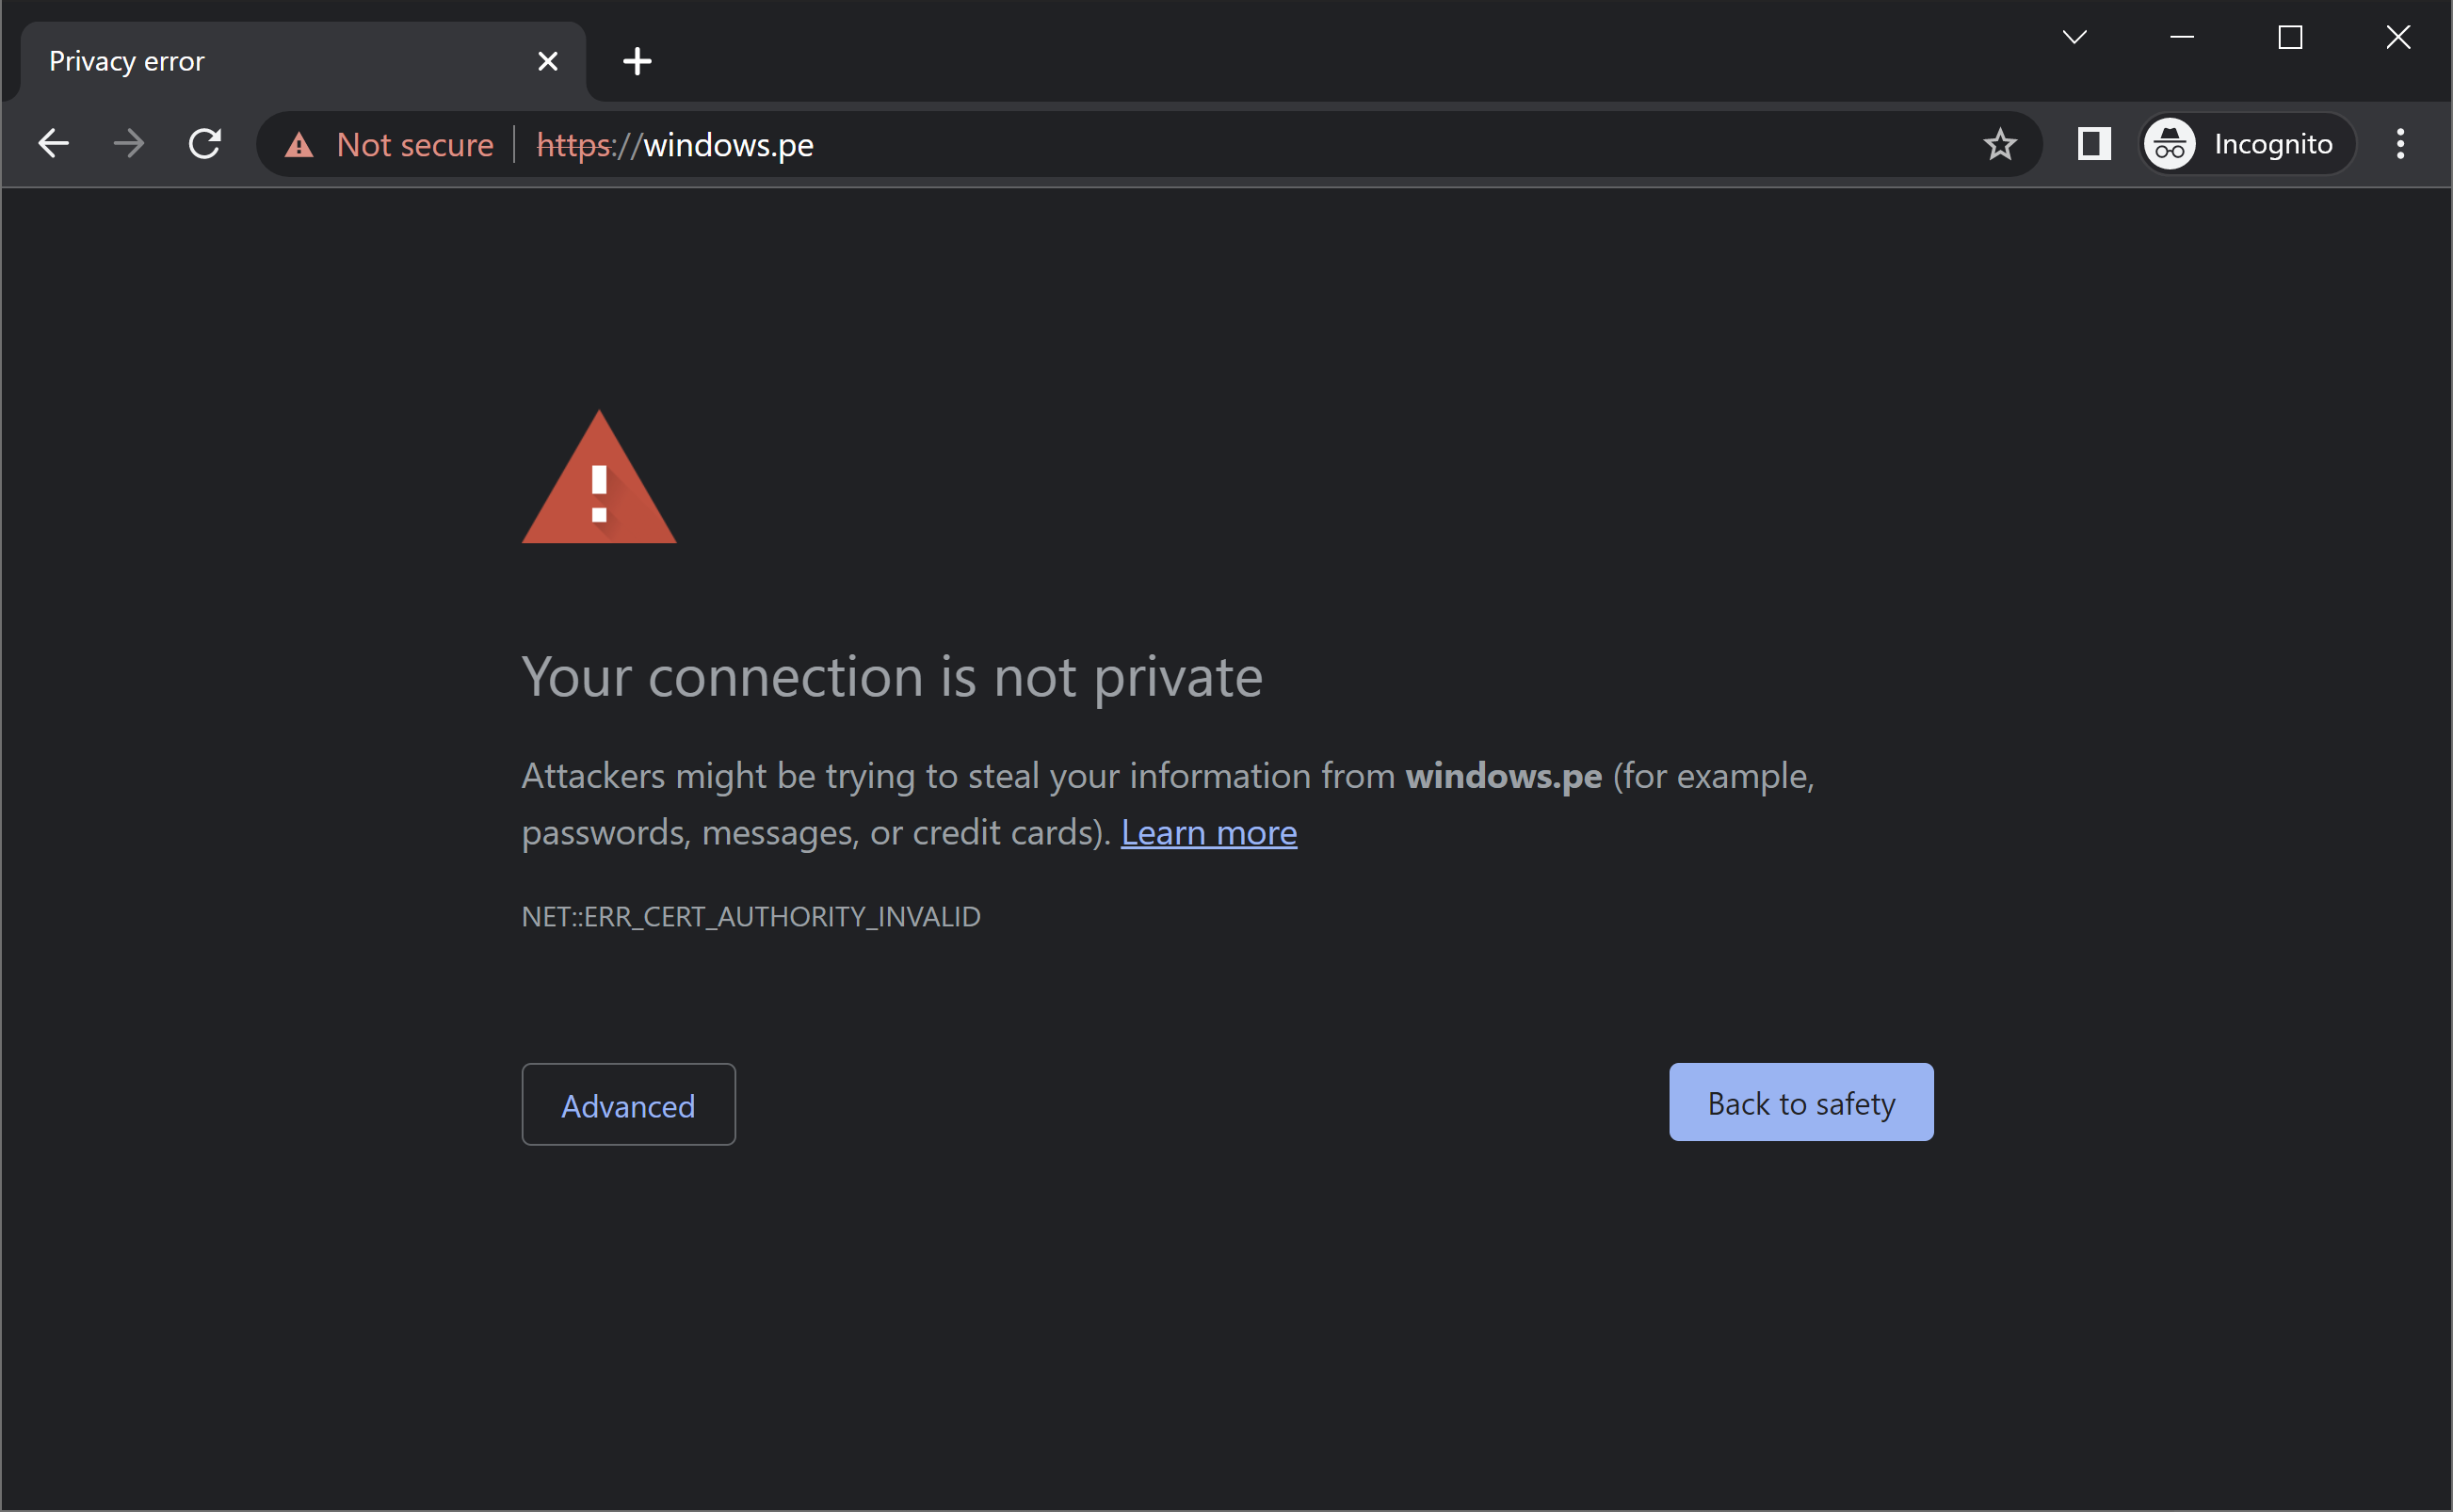
Since I am currently using a staging certificate during the testing process, you will see a warning like the one above. This will be removed once I move to a production SSL, but for now I will select to continue.
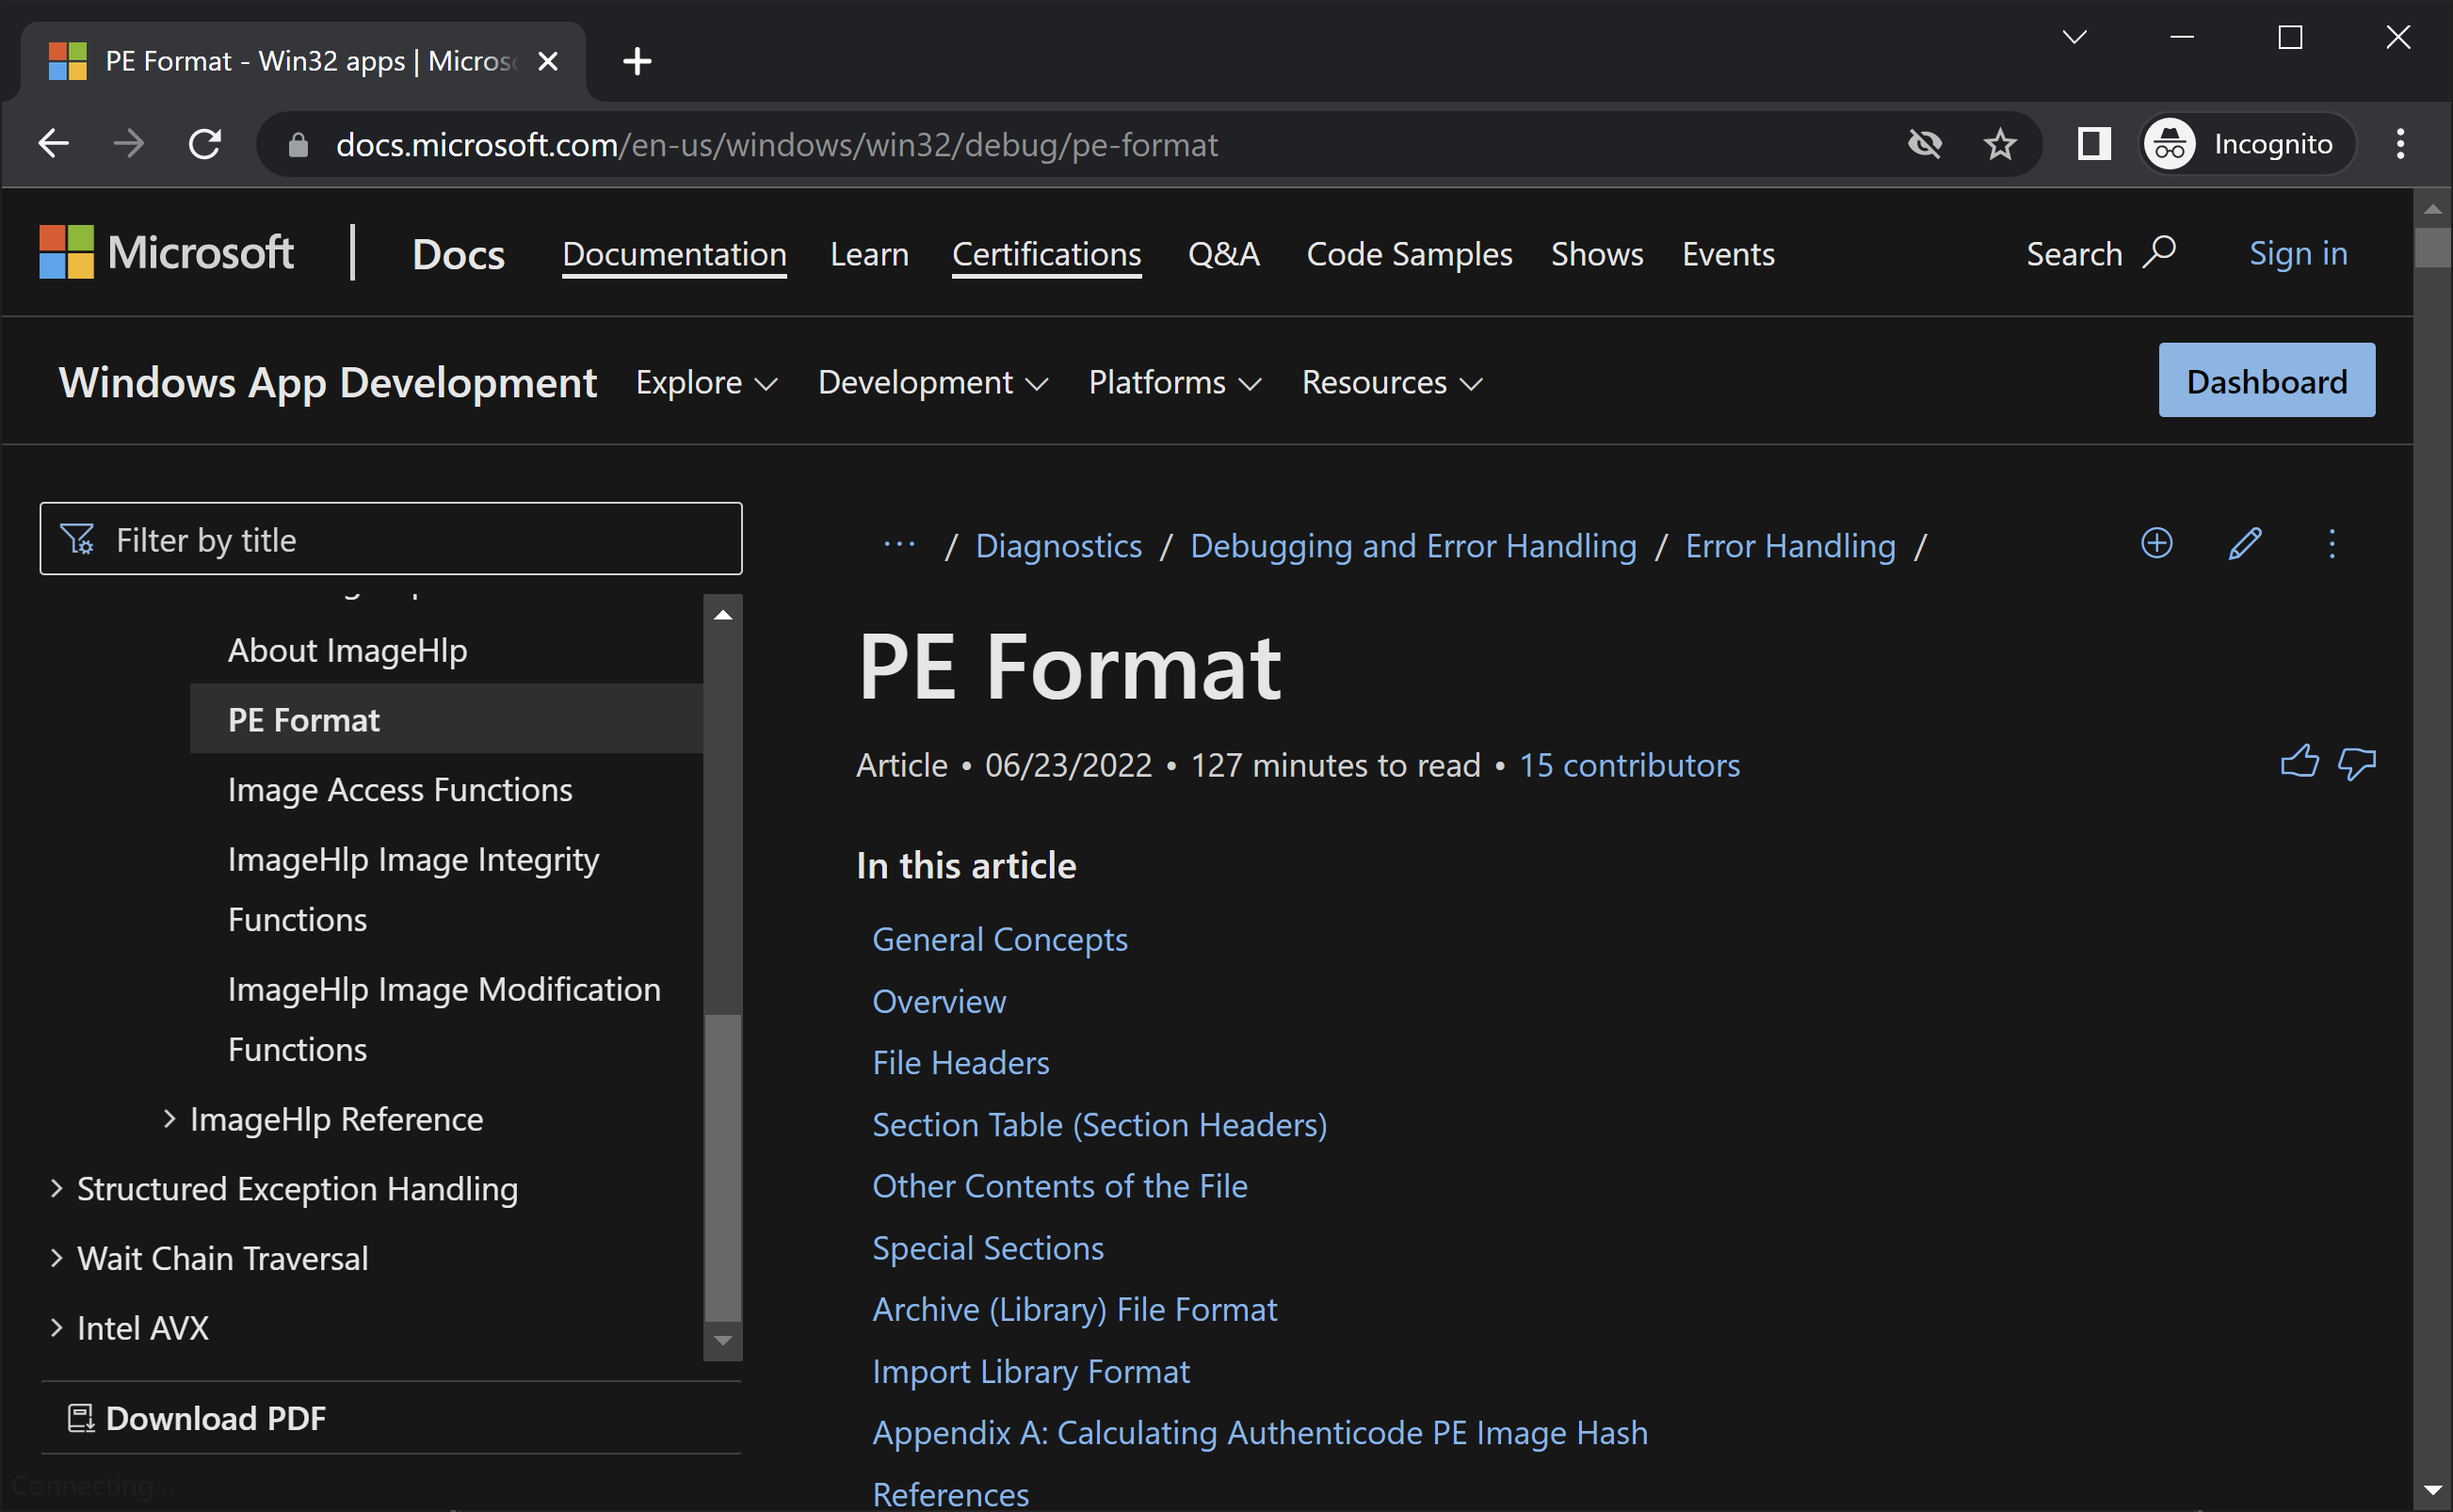
The request was redirected to the Windows PE Format docs page as expected. This page was selected since I am using the domain windows.pe, and most bots and crawlers will assume this page simply redirects to the PE Format information for a Windows binary file.
When using the specific User-Agent and endpoints described from the C2 profile, I will get the following response, which is expected since I haven't routed the traffic through the internal-redirector-1 instance yet.
Now that I know the HTTPS server configuration works good, I can start working on the redirectors.
HTTPS Redirector Setup
In order to tunnel HTTPS C2 traffic to the team server instance, I will have to ensure each step has a way of redirecting data to the next node. The following path will be used for the HTTPS C2 traffic.
edge-redirector-1 --> internal-redirector-1 --> team-server
Currently, the edge-redirector-1 instance is redirecting HTTPS traffic to the internal-redirector-1 instance already using the reverse_proxy directive within the Caddyfile configuration.
The internal-redirector-1 needs to tunnel the incoming HTTPS traffic on port 443, to the team-server instance also on port 443, and for this specific redirection I will be using socat. The following commands will be added to the internal-redirector-2 instance remote-exec provisioner to install socat and run a command to redirect traffic accordingly.
apt install socat -y
socat TCP4-LISTEN:443,fork TCP4:192.168.100.200:443
The above commands will start a listener on port 443, and redirect incoming HTTPS traffic to the team-server instance running on Nebula IP 192.168.100.200.
Now the C2 team-server will be able to listen on port 443 for HTTPS C2 traffic.
DNS Redirector Setup
In order to tunnel DNS C2 traffic to the team-server instance, I will have to ensure each step has a way of redirecting DNS data to the next node. The following path will be used for the DNS C2 traffic.
edge-redirector-2 --> internal-redirector-2 --> team-server
Because these three (3) instances will be dealing with DNS traffic, they will each need to have some commands added to their remote-exec provisioner to remove the systemd-resolved service and add some nameserver entries to the /etc/resolv.conf file.
The command to add are below.
systemctl disable systemd-resolved.service
systemctl stop systemd-resolved
rm -f /etc/resolv.conf
echo 'nameserver 8.8.8.8' >> /etc/resolv.conf
echo 'nameserver 8.8.4.4' >> /etc/resolv.conf
Once the above commands have been added to all three (3) instance, I can focus on adding a redirector on the edge-redirector-2 instance using iptables as seen below.
iptables -I INPUT -p udp -m udp --dport 53 -j ACCEPT
iptables -t nat -A PREROUTING -p udp --dport 53 -j DNAT --to-destination 192.168.100.120:53
iptables -t nat -A POSTROUTING -j MASQUERADE
iptables -I FORWARD -j ACCEPT
iptables -P FORWARD ACCEPT
sysctl net.ipv4.ip_forward=1
The above commands take incoming DNS traffic on UDP port 53 and redirect it to the internal-redirector-2 instance using Nebula IP 192.168.100.120 port 53.
Now traffic is coming from the edge-redirector-2 instance, and being redirected to the internal-redirector-2 instance via iptables, I need to redirect that incoming DNS traffic to the team-server instance, and again I use iptables as seen below.
iptables -I INPUT -p udp -m udp --dport 53 -j ACCEPT
iptables -t nat -A PREROUTING -p udp --dport 53 -j DNAT --to-destination 192.168.100.200:53
iptables -t nat -A POSTROUTING -j MASQUERADE
iptables -I FORWARD -j ACCEPT
iptables -P FORWARD ACCEPT
sysctl net.ipv4.ip_forward=1
This should complete the DNS tunnel from the edge-redirector-2 instance to the team-server instance through the internal-redirector-2 instance.
Firewall Setup
At this point, the last thing to do before moving on to setting up the C2 framework would be to setup some firewall rules for each virtual machine instance at the operating system level, so that there are no services exposed to the internet except the few I need to for operations to work correctly. I will be using ufw to setup some firewall rules on the server instances.
Lighthouse (192.168.100.1)
- Allow SSH
ufw allow ssh - Allow 4242/udp
ufw allow 4242/udp
Edge-Redirector-1 (HTTPS - 192.168.100.10)
- Allow SSH
ufw allow ssh - Allow HTTP
ufw allow 80 - Allow HTTPS
ufw allow 443 - Allow 4242/udp
ufw allow 4242/udp - Allow 192.168.100.110
ufw allow from 192.168.100.110
Internal-Redirector-1 (HTTPS - 192.168.100.110)
- Allow SSH
ufw allow ssh - Allow 4242/udp
ufw allow 4242/udp - Allow 192.168.100.10
ufw allow from 192.168.100.10 - Allow 192.168.100.200
ufw allow from 192.168.100.200
Edge-Redirector-2 (DNS - 192.168.100.20)
- Allow SSH
ufw allow ssh - Allow 53/udp
ufw allow 53/udp - Allow 4242/udp
ufw allow 4242/udp - Allow 192.168.100.120
ufw allow from 192.168.100.120
Internal-Redirector-2 (DNS - 192.168.100.120)
- Allow SSH
ufw allow ssh - Allow 4242/udp
ufw allow 4242/udp - Allow 192.168.100.20
ufw allow from 192.168.100.20 - Allow 192.168.100.200
ufw allow from 192.168.100.200
Team-Server (192.168.100.200)
- Allow SSH
ufw allow ssh - Allow 4242/udp
ufw allow 4242/udp - Allow 192.168.100.110
ufw allow from 192.168.100.110 - Allow 192.168.100.120
ufw allow from 192.168.100.120 - Allow 192.168.100.250
ufw allow from 192.168.100.250
After writing up all the rules above for each instance using ufw, the final version of the lighthouse.tf, edge-redirectors.tf and internal-redirectors.tf templates will be complete and shown below. The team-server.tf template will be completed in the next section about C2 framework setup.
lighthouse.tf
edge-redirectors.tf
internal-redirectors.tf
With the firewall rules setup, and the above templates completed, I can now finally focus on the team-server instance.
C2 Setup
First thing I will do is add the cobaltstrike.zip to the src/templates/files directory, since it will need to be moved to the team-server instance.
Now I will need to create a Java KeyStore using the SSL key and crt files that were generated by Caddy during the HTTP/S server provisioning. The files are stored in a specific location on the edge-redirector-1 instance, so I will need to add some commands to the remote-exec provisioner in order to scp those files to the team-server instance so they can be used for the Java KeyStore setup.
I will also need to setup two new file provisioners to move cobaltstrike.zip and the webbug_getonly.profile files from the operator host machine, to the /tmp directory on the team-server instance. But first I will need to install Java on the team-server instance first.
apt install openjdk-17-jre -yIn order to log into the edge-redirector-1 instance to scp the SSL keys, I will need to use the tls_private_key resource created in the security.tf file in an earlier development step.
echo '${tls_private_key.temp_key.private_key_pem}' > /root/temp_key
Using the key stored in /root/temp_key I can scp the files after changing the security permissions on the key file using chmod.
chmod 600 /root/temp_key
scp -oStrictHostKeyChecking=no -i /root/temp_key root@${linode_instance.edge-redirector-1.ip_address}:/root/.local/share/caddy/certificates/acme-staging-v02.api.letsencrypt.org-directory/${var.cloudflare_domain}/* .
NOTE: The directory located at /root/.local/share/caddy/certificates/acme-staging-v02.api.letsencrypt.org-directory/ may change when you switch to the production level SSL certificates, but for testing purposes this directory will be fine.
Once the keys are moved to the team-server instance, I will need to combine the separate public and private files into a single PKCS12 file using openssl as seen below.
openssl pkcs12 -inkey ${var.cloudflare_domain}.key -in ${var.cloudflare_domain}.crt -export -out acme.pkcs12 -passout pass:123456Once the acme.pkcs12 file is generated, the PKCS12 file can then be converted to a Java KeyStore using the keytool tool as seen below.
keytool -noprompt -importkeystore -srckeystore acme.pkcs12 -srcstoretype pkcs12 -destkeystore acme.store -deststorepass 123456 -destkeypass 123456 -srcstorepass 123456The above command will generate the acme.store file that will be used as part of the C2 profile, so I will move it to the /opt/cobaltstrike4.4/ directory. The last command to run will be to start the teamserver using the acme.store and the webbug_getonly.profile.
cd /opt/cobaltstrike4.4/ && ./teamserver 192.168.100.200 password! webbug_getonly.profileNOTE: Any of the passwords used in this build are of course easy to swap out or completely automate by adding 2 more random_string directives within the security.tf template, but for the demonstration they are fine being default.
Here is the team-server.tf template after the above modifications are done.
team-server.tf
So let me fire this build up one more time to verify everything is working as it should.
terraform apply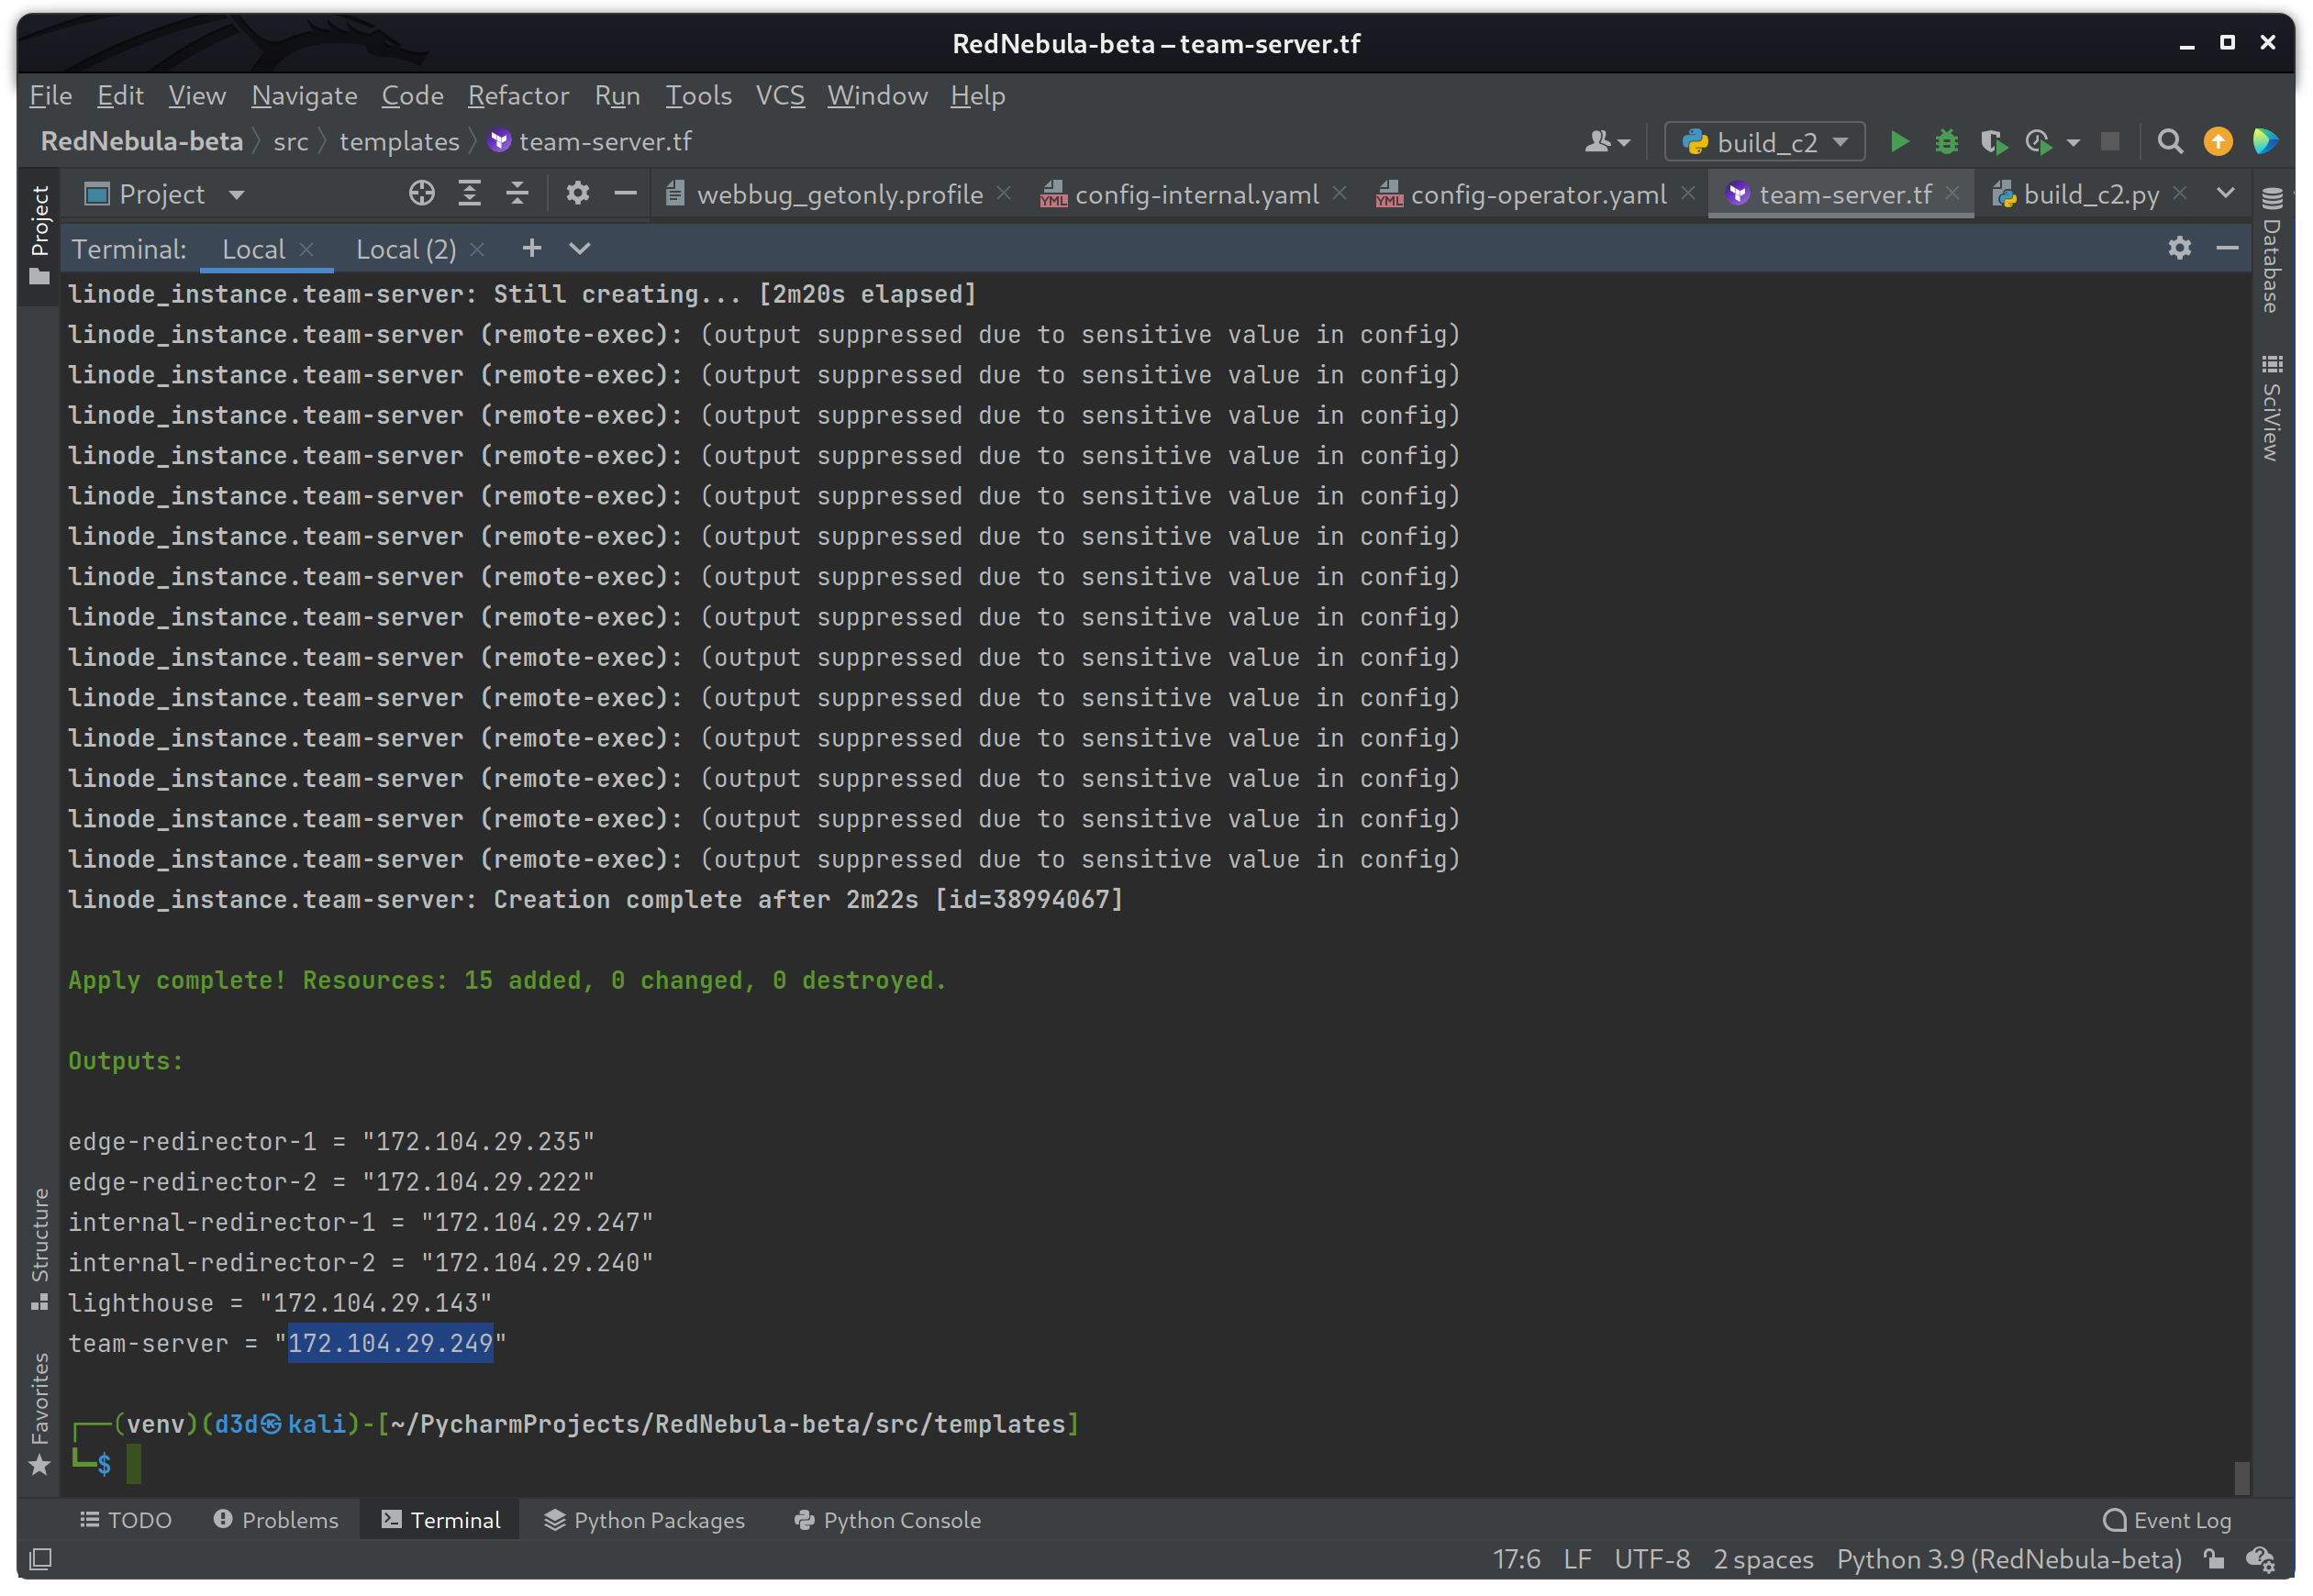
Now I will log into the team-server instance at IP 172.104.29.249 as seen above, and check to make sure the teamserver process is running and listening on port 50050 as expected.
ssh -i keys/red_nebula_rsa root@172.104.29.249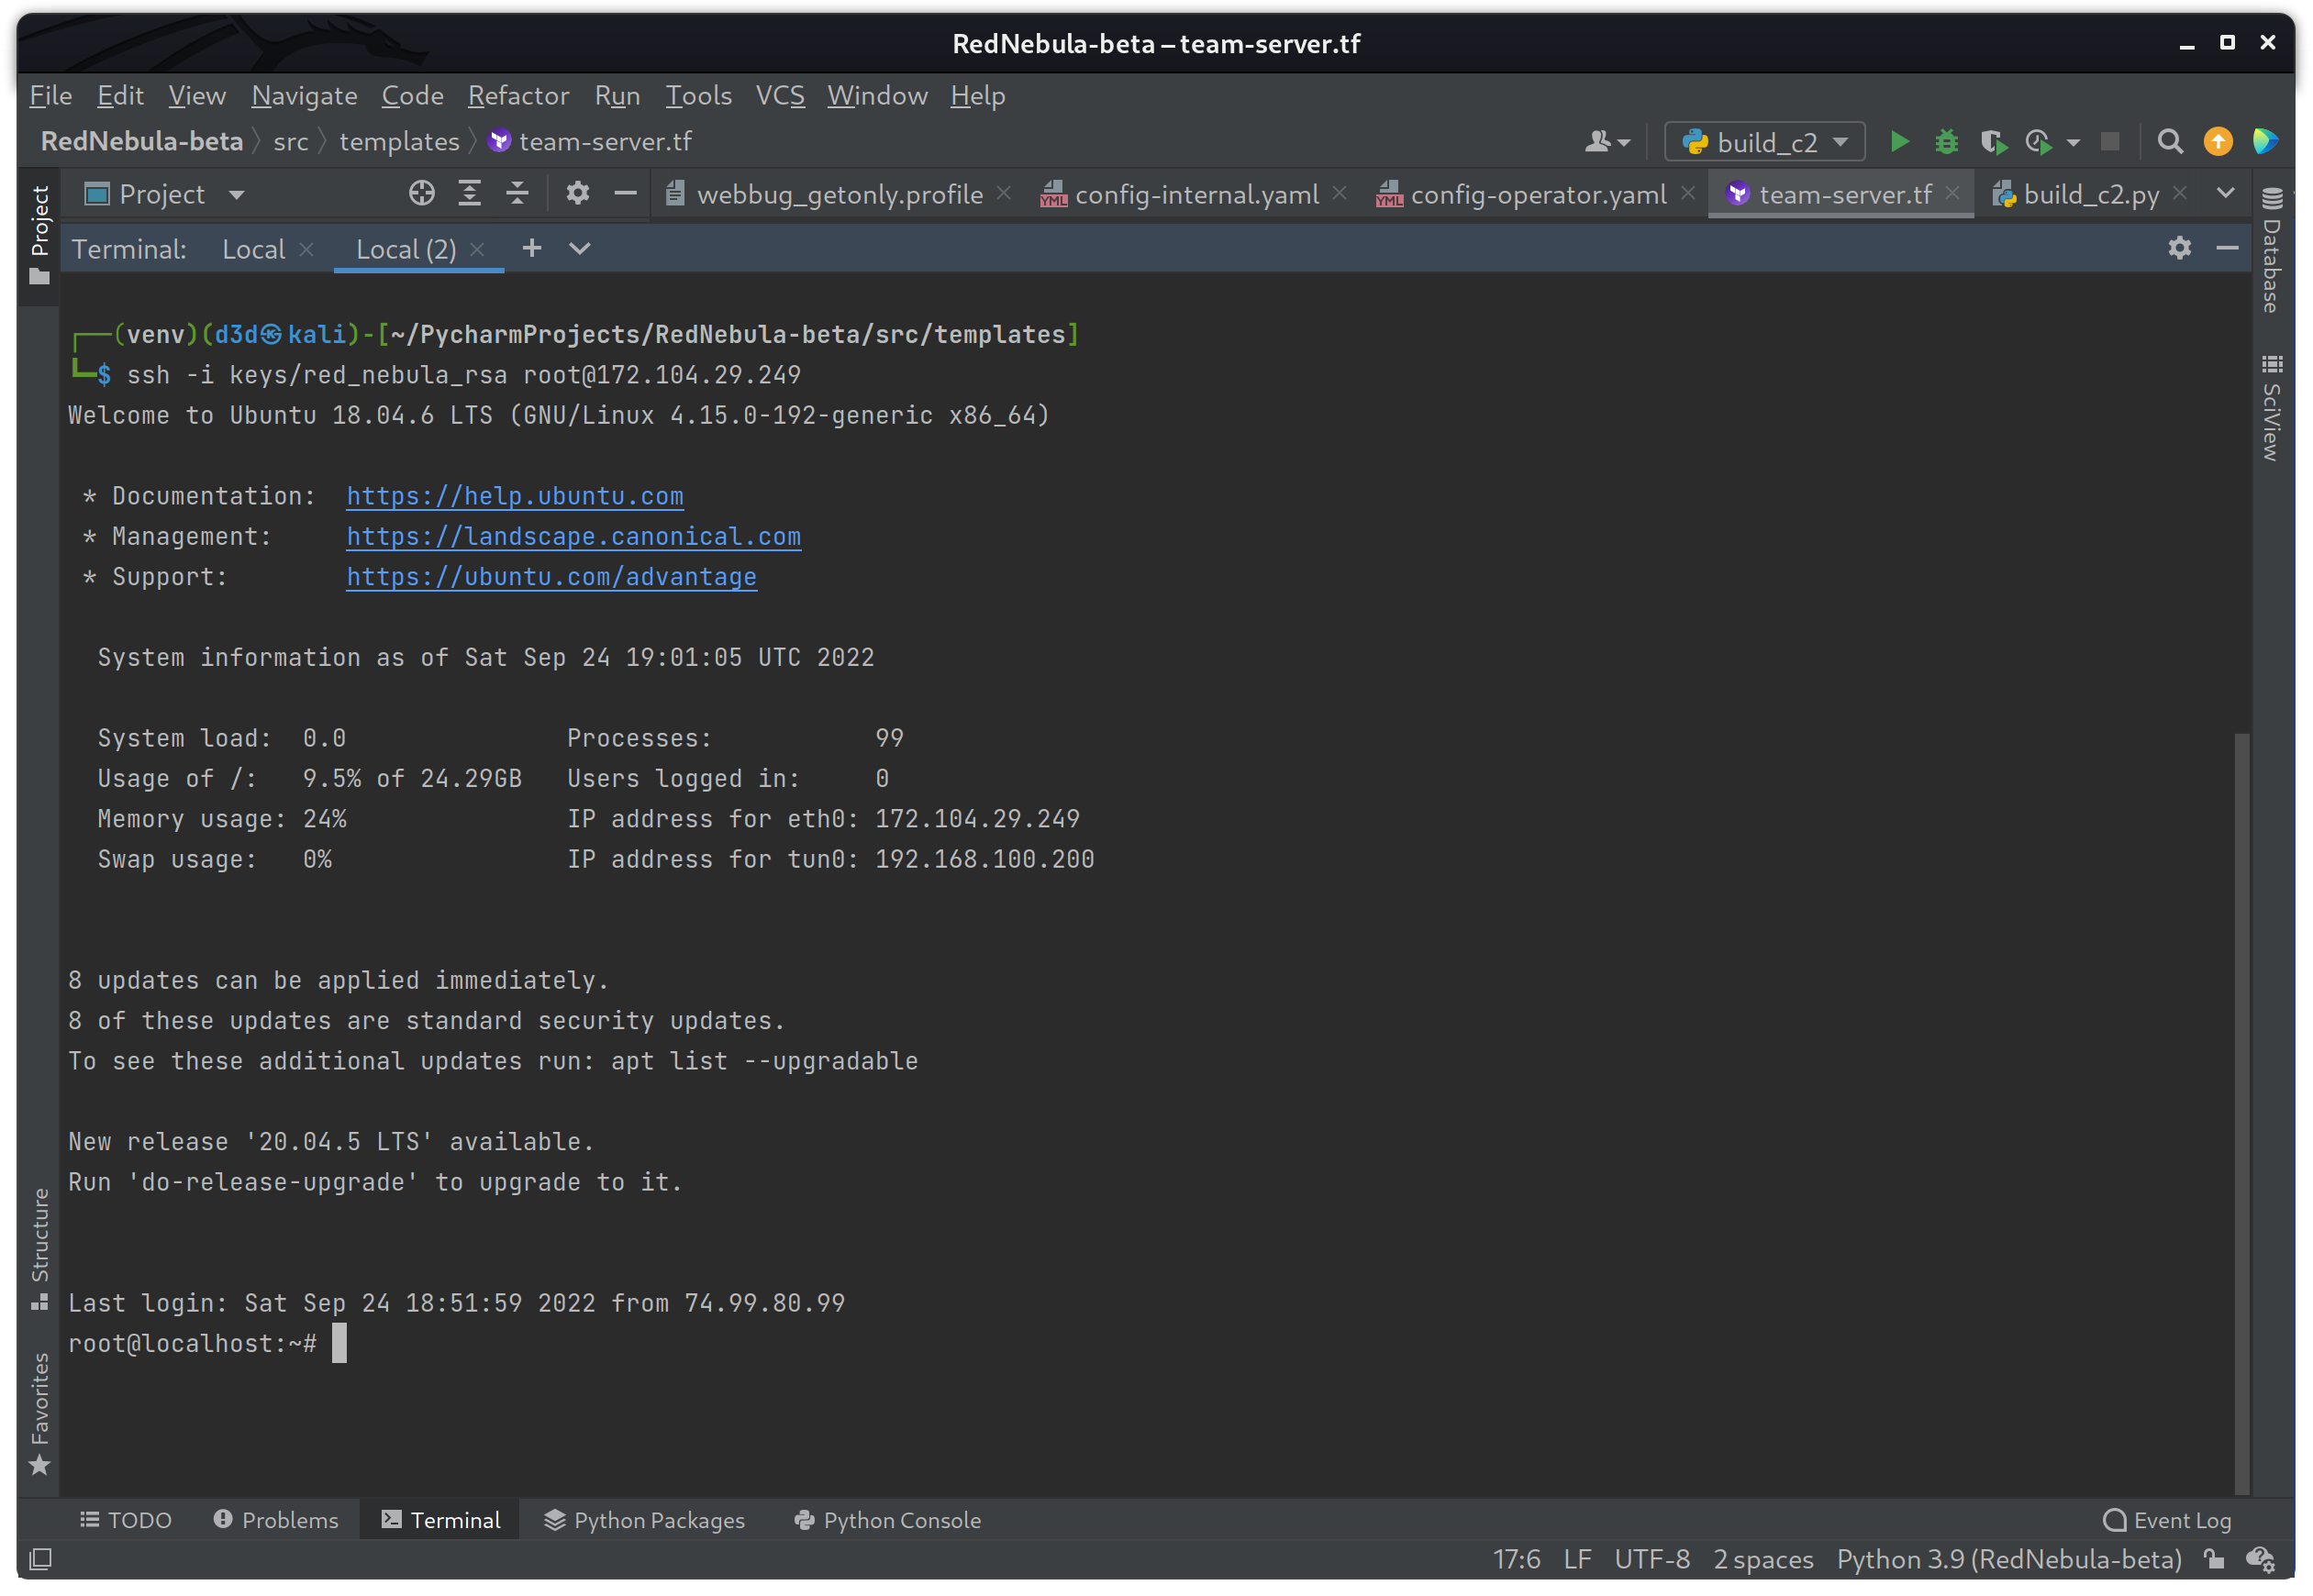
And then to check if the teamserver is running on port 50050 by using the following command.
ss -tupln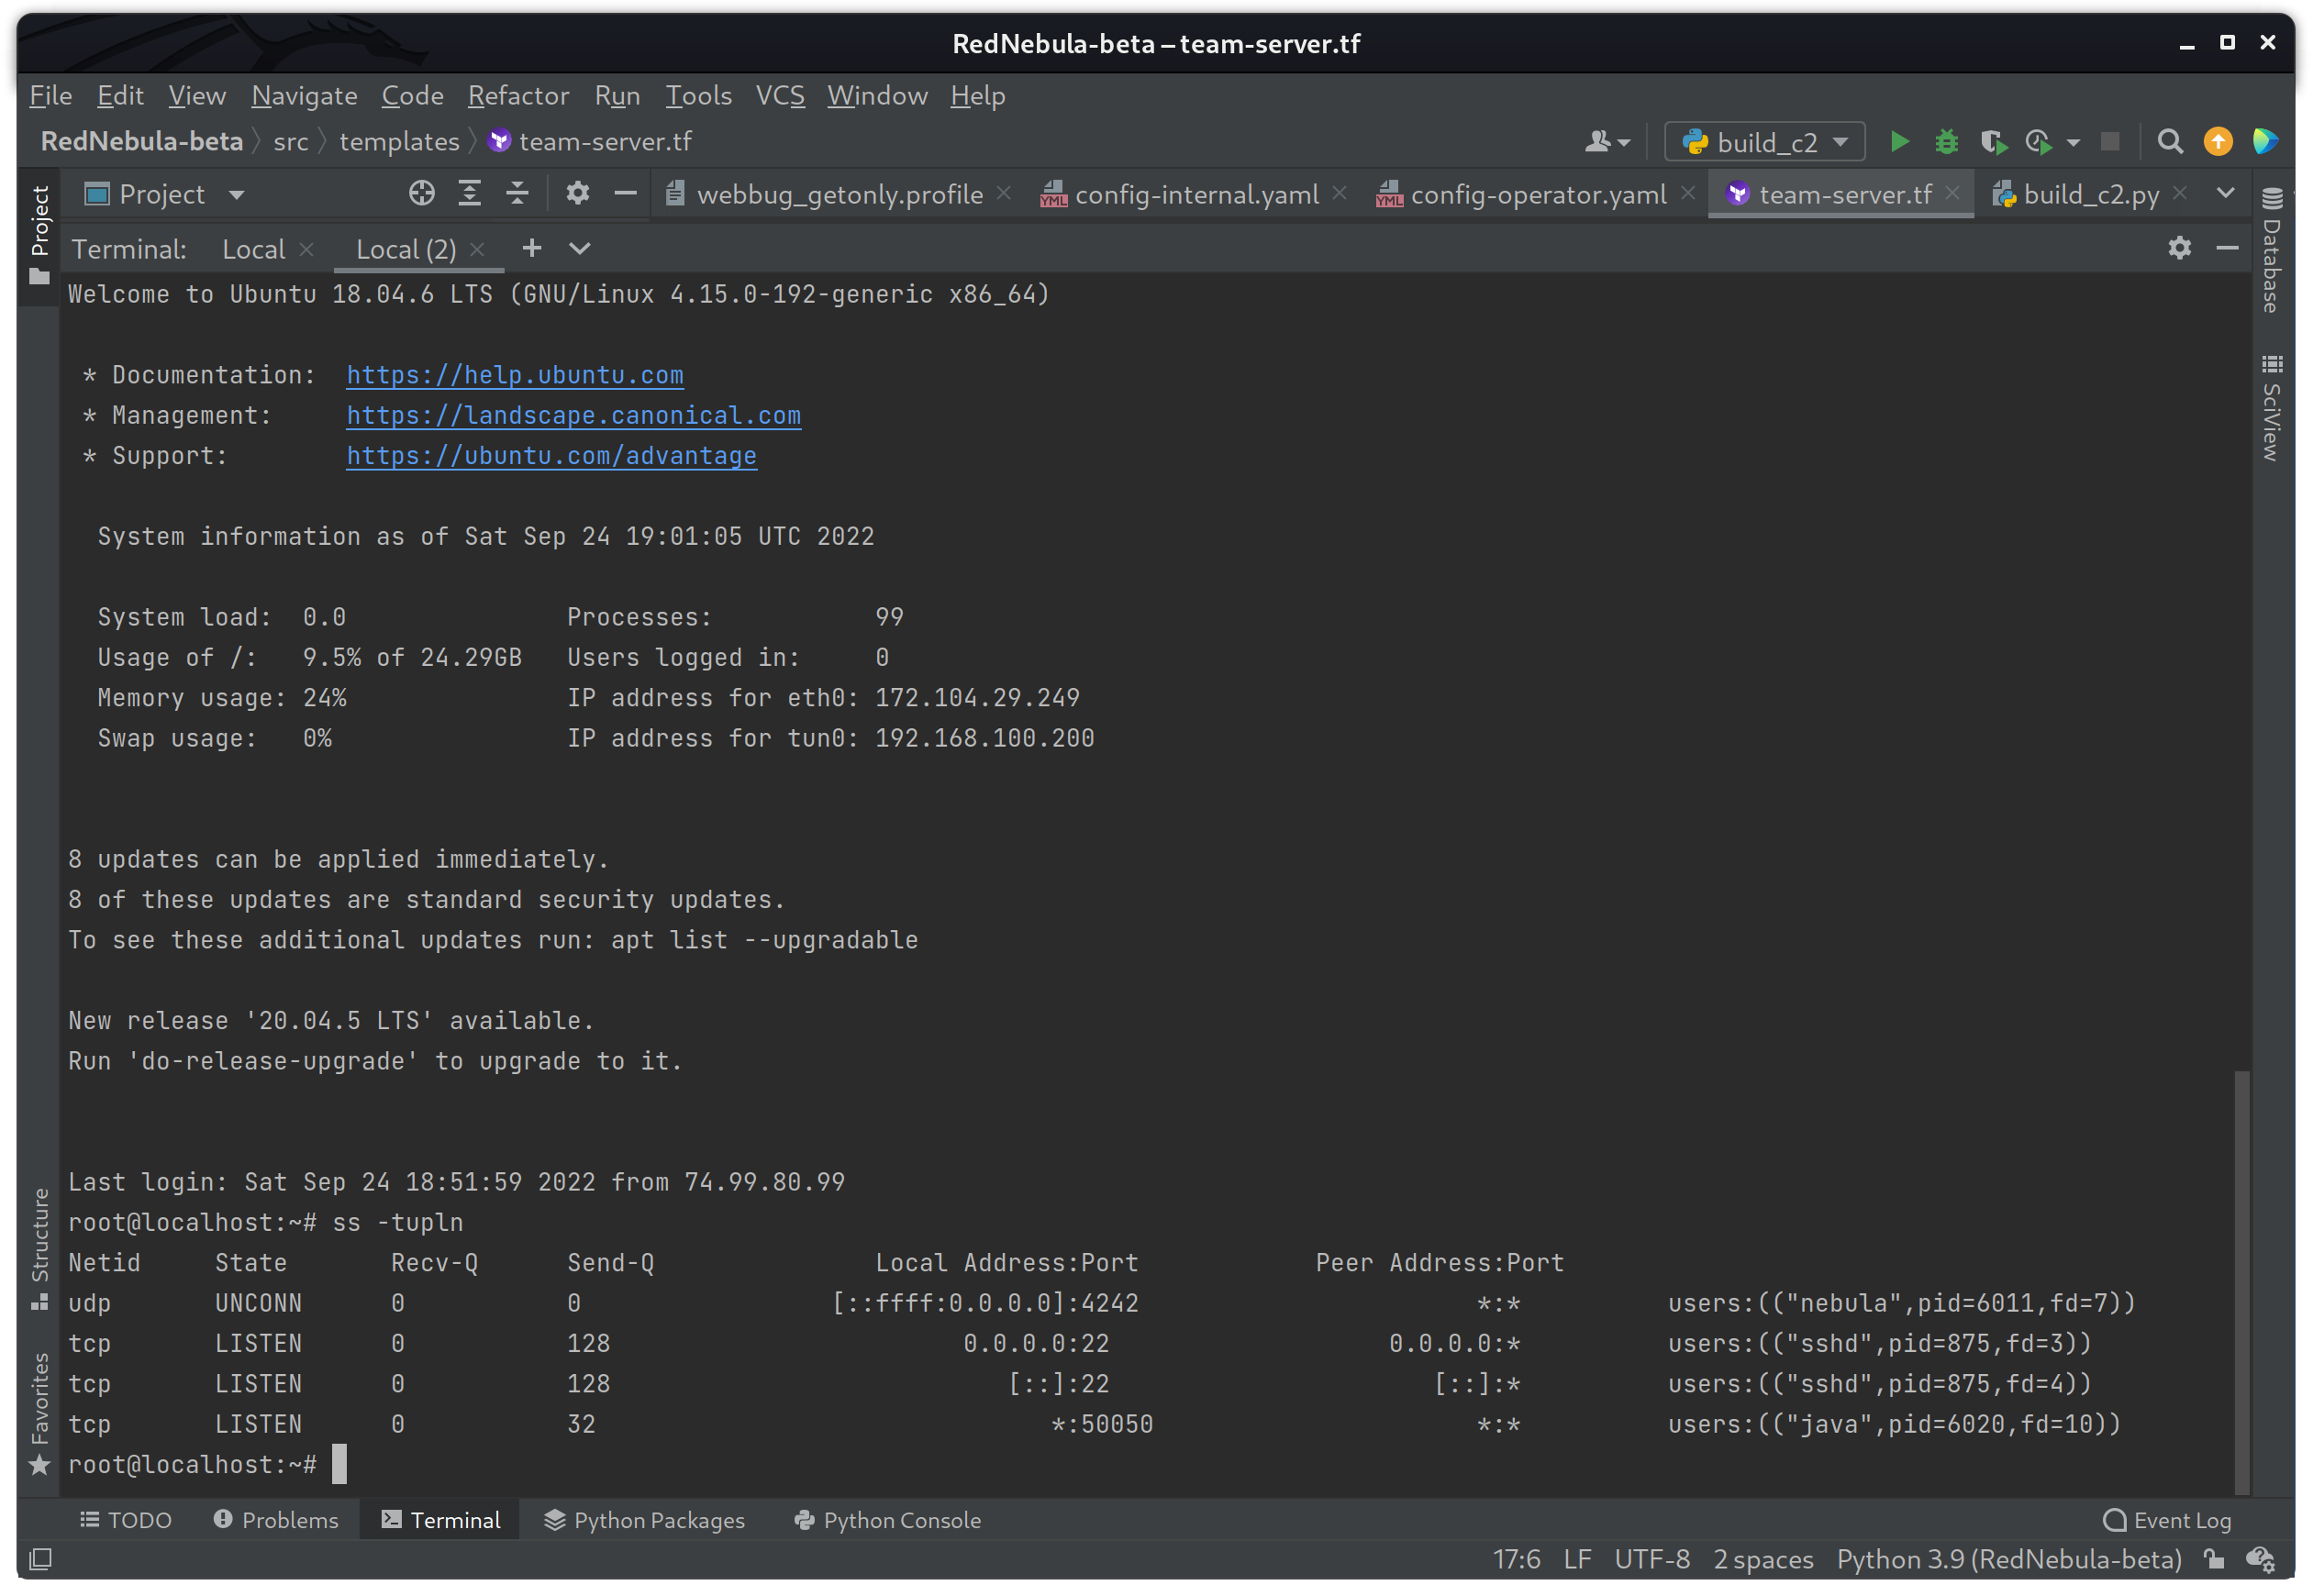
Success! The teamserver is running which shows as java on port 50050. This means that the SSL certificate was copied correctly, the new KeyStore was built, and the C2 profile is fully loaded and ready to go!
I am almost done with the C2 automation build, and just have to finish up by connecting an operator and testing both the HTTPS and DNS beacons.
Operator Setup
With the C2 infrastructure up and ready to go, the operator will simply need to add the "Lighthouse" IP address to the config-operator.yaml configuration file within the /tmp/nebula directory. I did not automate this process since the operators may not being use the same machine that was used to build the infrastructure, however any operator only needs the config-operator.yaml file, and the 3 keys associated with the operator, also located in the /tmp/nebula directory.
sed -i 's/LIGHTHOUSE_IP_ADDRESS/172.104.29.143/g' config-operator.yamlOnce the IP is set, the following commands will connect to the Nebula network.
sudo ./nebula -config config-operator.yaml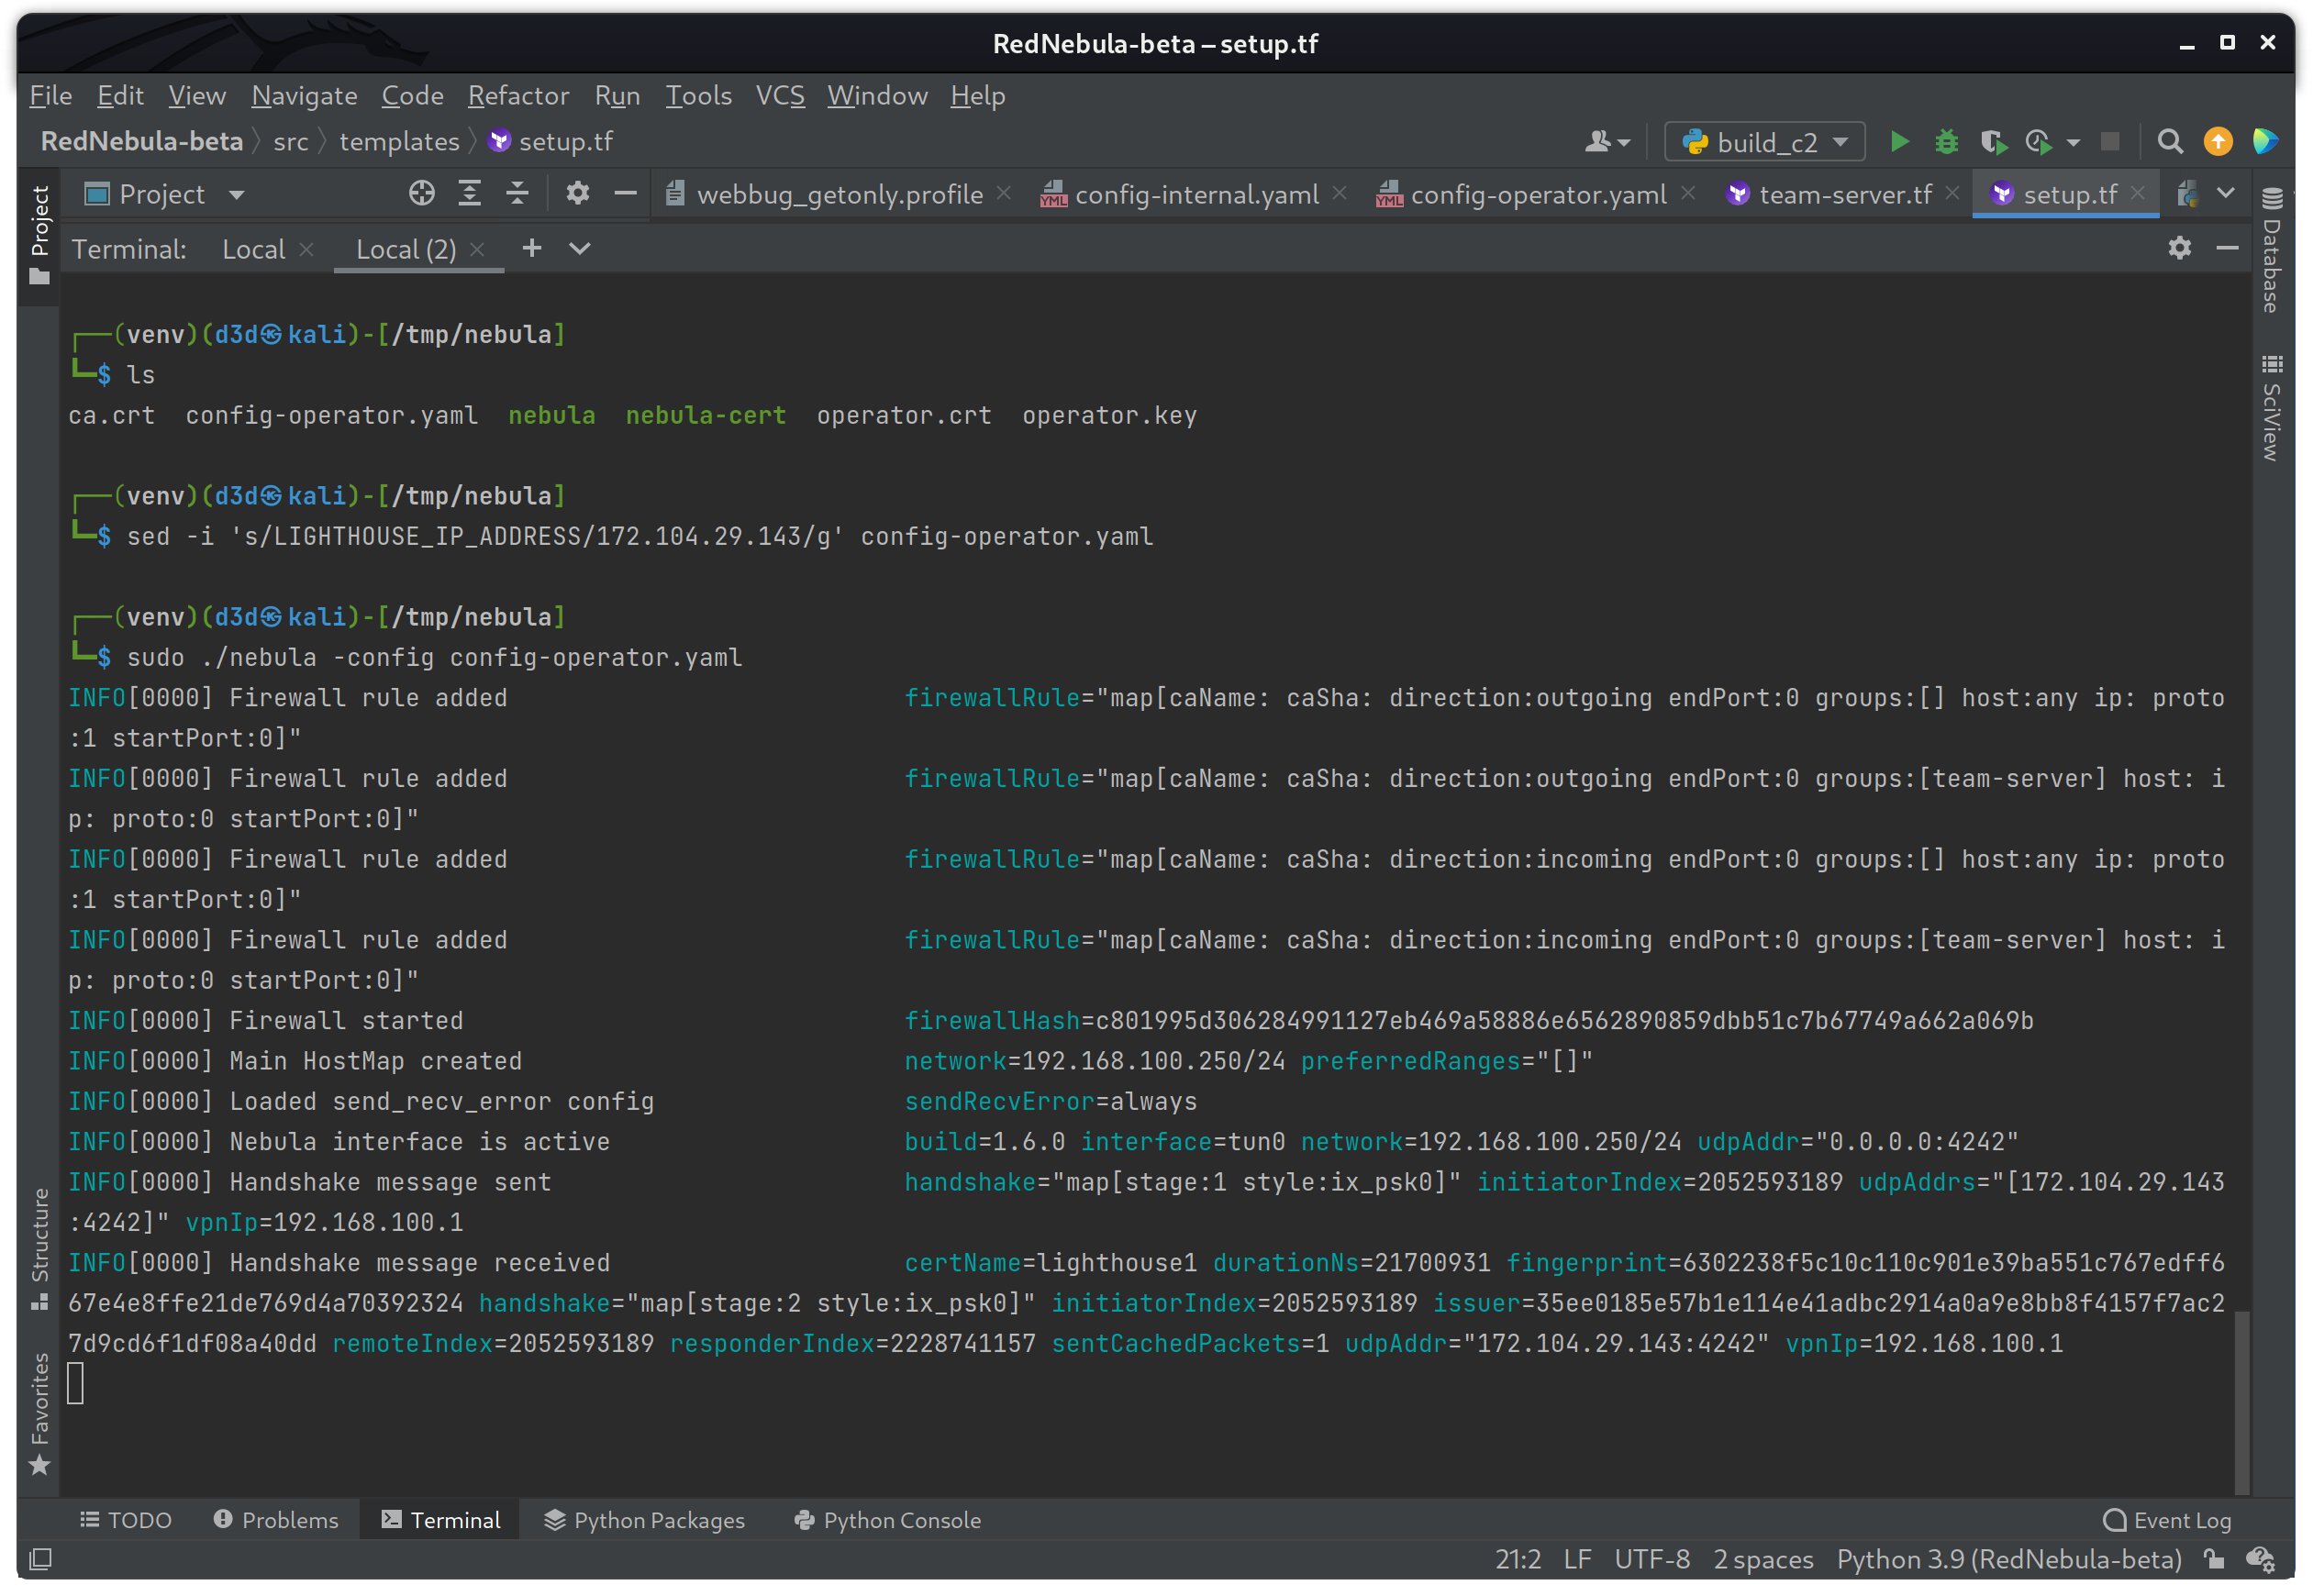
The connection is good, and the operator now has access to the team-server instance on port 50050.
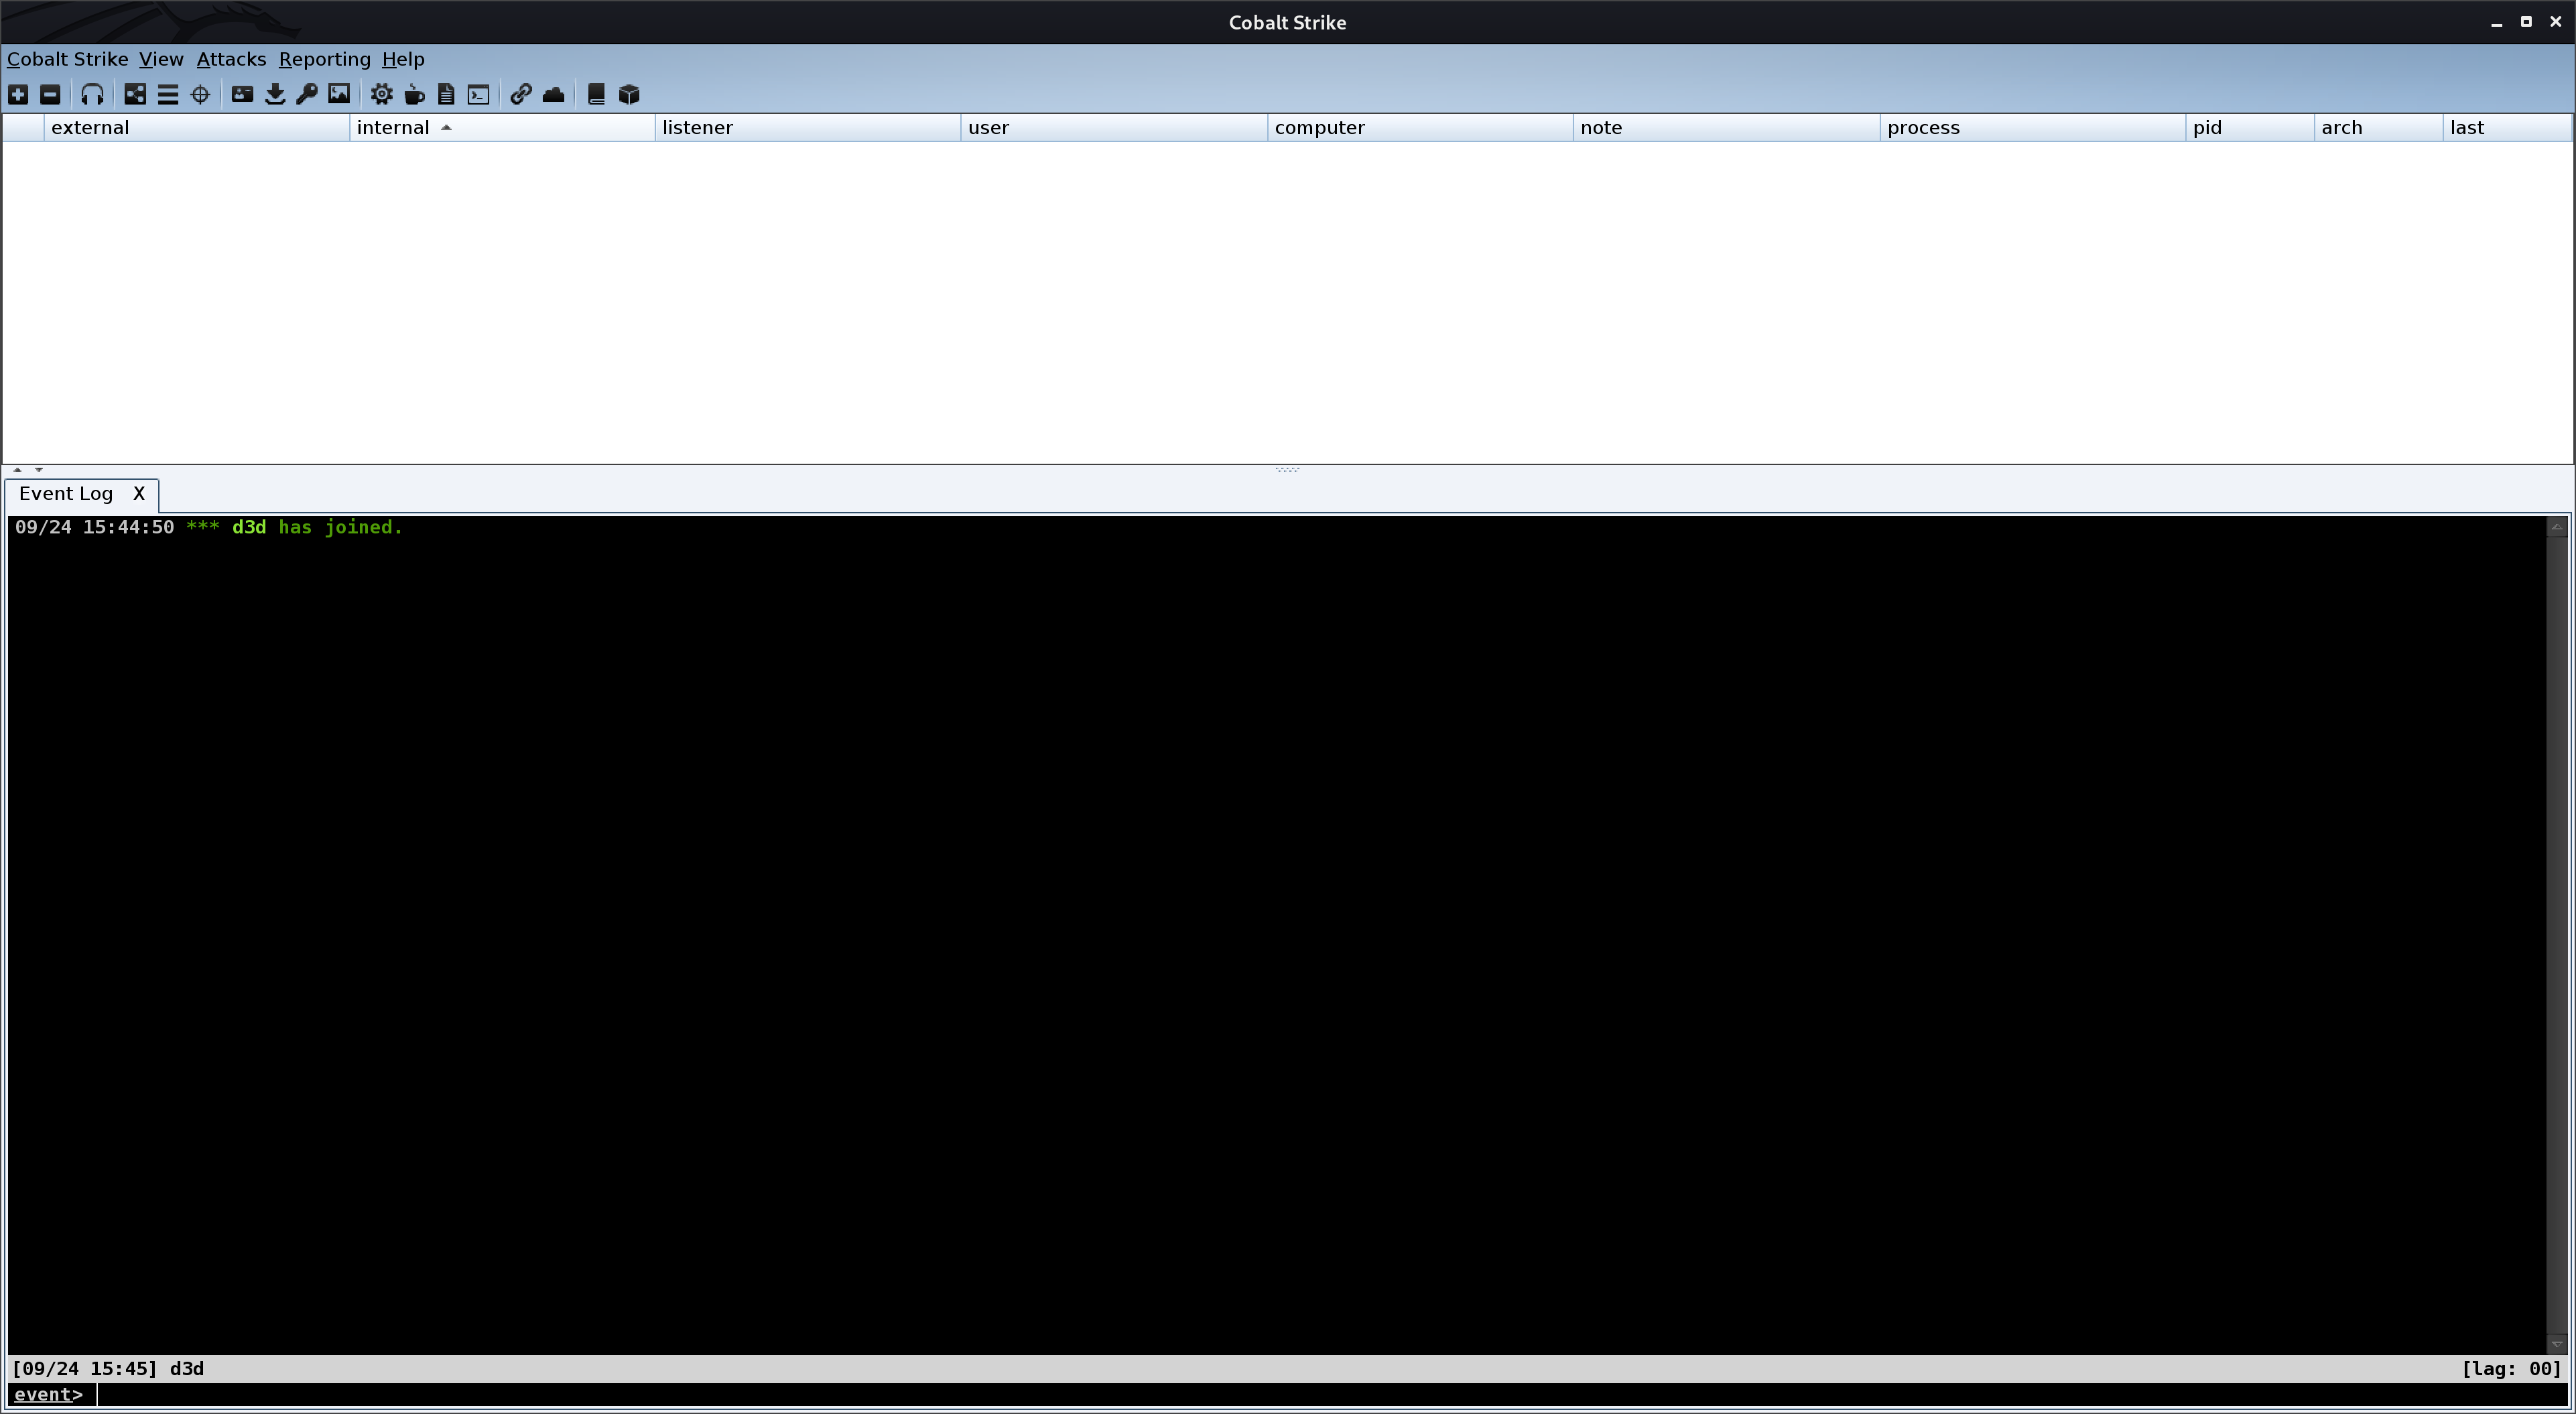
Next I will start up Cobalt Strike on the operator machine in order to connect to the team-server instance.
/opt/c2/cobaltstrike/start.sh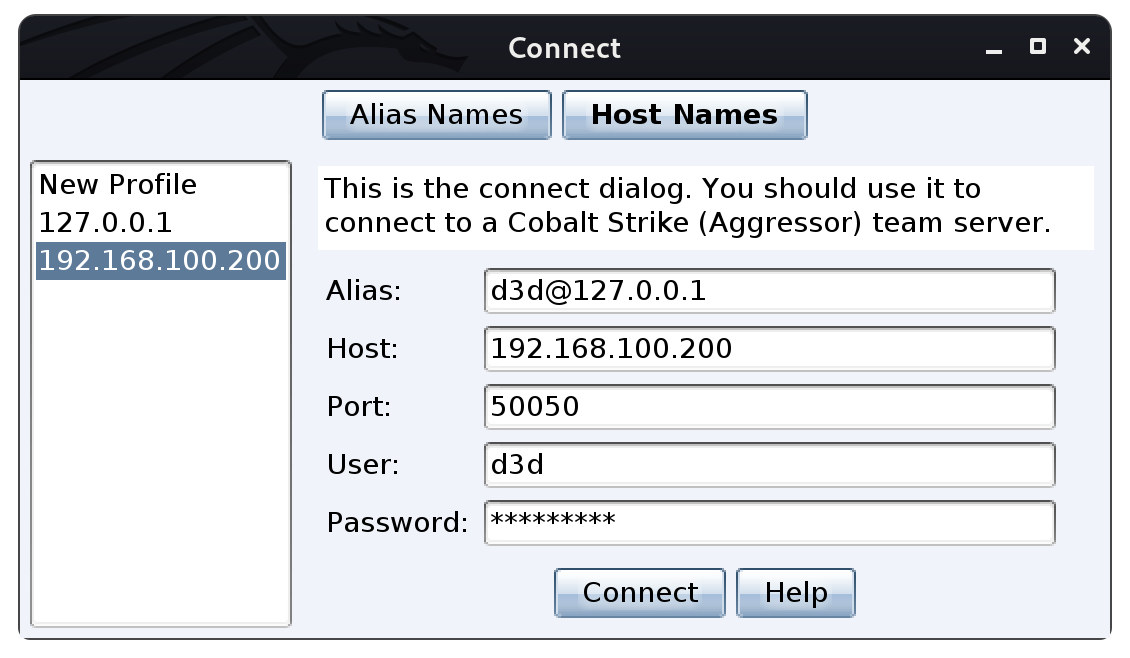
Here I will be setting up some connection input values to establish a connection to the "Team-Server."
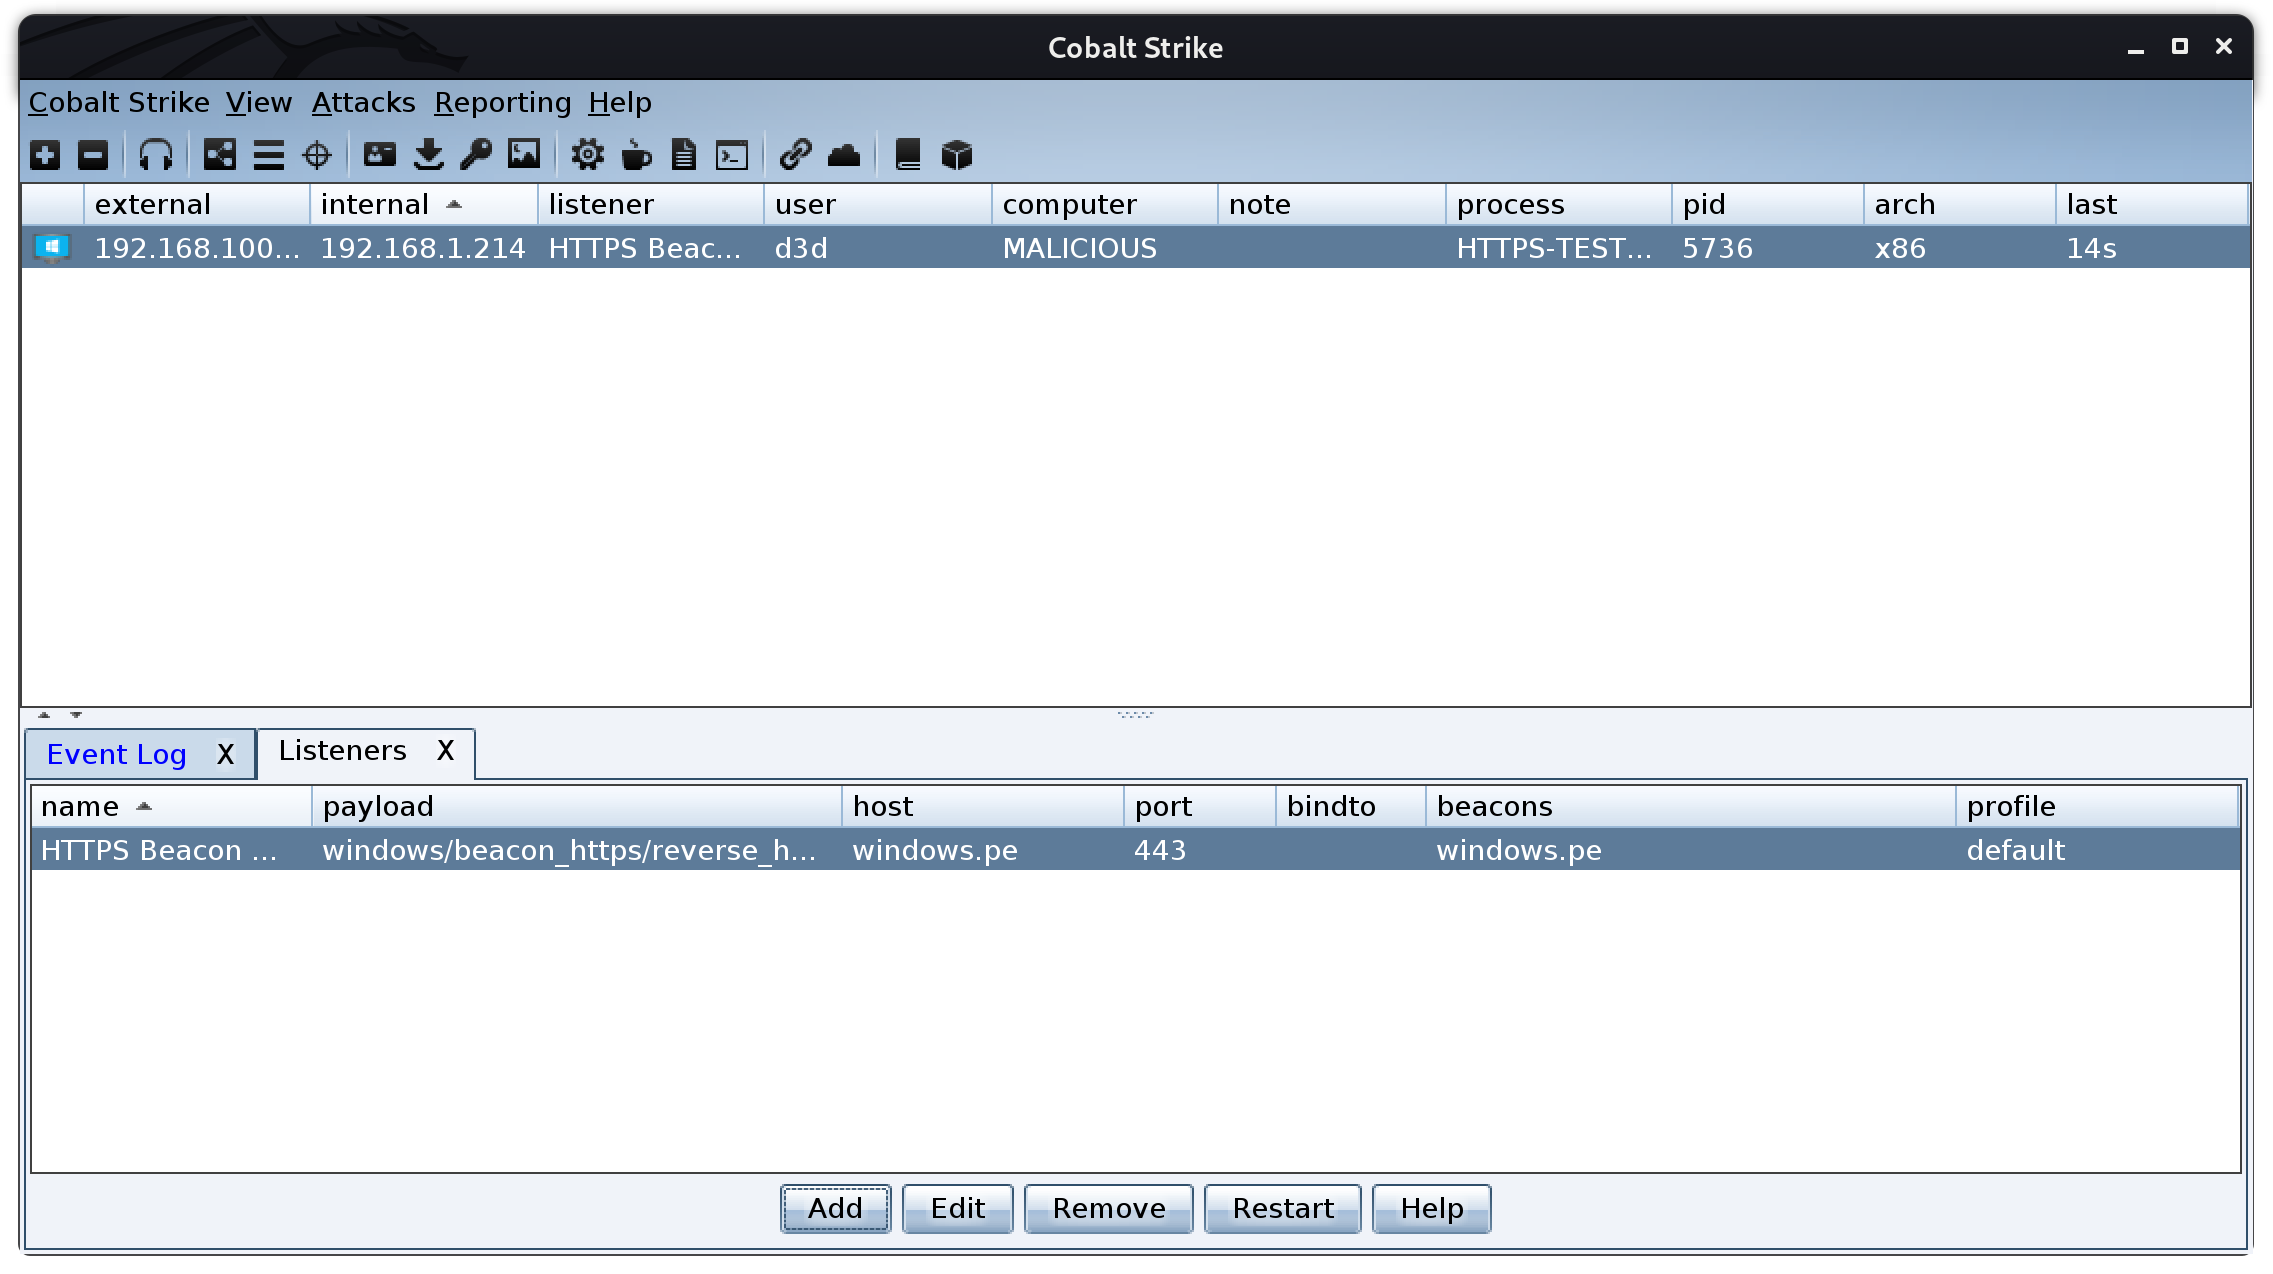
Once connected I am going to setup 2 listeners, one for the HTTPS traffic, and one for the DNS. For the HTTPS listener, I will be using the host windows.pe since that is where the entry point to the team server. The options I am using can be seen below.
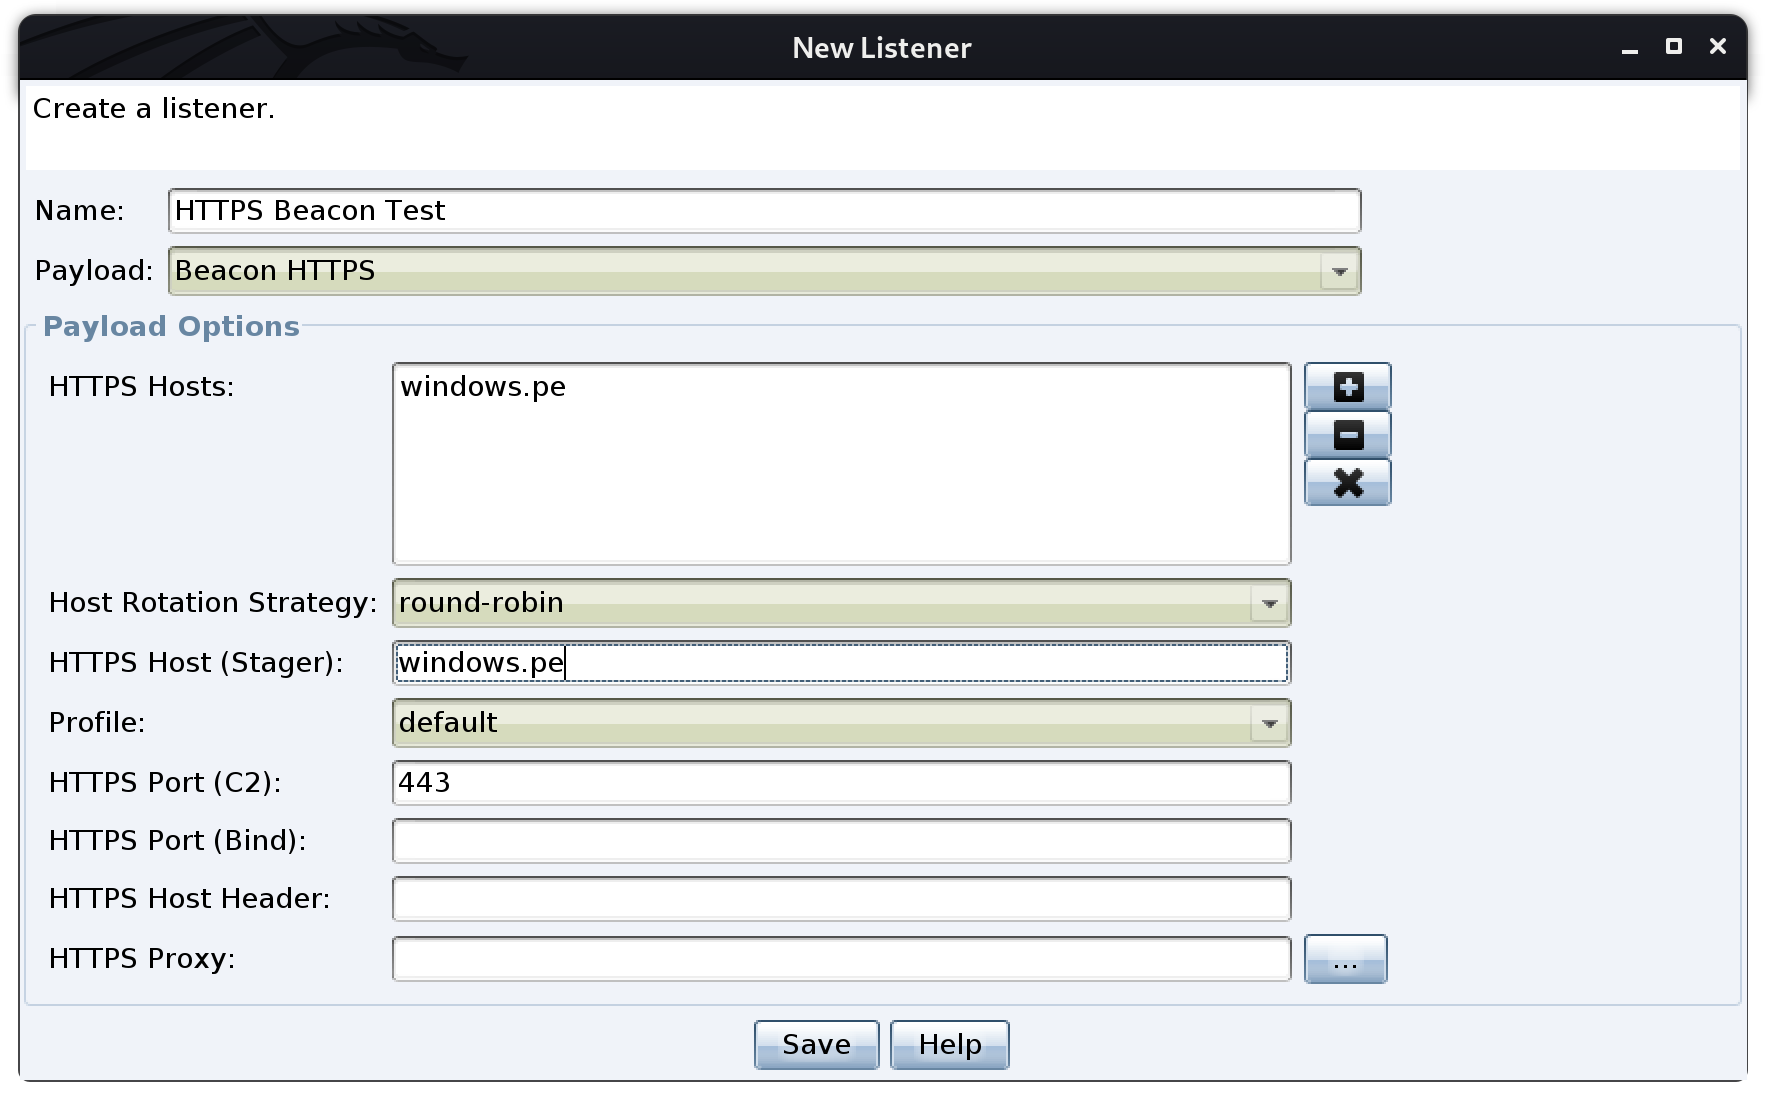
Once the settings are set to the C2 HTTPS edge domain, 'Save' the listener and make sure there are no errors. Next I am going to generate a Windows Executable to test the beacon, using the HTTPS listener I just created.
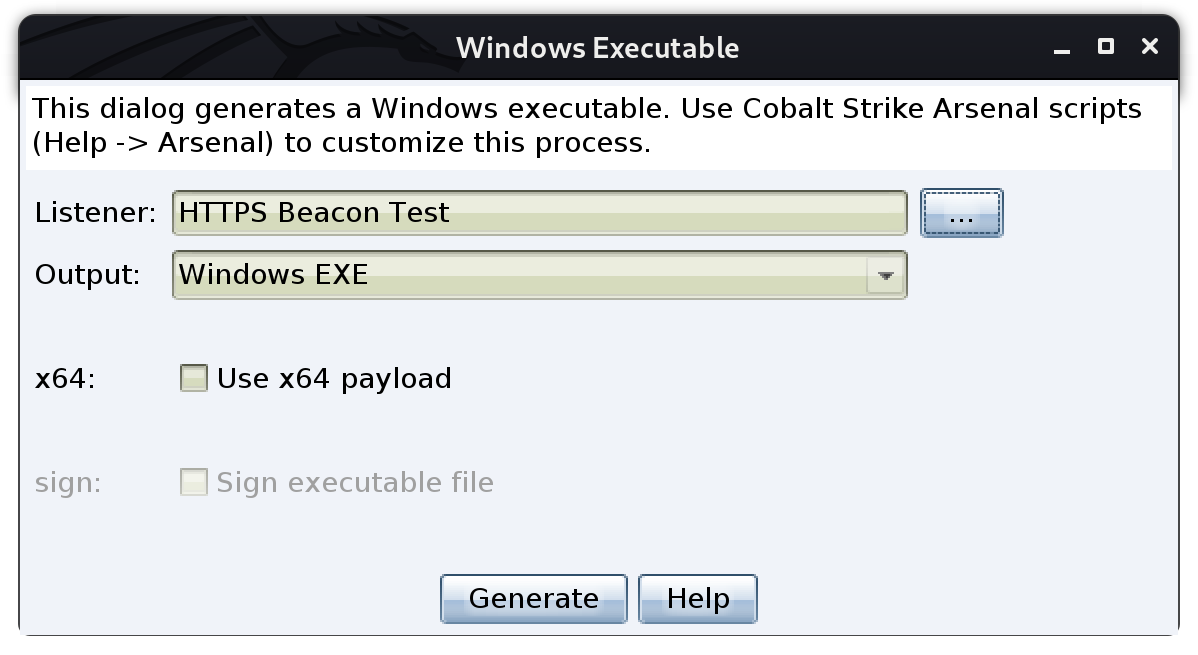
And once the Windows Executable was generate, I am going to move it to a vulnerable machine so I can test the beacon.
Boom, almost instantly the newly created beacon popped up without issue! This shows the HTTPS beacon is routing through all the rules and tunnels I created earlier and making it to the team server without issue.
Now it is time to create the DNS listener, in which the options are a little different since I will be using the DNS server and subdomains to route the UDP traffic straight to the team server.
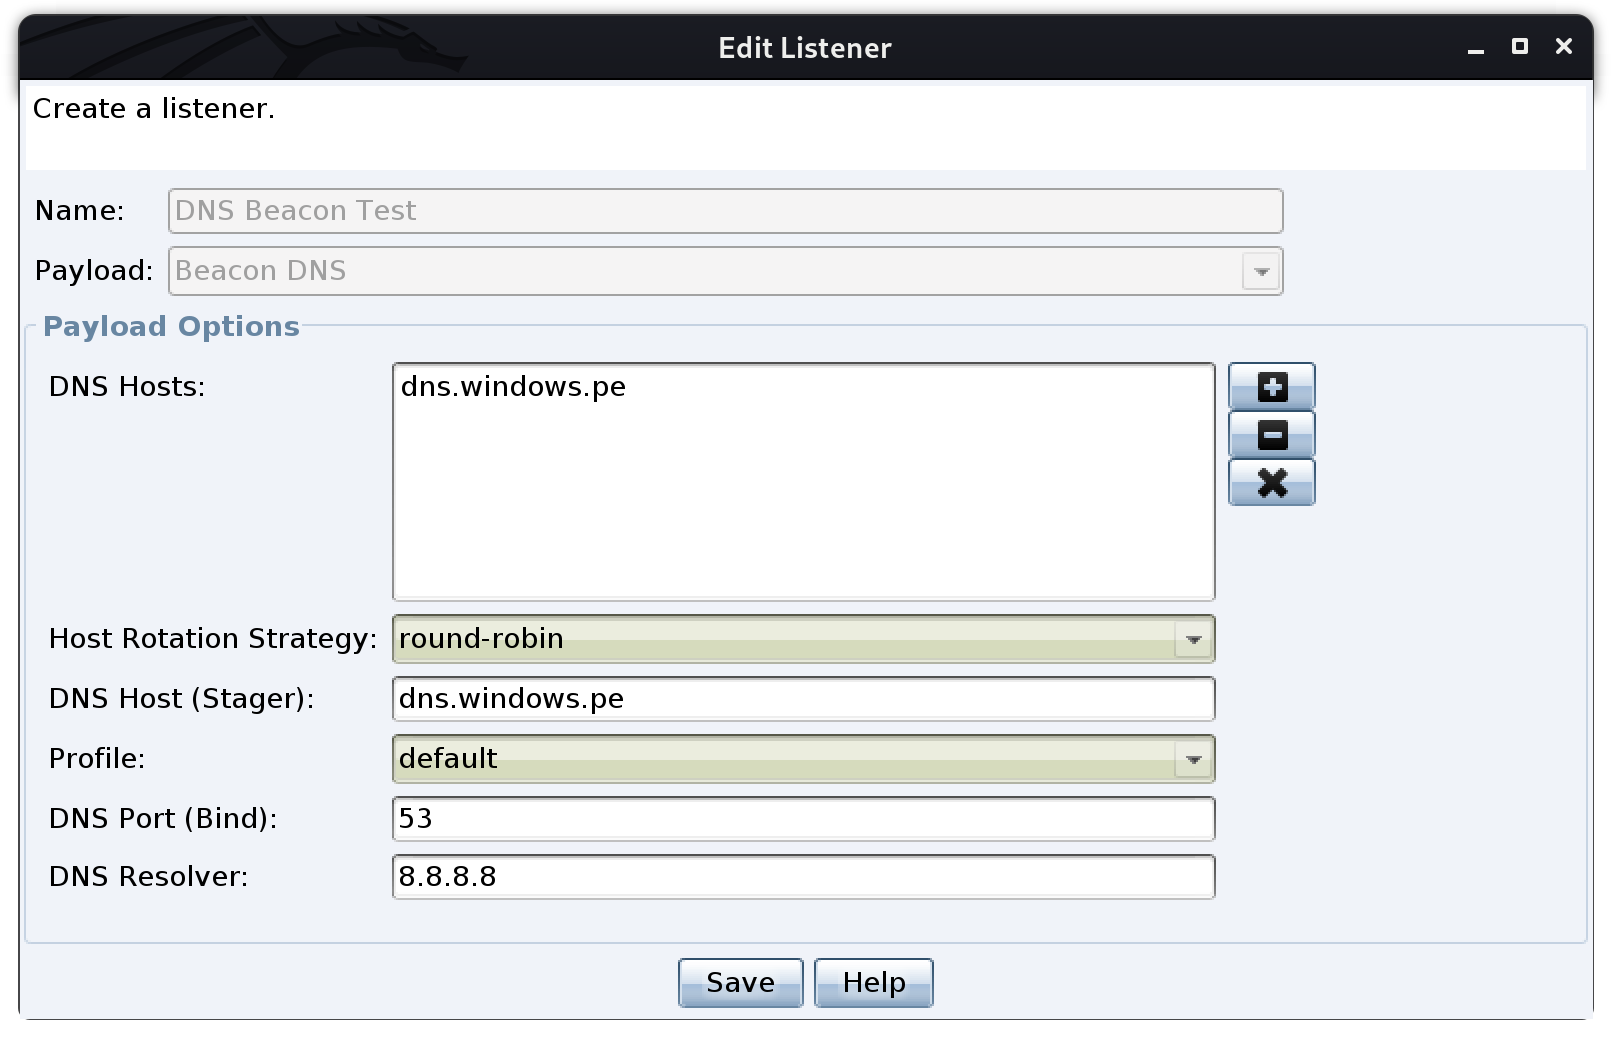
Same routine as last time, 'Save' the listener, then generate a Windows Executable to test on a vulnerable machine, and check the results within a few minutes.
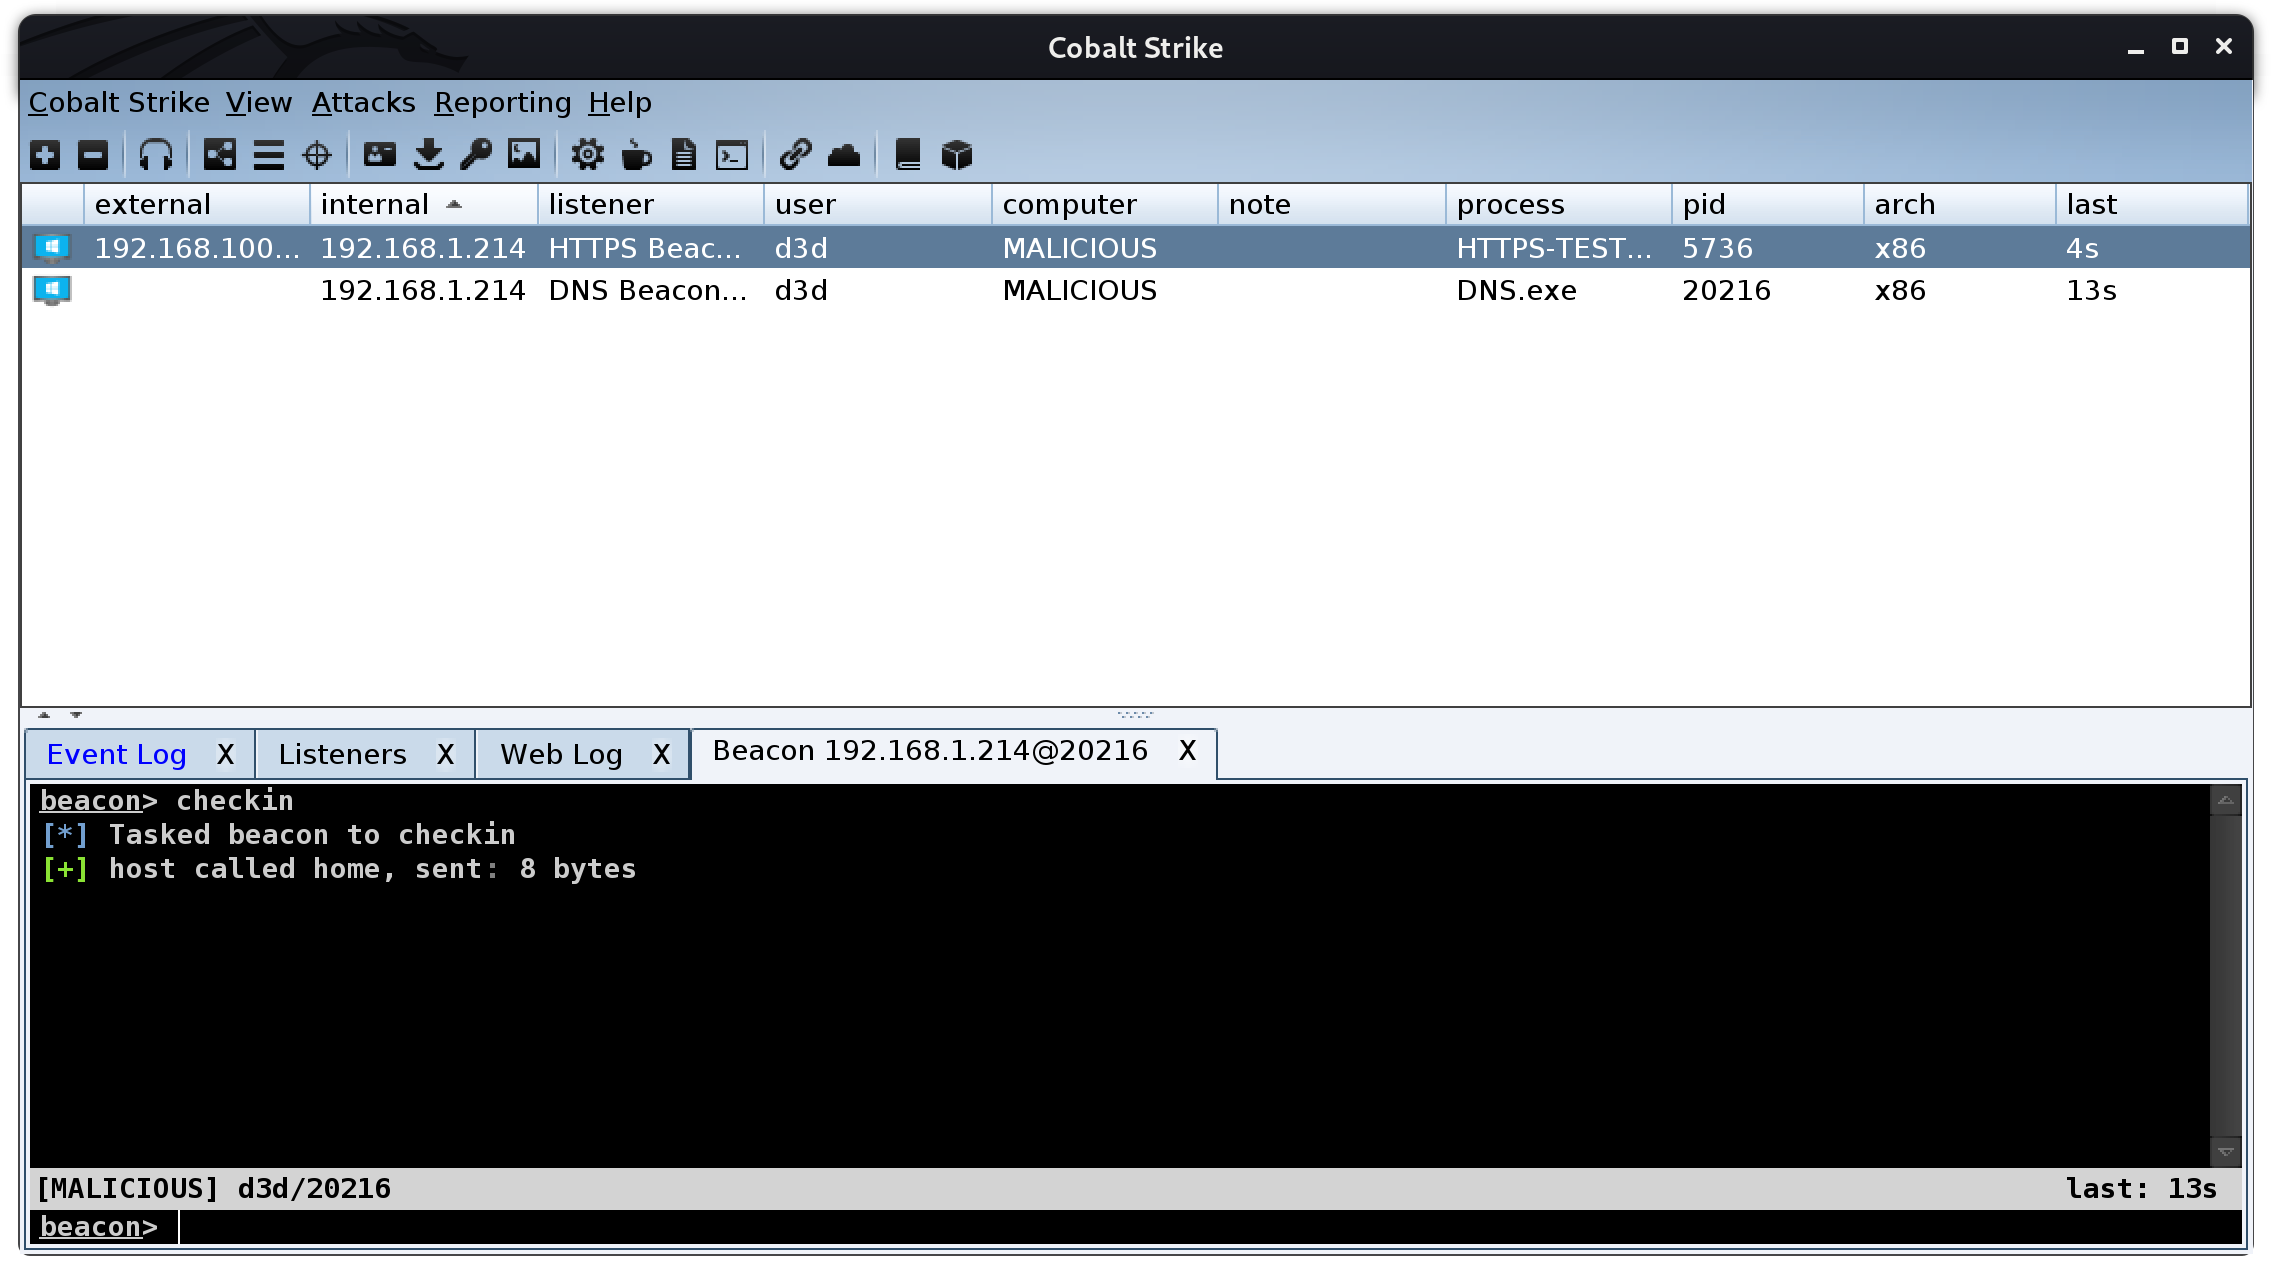
Success! Both beacons are working without error. The automated build literally dumps an active Cobalt Strike team server in the operators lab, and it only takes about five (5) minutes to build.
Wrapping up with Python
With the automation complete, I will be wrapping the Terraform builder and logic into a neat little Python tool that will spin up and destroy the infrastructure on-demand.
Before I can start building this script, I will need to install two (2) Python modules to help with the logic. Those modules are pyyaml and python-terraform and can be installed with the following commands.
pip install pyyaml
pip install python-terraform
Once these two (2) module are installed, I am going add a file named network.yaml to the src/config/ directory, which will store the Linode API key and domain as seen below.
network.yaml
It is a very simple configuration at this point and lists the Linode values that were stored as a value in the variables.tf file, so next I will remove the value data from variables.tf since the values will be stored here from now on.
variables.tf
As you can see I removed the value directive that was there during the testing process. Now going back in the Python project root folder, I am going to create a file called c2_build.py with the following content.
c2_build.py
This is a simple PoC script written to show how you can move complex Terraform builds into Python for the next level of customization. The tool I am currently building will be using more Python to provide more features to the operator, but this build here is for demonstrating how to quickly you can build your own custom C2 infrastructure.
Here is the script when run.
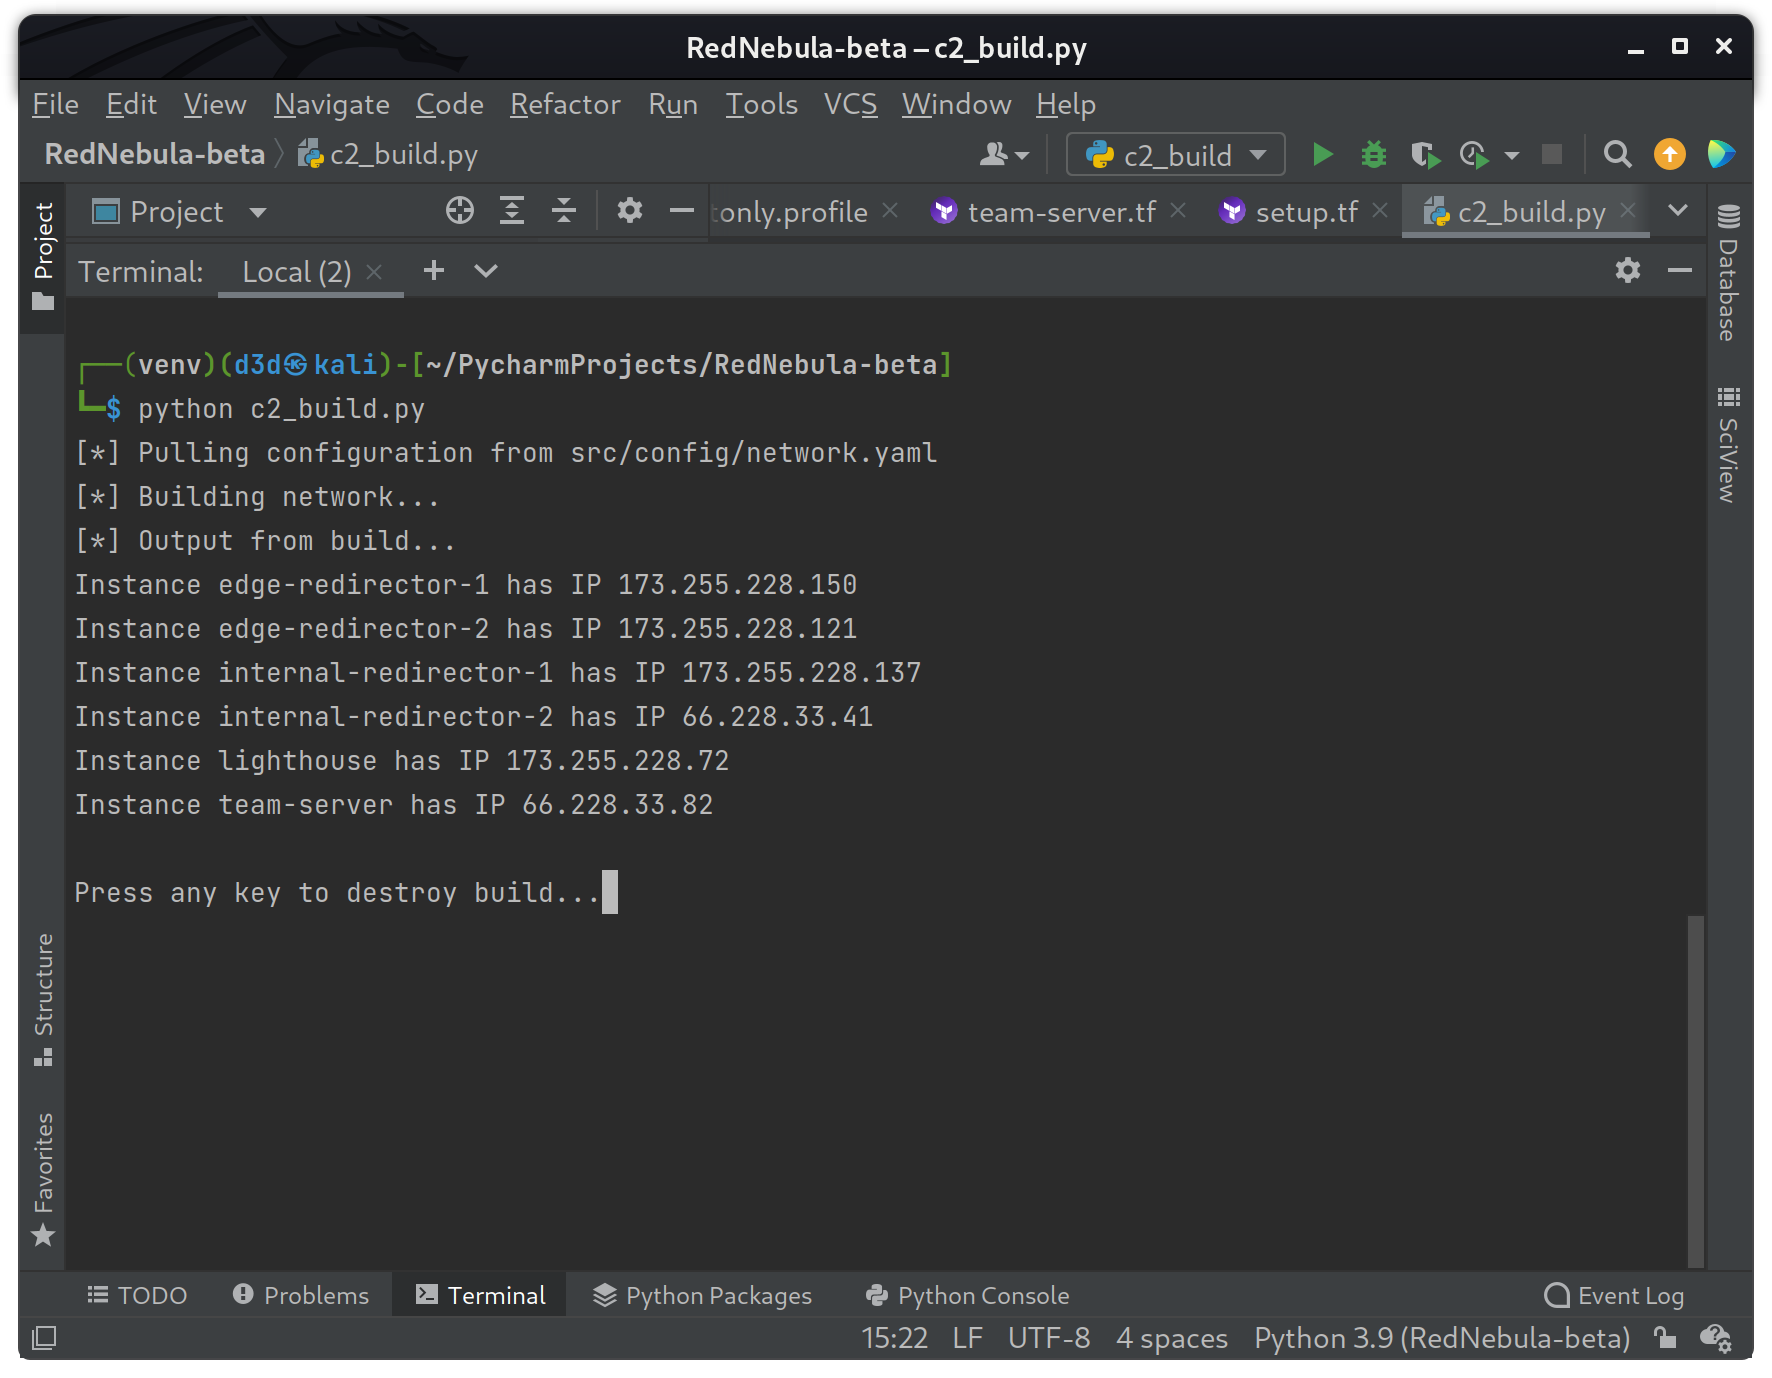
With a single command, the operator now has a fully functional C2 running their favorite framework without about five (5) minutes of total build time, and that includes DNS and HTTPS with SSL.
And with that, I am done. The official version of the 'Red Nebula' tool is currently under development, and should be ready in a month or so.
Comments ()